You can use this facility to reduce the number of steps required to measure the time from detection of a CAN frame on the bus to execution of the corresponding code in a program in the development of systems that use CAN communications.
This facility utilizes the following extended functions of the E2 emulator: CAN bus monitoring and time measurement.
Accordingly, to use this facility, be sure to select [Use the power supplied from the target] for the [Interface for supplying the power] property under the [E2 Expansion Interface] category [E2] on the [Connect Settings] tab in the Property panel before connecting the debug tool.
For details on the given extended functions of the E2 emulator, refer to the Application Note on the CAN Communication Time Measurement Solution (E2 Emulator, CS+). |
Open the Solution List panel and click on the [GO] button for measuring CAN bus reception processing times. The Measuring CAN Bus Reception Processing Times panel [E2] will open.
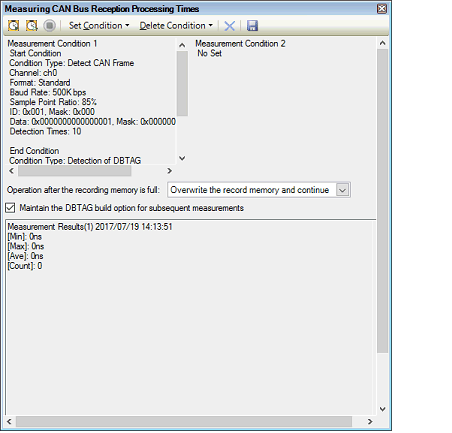
You can select up to two conditions (conditions 1 and 2) since two timer channels are available for use in measurement.
To set the conditions, use the Measurement Condition Setting dialog box [E2]. Open this by selecting [Set Condition] -> [Set Condition 1...] or [Set Condition 2...] from the toolbar of the Measuring CAN Bus Reception Processing Times panel [E2].
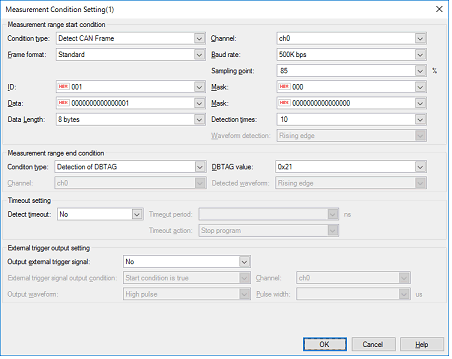
The [Measurement range start condition] area allows you to select a condition that defines the beginning of the range over which measurement will proceed. You can measure the time from the beginning to the end of the range, respectively defined by the start and end conditions.
Select "Detect CAN Frame" or "Detect External Trigger Input Signal" for [Condition type]. Other items for which you need to make settings depend on the selected condition type.
The beginning of the measurement range is a point where a specific CAN frame is detected by CAN bus monitoring, which is an extended function of the E2 emulator. You need to enter the following information regarding the CAN frame to be detected.
Select the channel for use in the detection of CAN frames by CAN bus monitoring through the E2 expansion interface.
Select "Standard" or "Extended" as the format of CAN frames to be detected.
Select one of the following values as the bit rate for use in the detection of CAN communications.
1M bps, 500K bps, 250K bps, 125K bps
Specify the relative position as a percentage (1 to 100%) within one bit period for the sampling of each bit of data in the CAN frame to be detected.
Specify ID in CAN frames to be detected and the mask value to be used as hexadecimal values.
When 0 is selected for a mask bit of the mask value, the bit is treated as being masked.
Specify data in CAN frames to be detected and the mask value to be used as hexadecimal values.
When 0 is selected for a mask bit of the mask value, the bit is treated as being masked.
Select the data size in bytes for CAN frames to be detected as a value from 0 to 8.
Time measurement starts when CAN frames have been detected the number of times specified in this field.
The beginning of the measurement range is a point where the input of an external trigger signal through the E2 expansion interface is detected. You need to enter the following information regarding the external trigger input signal to be detected.
Select the channel for use in detecting the input of external trigger signals through the E2 expansion interface.
Select the type of waveform to be detected as the external trigger input from among "Rising edge", "Falling edge", and "Both edges", which are in the drop-down list.
The [Measurement range end condition] area allows you to select conditions that define the end of the range over which measurement will proceed. You can measure the time from the beginning to the end of the range, respectively defined by the start and end conditions.
Select "Detection of DBTAG" or "Detection of external input trigger signal" for [Condition type]. Other items for which you need to make settings depend on the selected condition type.
The end of the measurement range is a point where the execution of a dbtag instruction (part of the instruction set of RH850 MCUs) is detected. You need to select the value of DBTAG to be detected from among the following values.
0x21, 0x29, 0x31, 0x39, 0x41, 0x49, 0x51, 0x59, 0x61, 0x69
Go to "(3) Insert dbtag instructions at desired positions", insert dbtag instructions at desired positions, to select the value of DBTAG to be detected.
The end of the measurement range is a point where the input of an external trigger signal through the E2 expansion interface is detected. You need to enter the following information regarding the external trigger input signal to be detected.
Select the channel for use in detecting the input of external trigger signals through the E2 expansion interface.
Select the type of waveform to be detected as the external trigger input from among "Rising edge", "Falling edge", and "Both edges", which are in the drop-down list.
The [Timeout setting] area allows you to make timeout settings. Use [Detect timeout] to select whether to enable timeout detection. With timeout detection enabled, CS+ will detect timeout in the form of the time entered in [Timeout period] having elapsed after time measurement was started but before the measurement-end conditions have been satisfied. Select one of the following actions in response to timeout detection.
CS+ only detects the timeout and will not take any other action.
Detection of timeout is only used as a condition for external trigger output in "(d) Make settings for the output of an external trigger signal".
Execution of the program stops.
"Stop internal tracing" is not selectable as the action on timeout detection when "Detection of DBTAG" is selected as the type of measurement-end condition. |
The [External trigger output setting] area allows you to make settings for the output of an external trigger signal. Use [Output external trigger signal] to select whether to enable the output of an external trigger signal. With the output of an external trigger signal enabled, CS+ will output an external trigger (high-level pulse) signal when the required condition is satisfied.
Enter the following information.
Select the condition for the output of an external trigger signal from among the following.
"Start condition is true" is not selectable when "Detect External Trigger Input Signal" is selected as the type of measurement-start condition. |
Select the channel for output of the external trigger through the E2 expansion interface.
Specify the width of the high-level pulse to be output as the external trigger.
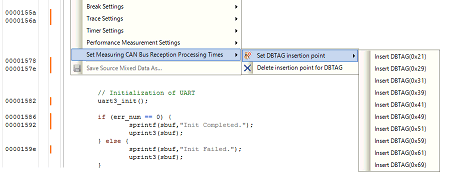
Insert dbtag instructions at positions where you wish to detect their execution.
You need to specify a DBTAG value for each dbtag instruction. Select one of the following ten values.
0x21, 0x29, 0x31, 0x39, 0x41, 0x49, 0x51, 0x59, 0x61, 0x69
See "RH850G3M/G3MH/G3K/G3KH User's Manual: Debug Instructions" for details on dbtag instructions. |
Prior to measurement, you can insert dbtag instructions at desired positions and proceed with automatic rebuilding and downloading when V1.06.00 or a later version of the CC-RH compiler is selected for the active project.
When you insert dbtag instructions prior to measurement and the [CPU Reset after download] property is set to [Yes] in the [Download] category on the [Download File Settings] tab in the Property panel, note that the CPU will be reset by rebuilding and downloading. |
You can use the context menu in the Editor panel to set DBTAG insertion points at desired positions in the source code registered in the active project.
Start measuring CAN bus reception processing times by using the facilities of the E2 emulator.
Click on  or
or  on the toolbar in the Measuring CAN Bus Reception Processing Times panel [E2].

CAN bus reception processing times are not measured by clicking on |
 in the
The project is rebuilt and downloaded before measurement starts. However, if the compiler used in the active project is a version of CC-RH earlier than V1.06.00, rebuilding and downloading do not proceed.
When [Maintain the DBTAG build option for subsequent measurements] in the Measuring CAN Bus Reception Processing Times panel [E2] is selected, the options which are specified for rebuilding and downloading before measurement are reflected in the [Parameters of software trace (DBTAG) for measuring CAN bus reception processing time] property of the build tool.

The project is not rebuilt and downloaded before measurement starts.
Select this button when you want to measure CAN bus reception processing times without resets due to rebuilding and downloading.
Note that this button is not displayed if the compiler used in the active project is a version of CC-RH earlier than V1.06.00.
Measurement ends at the same time as execution of the program is stopped.
Execution of the program can be stopped by setting a breakpoint or timeout, or by clicking on  .
.
Measurement ends at the same time as execution of the program is stopped.
At the same time as measurement ends, the minimum time, maximum time, average time, and number of rounds of measurement are displayed in the measurement results display area of the Measuring CAN Bus Reception Processing Times panel [E2].
Check that the values shown are as intended.
Click on  on the toolbar in the Measuring CAN Bus Reception Processing Times panel [E2] to save the latest results of measurement in a file.
Details of the CAN frames and dbtag instructions detected during measurement are also recorded with timestamps in the same file as the values displayed in the measurement results display area.