Introduction
This document outlines how to use the Renesas VS Code plugins within the Microsoft Visual Studio Code(*) environment. Renesas provides 2 extensions that help building and debugging Renesas C/C++ project in VS Code.
Note: This guide currently requires an e2 studio installation on the machine you are using to obtain all required dependent device files.
(*) Visual Studio Code (VS Code) is a lightweight but powerful source code editor which runs on your desktop and is available for Windows, macOS and Linux. It comes with built-in support for JavaScript, TypeScript and Node.js and has a rich ecosystem of extensions for other languages and runtimes (such as C, C#, Java, Python, PHP, Go, .NET). With C/C++ for Visual Studio Code extension, C/C++ language support, including editing intellisense and debugging futures, could be added for VS Code. Please visit User Guide for VS Code for more information.
1. Overview
1.1 Purpose
This document describes how to open, build and debug a Renesas C/C++ project in VS Code using Renesas’s VS Code extensions.
1.2 Operating Environment
| Operating System | Windows 10 |
|---|---|
e2 studio version |
2023-04 |
VS Code version |
1.79.1 |
2. Setup
2.1 Setup VS Code
VS Code can be downloaded and installed from this page https://code.visualstudio.com/.
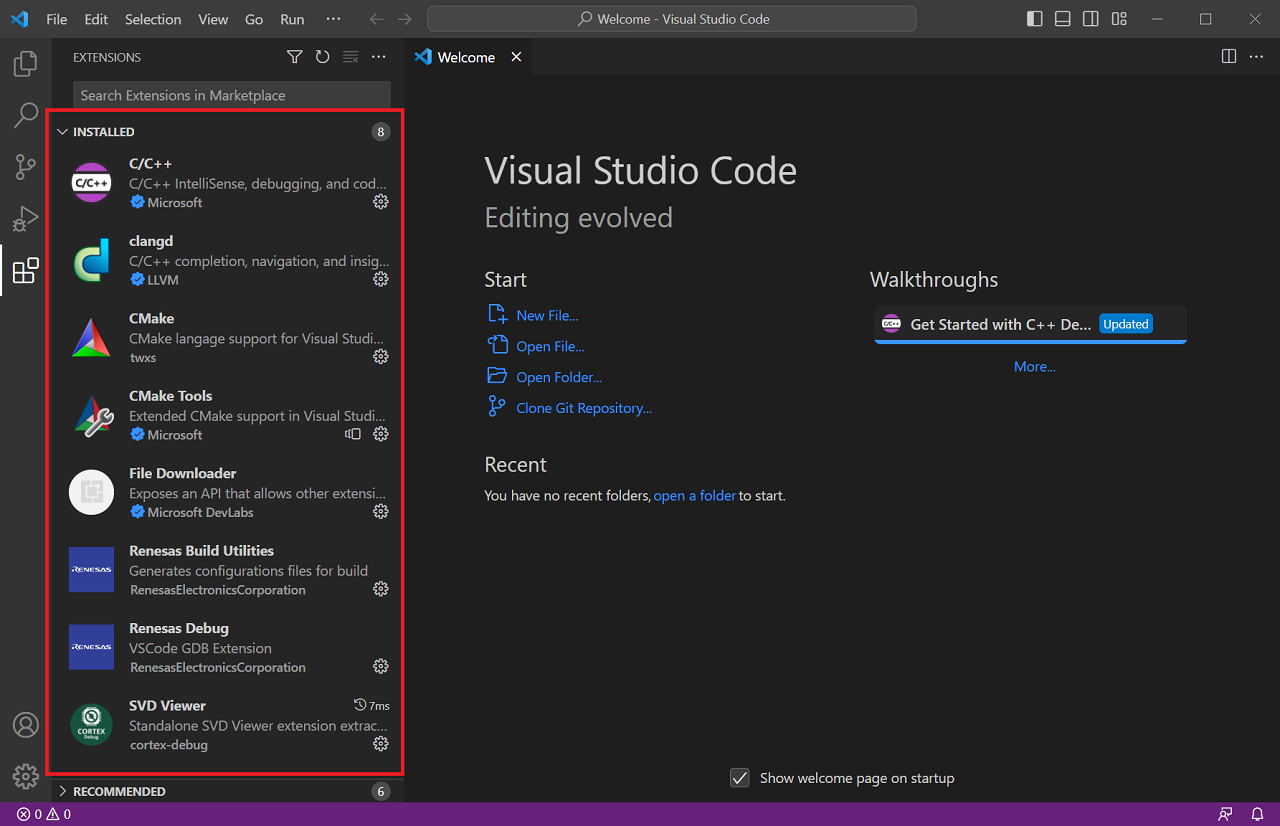
Renesas provides 2 extensions that help building and debugging Renesas C/C++ project in VS Code: Renesas Build Utilities (renesas-build-utilities) and Renesas Debug (renesas-debug) extensions. These 2 extensions can be installed from its .vsix file.
Note: These 2 extensions will be available on VS Code Marketplace in future.
There are three ways to install an extension from .vsix file:
-
Using the [Install from VSIX…] command in the [Extensions] view command dropdown.
-
Select [Extensions] view.
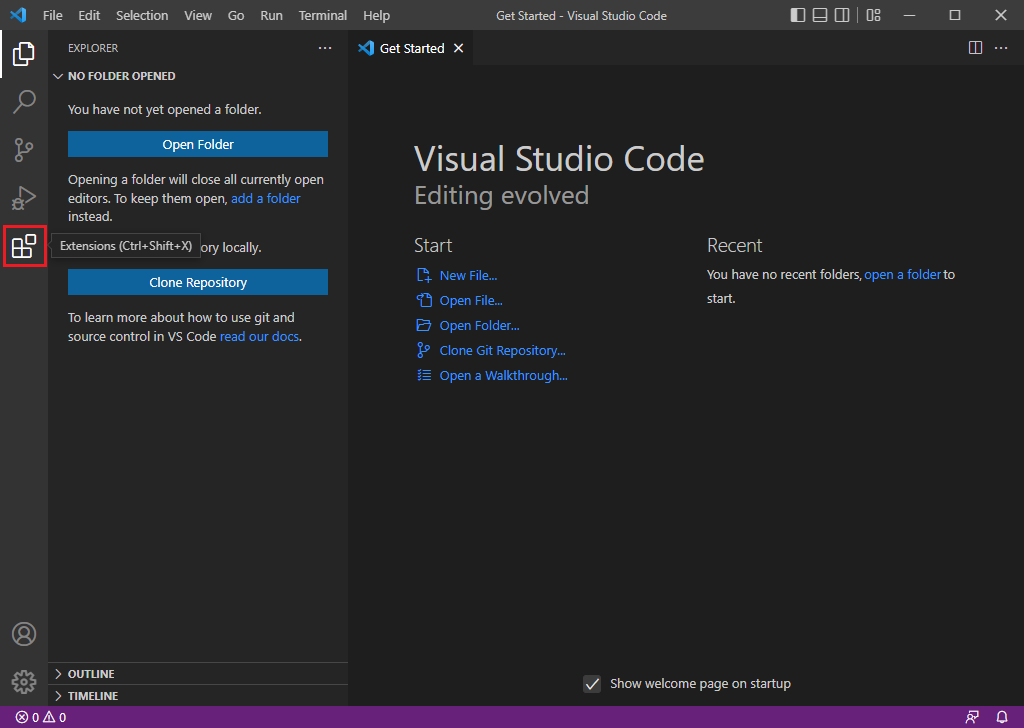
-
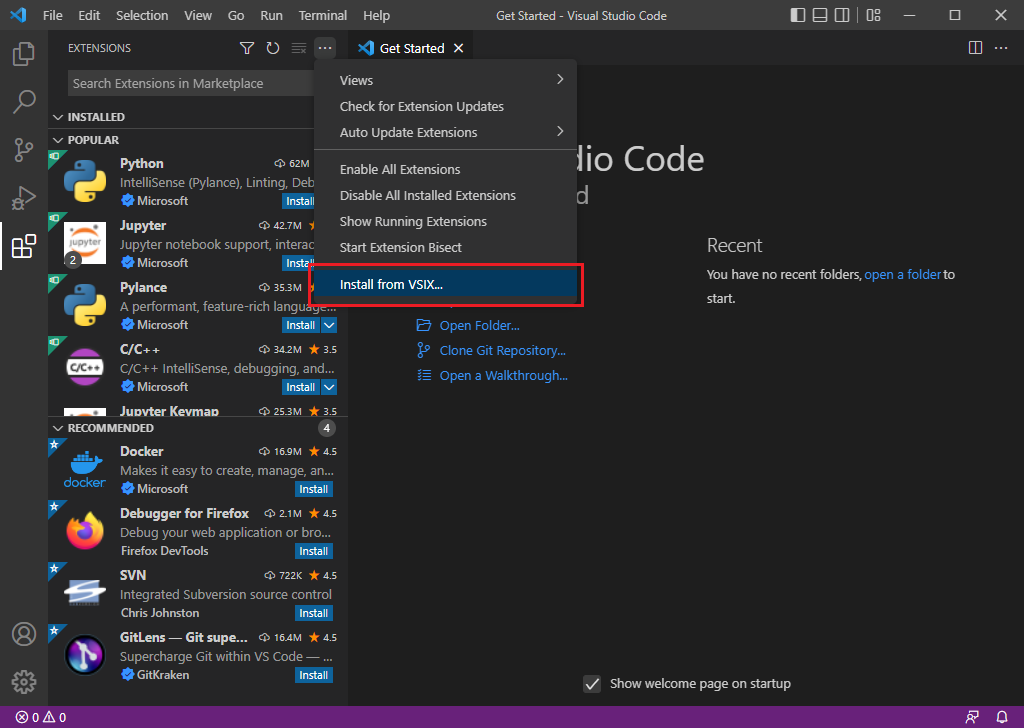
Select [Views and More Actions…] button.

-
Select [Install from VSIX…] command.
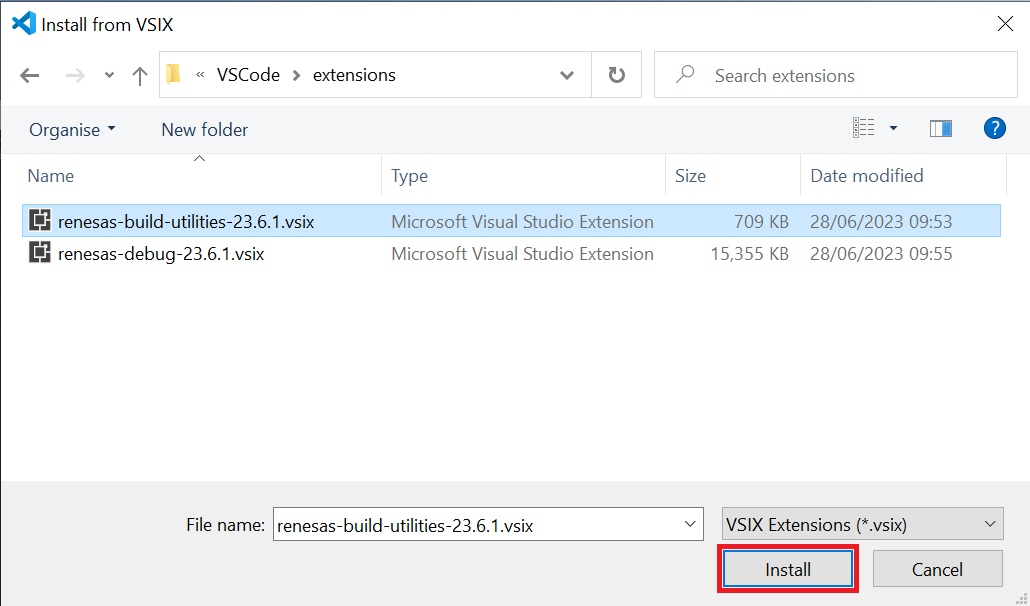
-
In the opened [Install from VSIX] dialog, browse to and select the .vsix file of the desired extension, then click [Install] button.
-
Refer to methods (2) and (3) in section 6.1.1 Install an extension from .vsix file
2.2 Setup for building
In order to be able to build a Renesas project in VS Code, the below setup steps need to be performed. If building Renesas projects in VS Code is not desired this setup can be skipped (the installation of Renesas Build Utilities (renesas-build-utilities) extension is not required in this case).
- Windows:
-
Step 1: Install cmake from cmake-3.25.2-windows-x86_64.
Step 2: The Windows installer has an option to modify the system PATH environment variable. If that is not selected during installation, one may manually add the install directory (e.g. C:\Program Files\CMake\bin) to the PATH in a command prompt. Example add the path of CMake’s bin folder to PATH environment variable.
-
Use Window search to find and open "Edit the system environment variables"

-
In "Advanced" tab, click on "Environment Variables…" button to open "Environment Variables" dialog
-
Select to edit "Path"
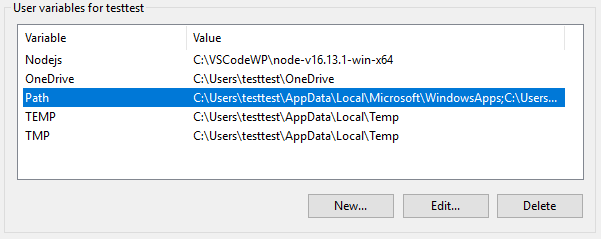
-
Add the path of CMake’s bin folder
-
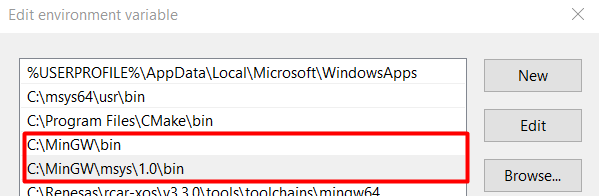
Install MinGW and msys package from mingw-get-setup.exe.
-
Add the path of mingw’s bin folder to PATH environment variable.
-
-
Open this path in the file browser and copy the address (C:\MinGW\bin, C:\MinGW\msys\1.0\bin)
-
Use Window search to find and open "Edit the system environment variables"
-
In "Adcanced" tab, click on "Environment Variables…" button to open "Environment Variables" dialog
-
Select to edit "Path"
-
Add the path of mingw’s bin folder
-
Click OK to close the dialog
-
Add the path of desired toolchain’s bin folder to PATH environment variable.
-
-
For building CC-RX project, add "BIN_RX" variable which value is the path of toolchain’s bin folder to environment variables.
For building CC-RL project, install e2 studio to have access to device file (see 6.2 How to locate e2 studio resources for building/debugging).
- Ubuntu:
-
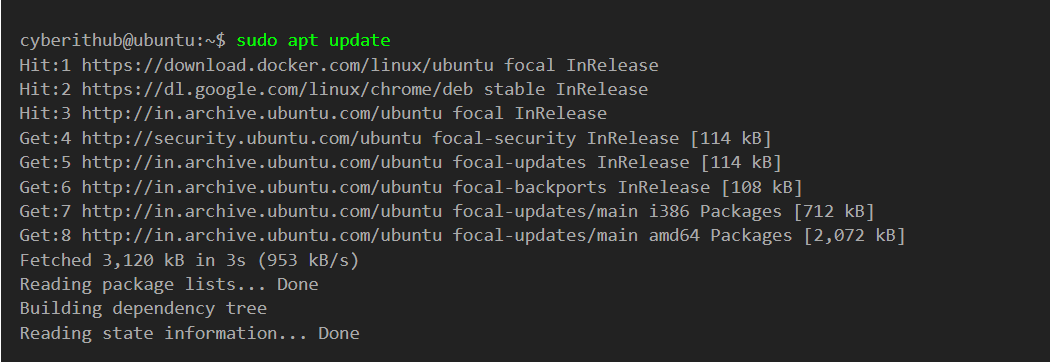
Step 1: Install cmake
First run "sudo apt update" to refresh tha package lists
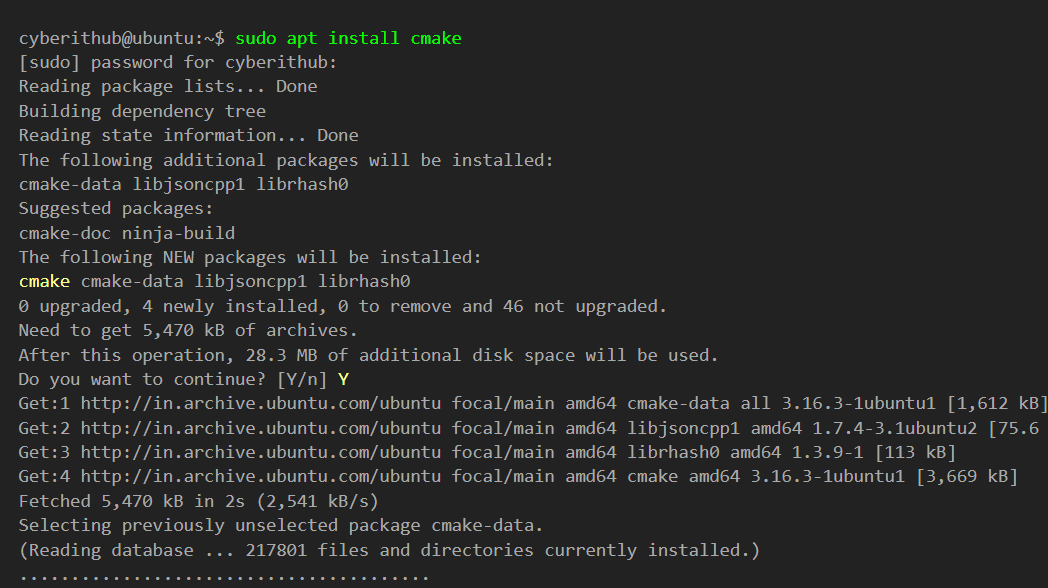
Next install cmake using "sudo apt install cmake"
Step 2: Check cmake version
You can also verify the current installed version by running cmake --version command as shown below.

2.3 Setup for debugging
In order to be able to debug a Renesas project in VS Code, the below setup steps need to be performed. If debugging Renesas projects in VS Code is not desired this setup can be skipped (the installation of the Renesas Debug extension is not required in this case).
-
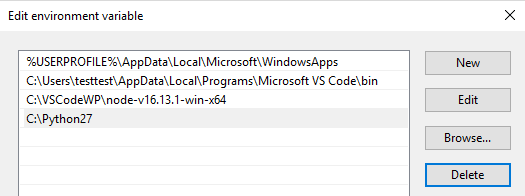
Install Python 2.7.16 (32-bit Python is needed even in 64-bit OS environment).
-
Add the path of the folder containing the installed python27.dll file to PATH environment variable.
-
Use Window search to find and open "Edit the system environment variables"
-
In "Adcanced" tab, click on "Environment Variables…" button to open "Environment Variables" dialog
-
Select to edit "Path"
-
Add the path of Python folder
-
Click OK to close the dialog
-
-
Add "PYTHONPATH" variable which value is the path of the installed python’s Lib folder to environment variables.
-
Install e2 studio to have access to GDB and GDB server (see 6.2 How to locate e2 studio resources for building/debugging).
3. Open a project
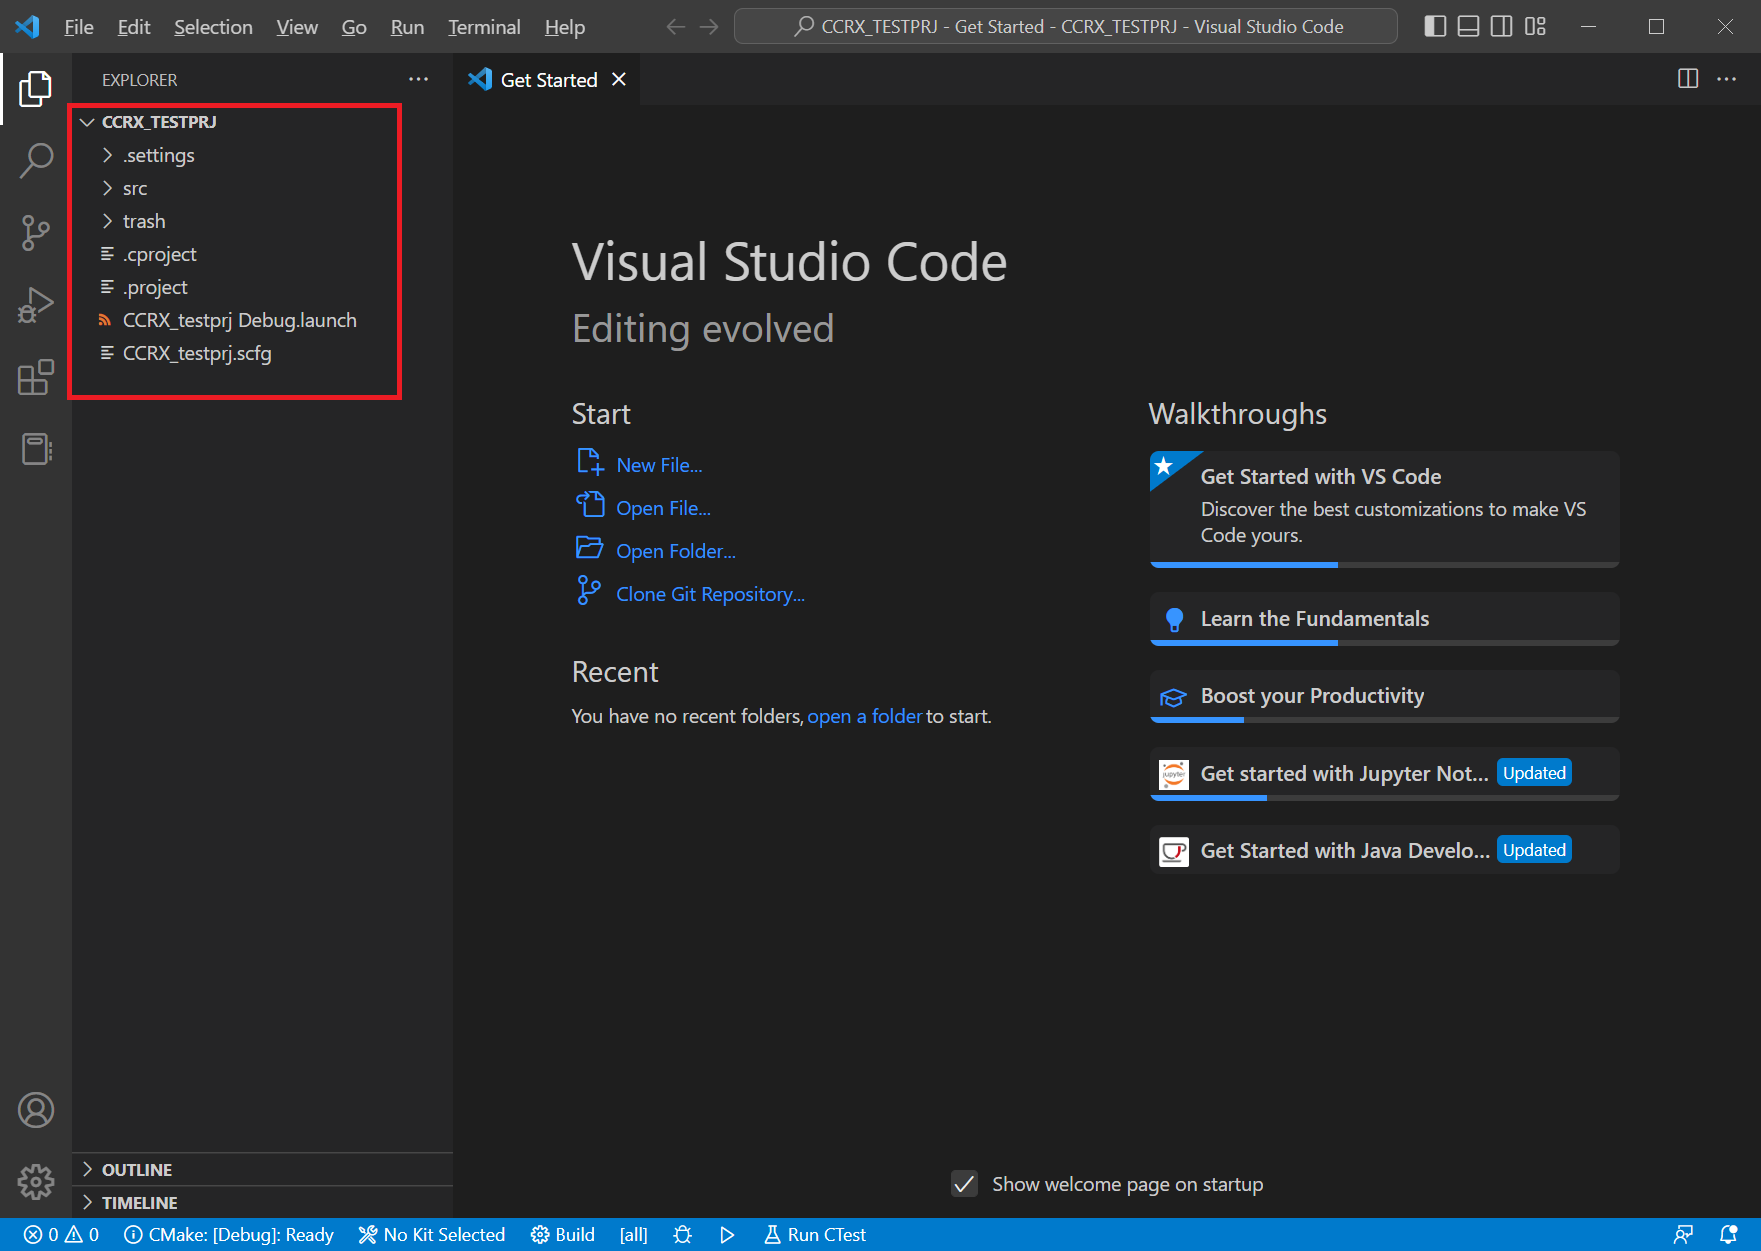
For RE, RL78, RX, RZ, R-Car (Ax Core) projects created in e2 studio, projects can be opened in VS Code by simply opening the project folder and then following the instructions below.
For Renesas RA device family projects, please refer to section 6.3 How to use RA Smart Configurator (RA SC) to generate project for VS Code for creating RA project from scratch using Smart Configurator.
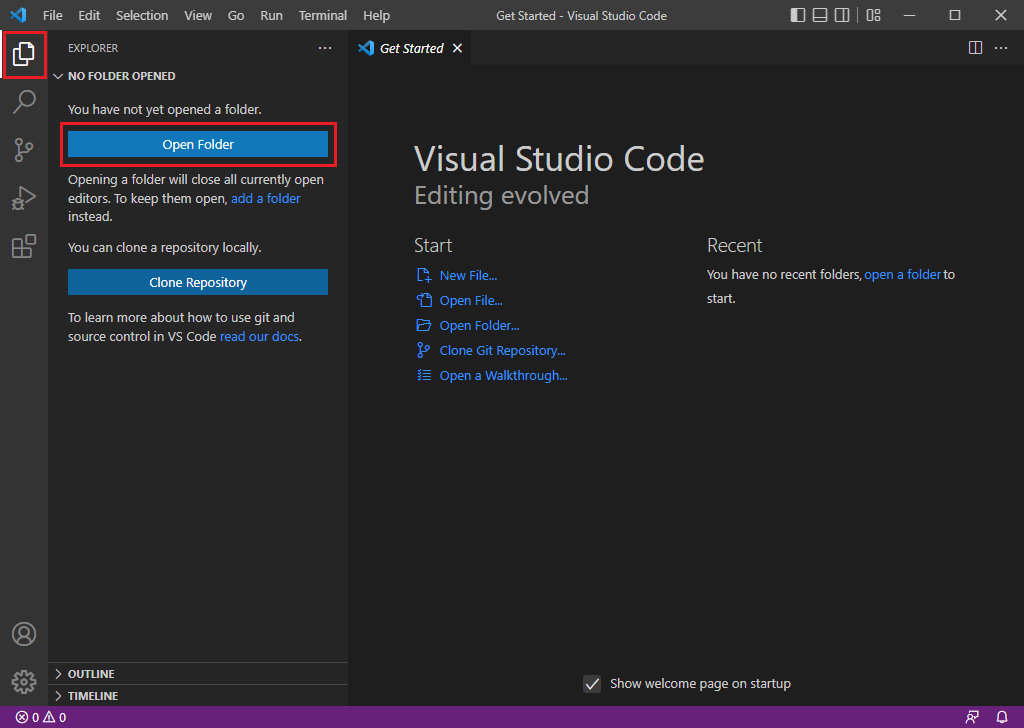
Like installing extension, there are 3 standard ways to open a folder:
-
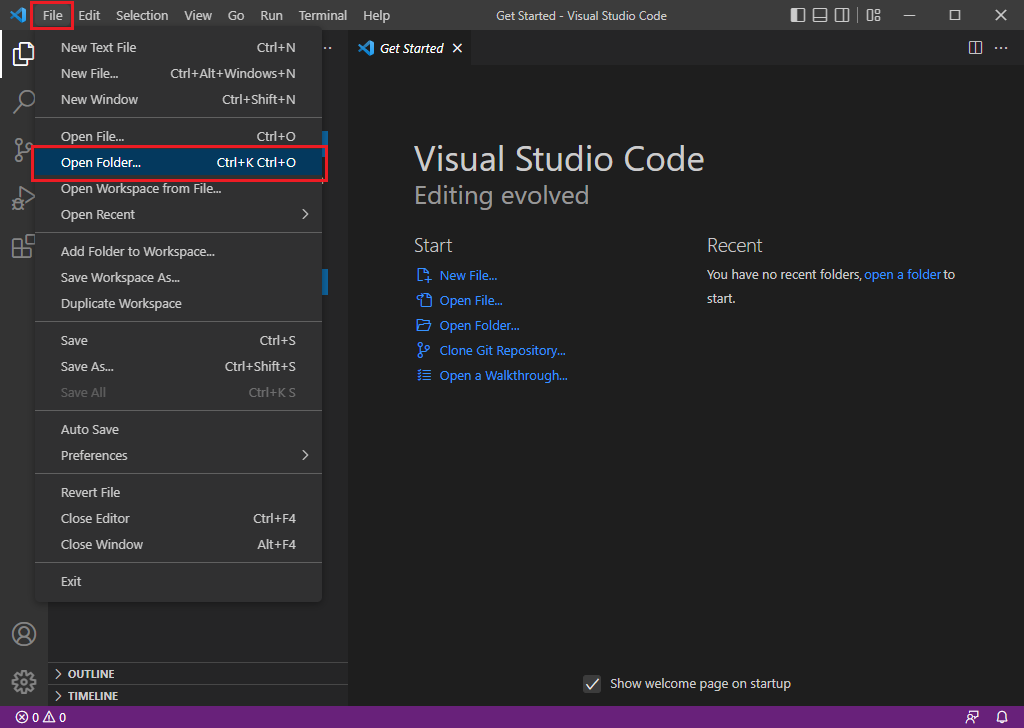
Using [Explorer] view [File] menu
-
In [Explorer] view, select [Open Folder] button if available. If not, select [File] → [Open Folder…] menu item.
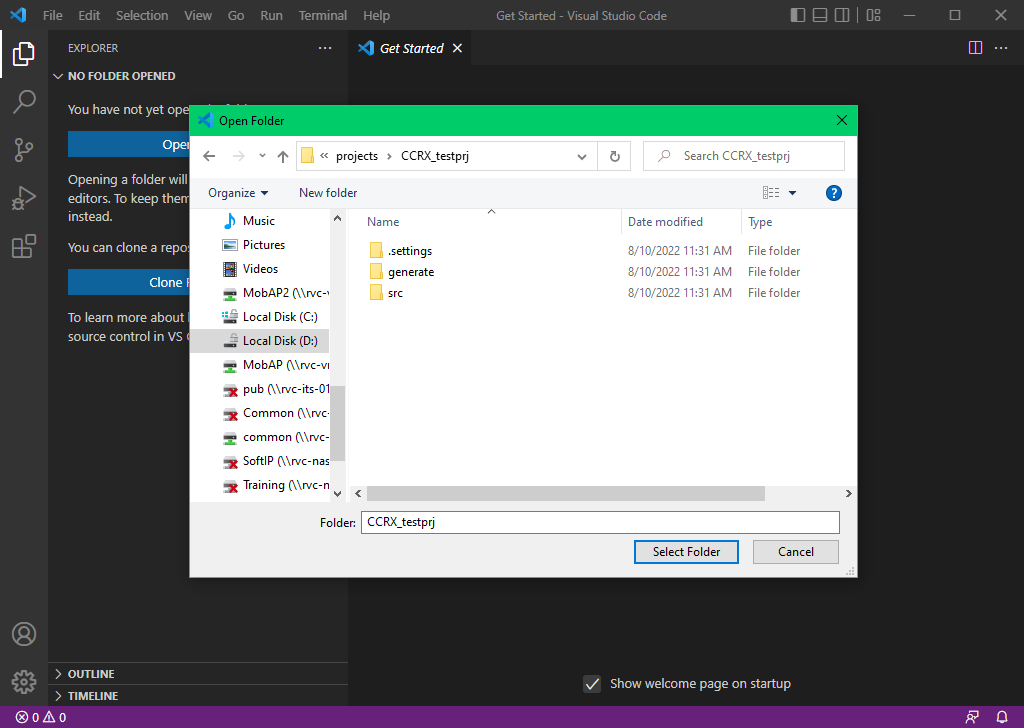
-
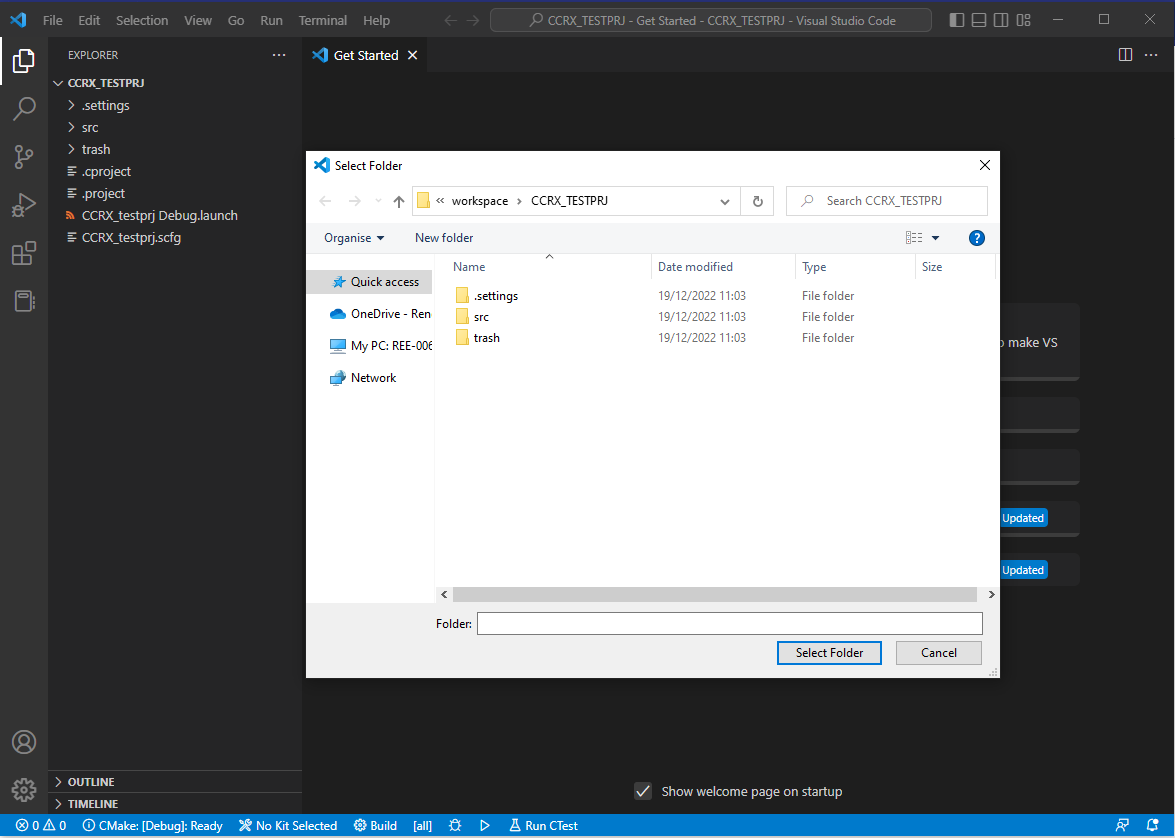
In [Open Folder] dialog, browse to project folder and click [Select Folder] button.
-
Refer to methods (2) and (3) in section 6.1.2 Open a project
Beside the above standard methods, the Renesas Build Utilities extension provides commands to open a project and automatically add some setup to build the project with CMake.
-
Install an extension the Renesas Build Utilities (renesas-build-utilities) from .vsix file.
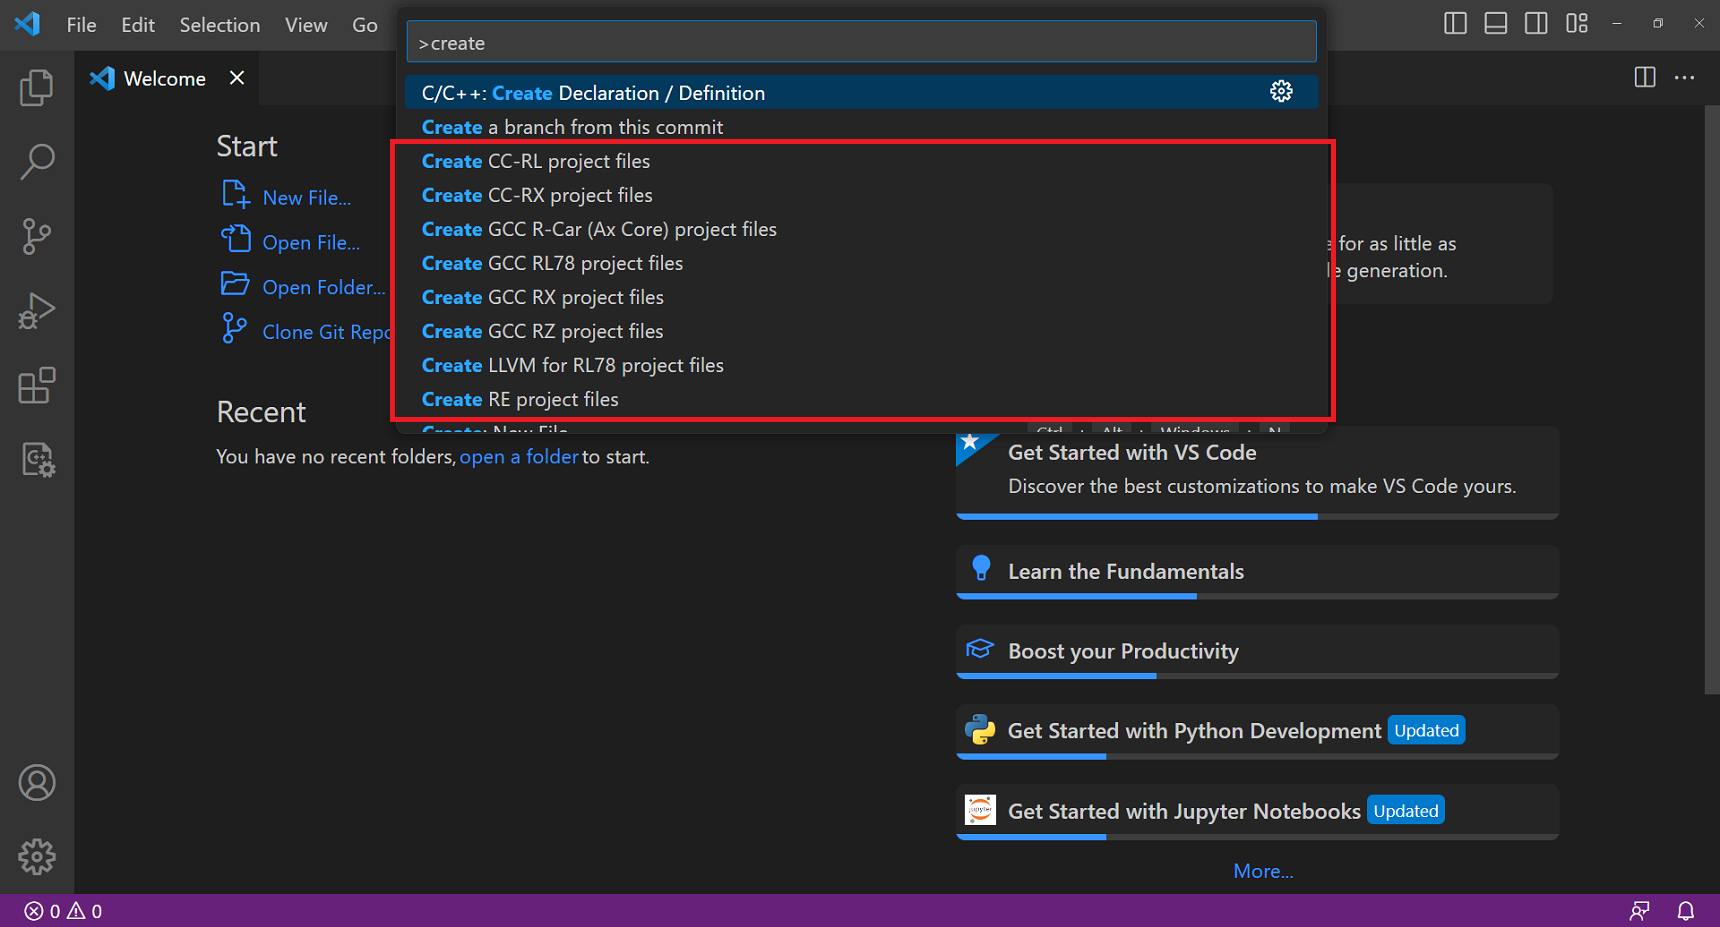
-
Open [Command Palette] and type "Create" to filter the commands. Currently, the Renesas Build Utilities extension provide the following commands:
-
Create CC-RL project files
-
Create CC-RX project files
-
Create GCC R-Car (Ax Core) project files
-
Create GCC RL78 project files
-
Create GCC RX project files
-
Create GCC RZ project files
-
Create LLVM for RL78 project files
-
Create RE project files
-
-
Select the desired command, [Select Folder] dialog will appear. Browser to project folder and click [Select Folder] button to open the project.
-
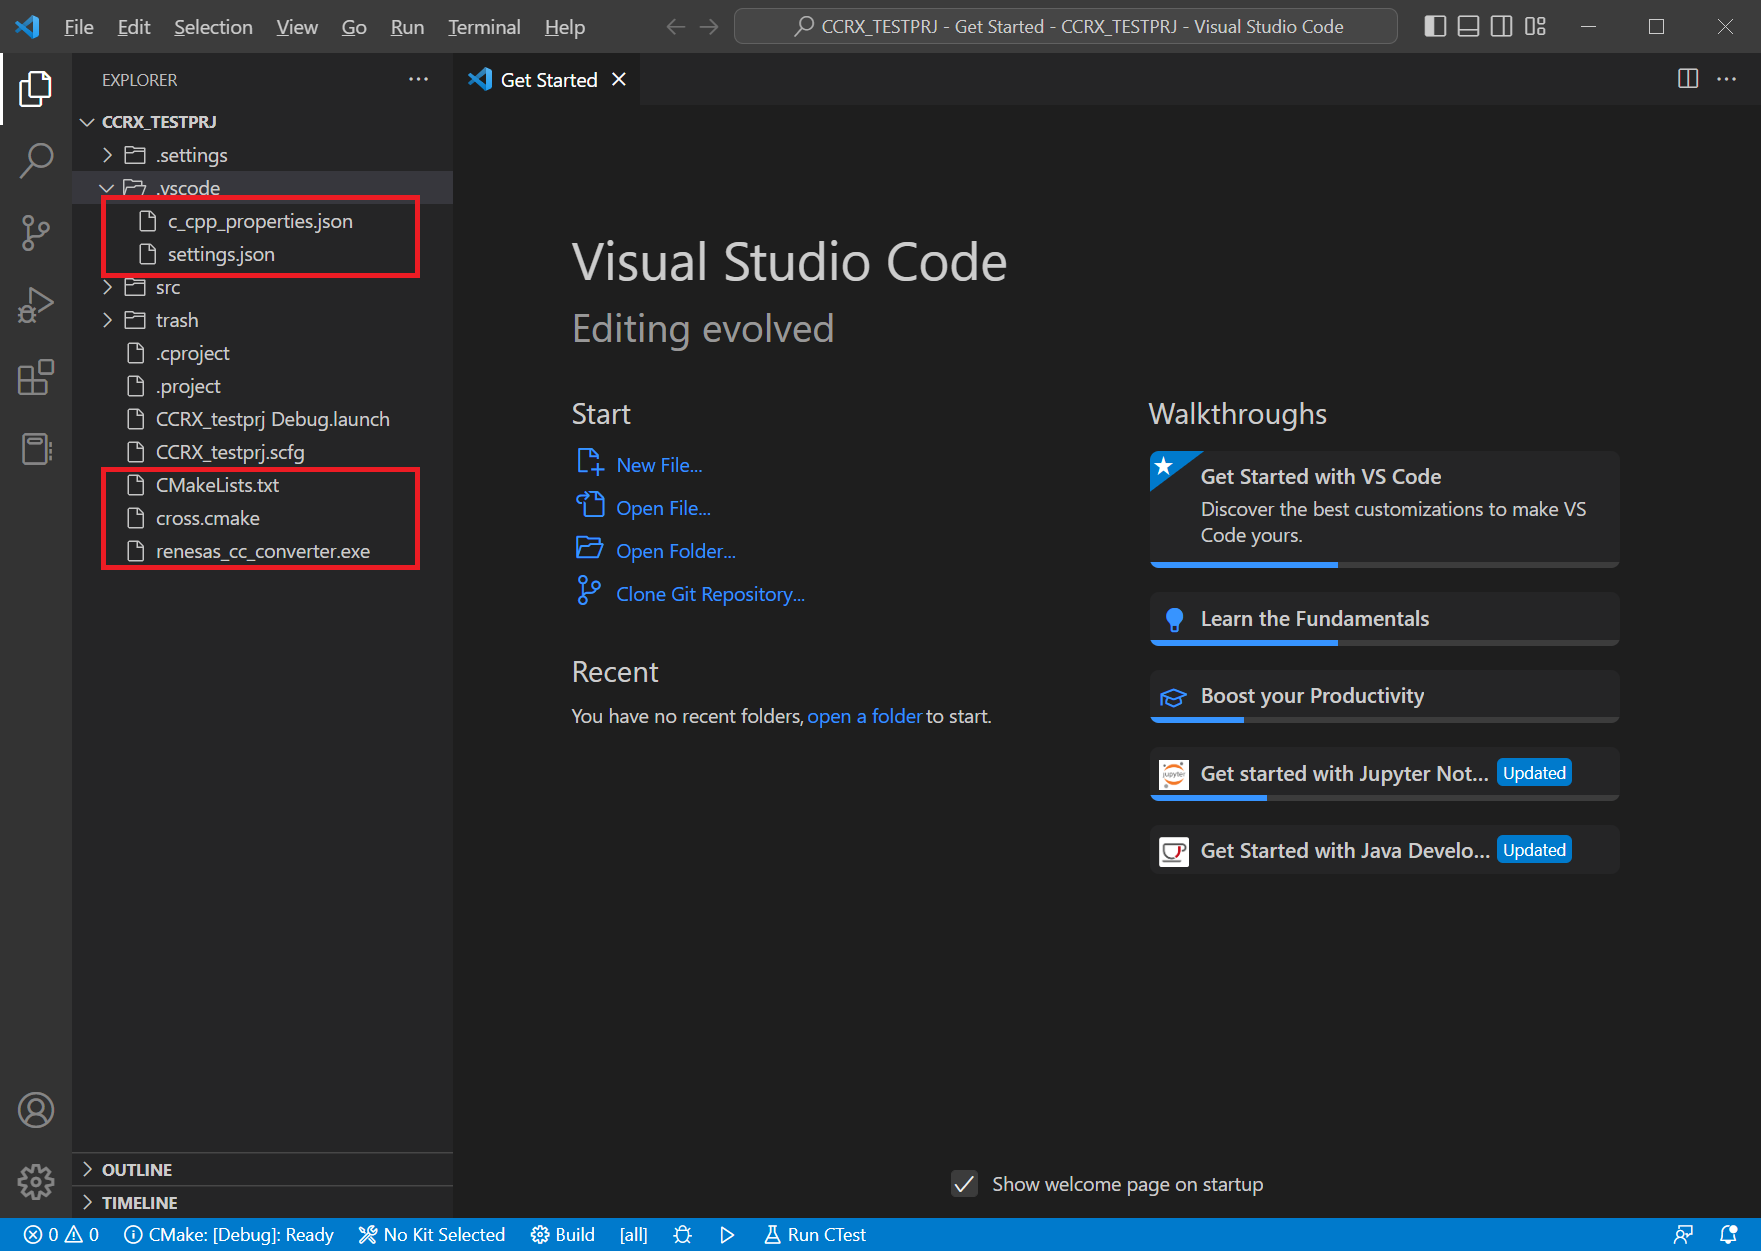
After opened, notice that some additional files are added. These files are used to build the project with CMake.
Note: How to handle notifications after installing Renesas Build Utilities extension
When installing the Renesas Build Utilities extension for the first time, a notification may appear as shown below:
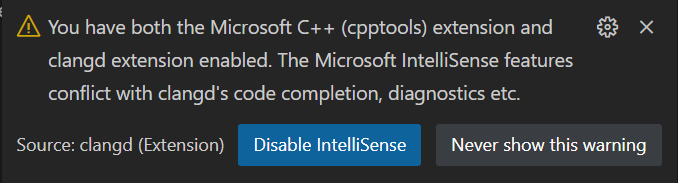
Please select [Disable IntelliSense]
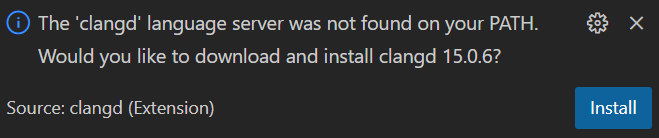
Please select [Install]
Then select [Reload window]

4. Build a project
4.1 Setup build options
If the project was opened using [Create xxx project files] command of the Renesas Build Utilities extension, some necessary files have already been created. Otherwise, create the below files if not yet created.
-
.vscode/settings.json - this file contains the settings for CMake.
-
.vscode/tasks.json - this file contains the build definitions for VSCode.
-
<file name>.cmake - this file contains the information about the toolchain to use.
-
CMakeLists.txt - this file contains the information about the building project (which files to build, which options to set etc.).
4.1.1 settings.json file’s general content
File .vscode/settings.json - this file contains the settings for CMake.
{
    "cmake.configureArgs": [
        "-DCMAKE_TOOLCHAIN_FILE=<absolute/relative path of toolchain information file (<file name>.cmake file)"
    ],
    "cmake.sourceDirectory": "<absolute/relative path of the folder containing the root CMakeLists.txt file>"
}
4.1.2 tasks.json file’s general content
File .vscode/tasks.json - this file contains the build definitions for VSCode.
{
  "version": "2.0.0",
  "tasks": [
    {
      "label": "Build Project",
      "group": "build",
      "type": "renesas-build",
      "command": "build",
      "deviceFamily": "<Device family (e.g. RA, RCAR, RE, RL78, RX or RZ)>",
      "toolchain": "<Toolchain (e.g. gcc, cc-rl, cc-rx, llvm)>"
    }
  ]
}
4.1.3 <file name>.cmake file’s general content
<file name>.cmake - this file contains the information about the toolchain to use.
# Specify toolchain path
SET(CMAKE_FIND_ROOT_PATH "<absolute path of toolchain's bin folder>")

# Specify the C compiler and necessary options
SET(CMAKE_C_COMPILER ${CMAKE_FIND_ROOT_PATH}/<C compiler executable file>)

# Specify the CPP compiler and necessary options
SET(CMAKE_CXX_COMPILER ${CMAKE_FIND_ROOT_PATH}/<CPP compiler executable file>)

# Specify the assembler and necessary options
SET(CMAKE_ASM_COMPILER ${CMAKE_FIND_ROOT_PATH}/<assembler executable file>)

# Specify the linker and necessary options
SET(CMAKE_LINKER ${CMAKE_FIND_ROOT_PATH}/<linker executable file>)

# Specify the library generator and necessary options
SET(CMAKE_LIBRARY ${CMAKE_FIND_ROOT_PATH}/<library generator executable file>)

# Specify the converter and necessary options
SET(CMAKE_CONVERTER_EXECUTABLE ${CMAKE_FIND_ROOT_PATH}/<converter executable file>)
4.1.4 CMakeLists.txt file’s general content
CMakeLists.txt - this file contains the information about the building project (which files to build, which options to set etc.).
cmake_minimum_required(VERSION 3.16)

# Set project name
project("<project name>")

enable_language(C ASM)

# Collect source files
FILE (GLOB_RECURSE SOURCE ${CMAKE_CURRENT_SOURCE_DIR}
"*.c" "*.cpp" "*.asm"
)
add_executable(${PROJECT_NAME} ${SOURCE})

# Set C compiler command
SET(CMAKE_C_COMPILE_OBJECT "${CMAKE_C_COMPILER} <specify C compiler options here>")

# Set C++ compiler command
SET(CMAKE_CXX_COMPILE_OBJECT "${CMAKE_CXX_COMPILER} <specify C++ compiler options here>")

# Set Assembler command
SET(CMAKE_ASM_COMPILE_OBJECT "${CMAKE_ASM_COMPILER} <specify assembler options here>")

# Set Linker command
SET(CMAKE_C_LINK_EXECUTABLE "${CMAKE_LINKER} <specify linker options here>")

# Set Library generator command
add_custom_COMMAND(
 TARGET ${CMAKE_PROJECT_NAME}
 PRE_LINK
 COMMAND ${CMAKE_LIBRARY} <specify library generator options here>
 COMMENT "Libgen:"
 VERBATIM
 )

# Set Converter Command
add_custom_command (
 TARGET ${CMAKE_PROJECT_NAME}
 COMMAND ${CMAKE_CONVERTER_EXECUTABLE} <specify converter options here>
 COMMENT "Converter:"
 VERBATIM
)
Note: <File name>.cmake requires the project name to configure and build. Please make sure to modify the project name to be built.
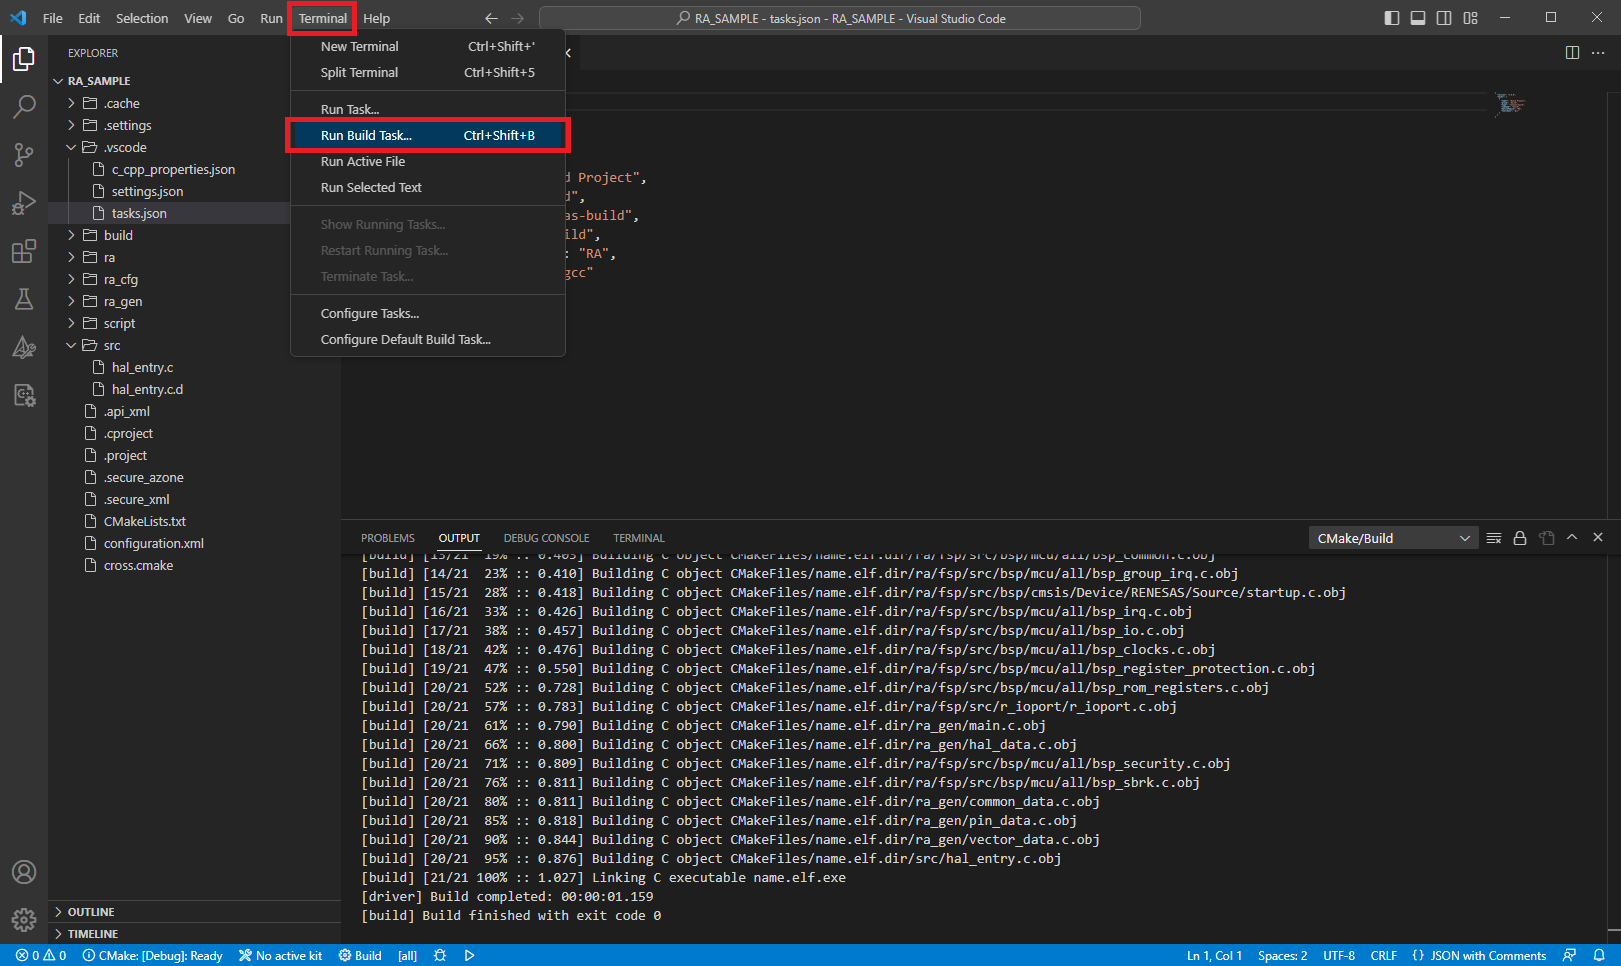
4.2 Start building
Once all necessary files are in place perform the below steps to build the project.
-
Press Ctrl+Shift+B or select [Terminal] → [Run Build Task…] from the menu.
5. Debug a project
5.1 Setup debugger options
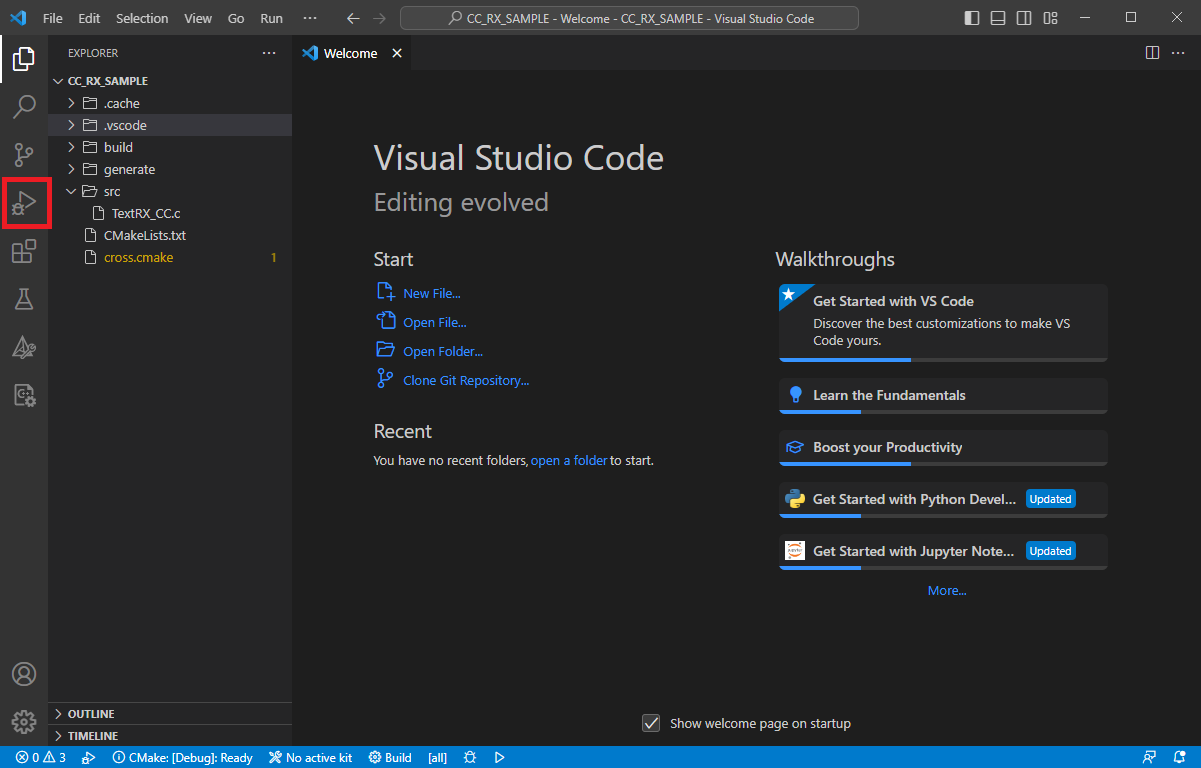
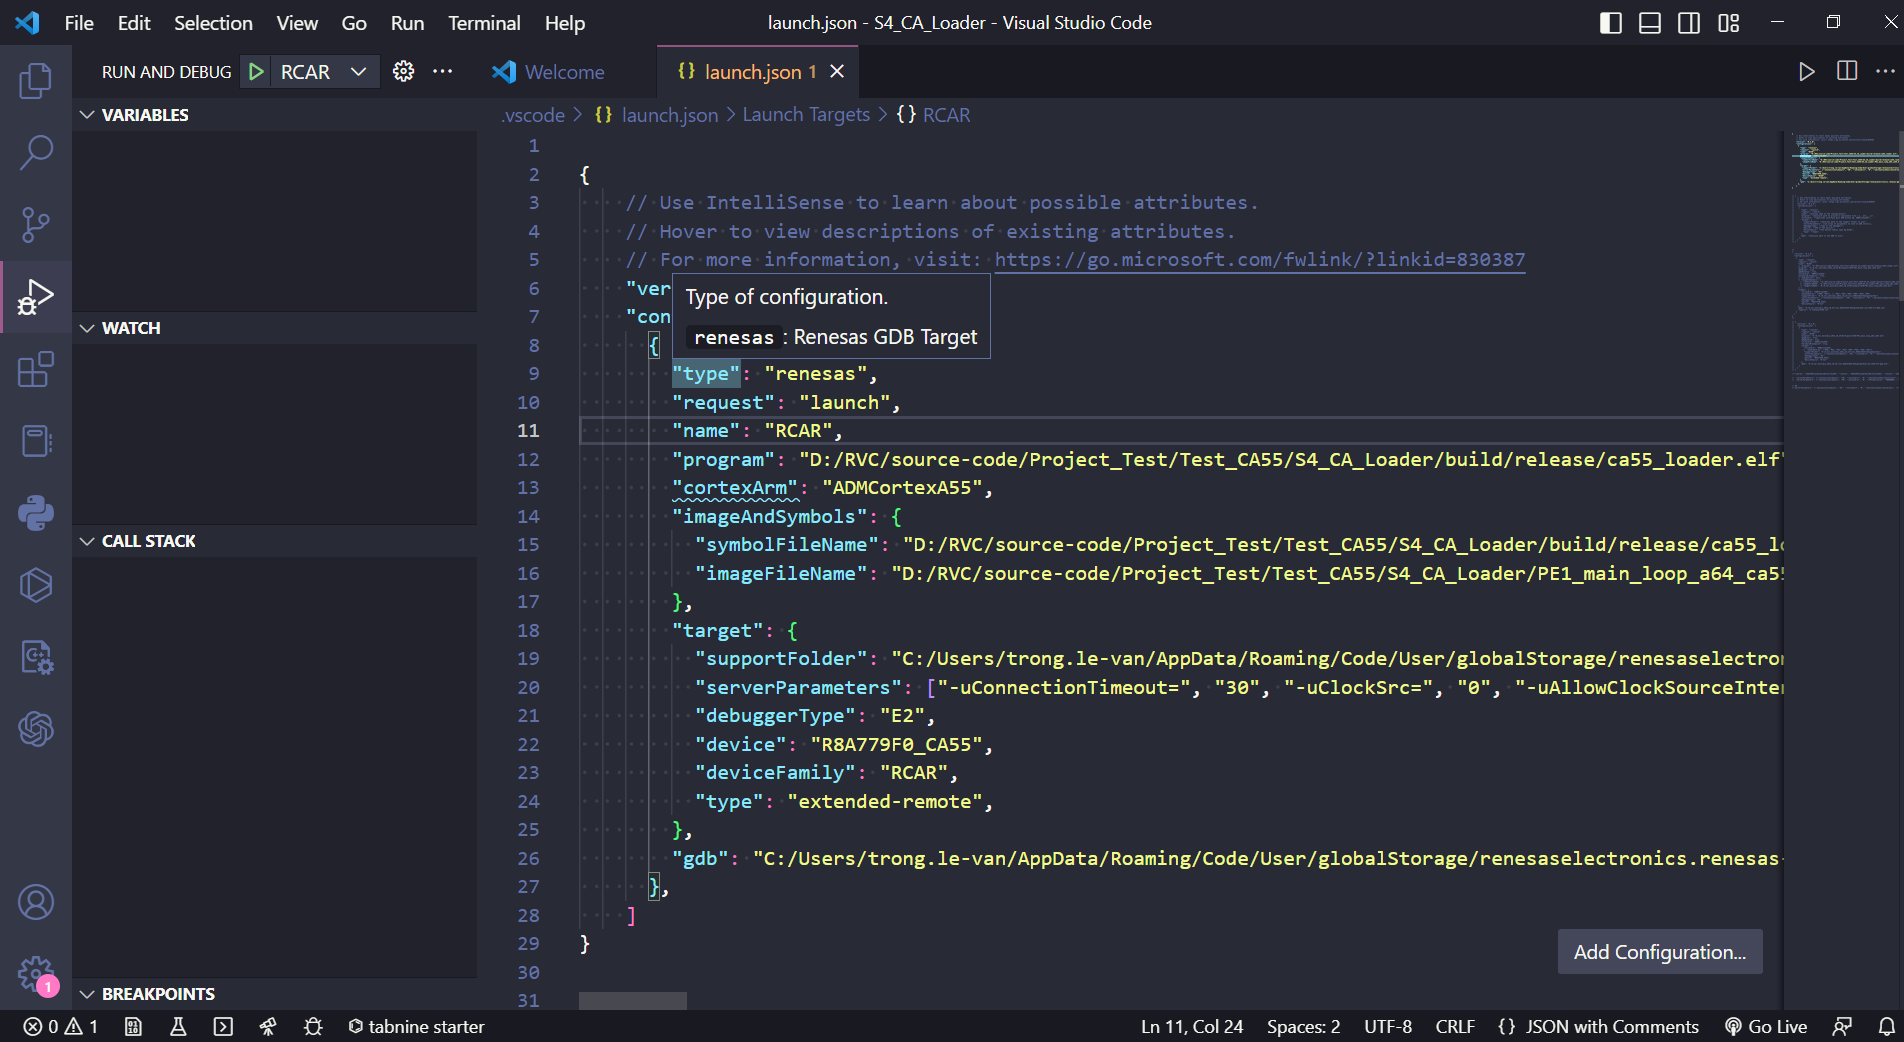
In order to debug a project using VS Code and the Renesas Debug extension, a configuration file called launch.json needs to be created.
-
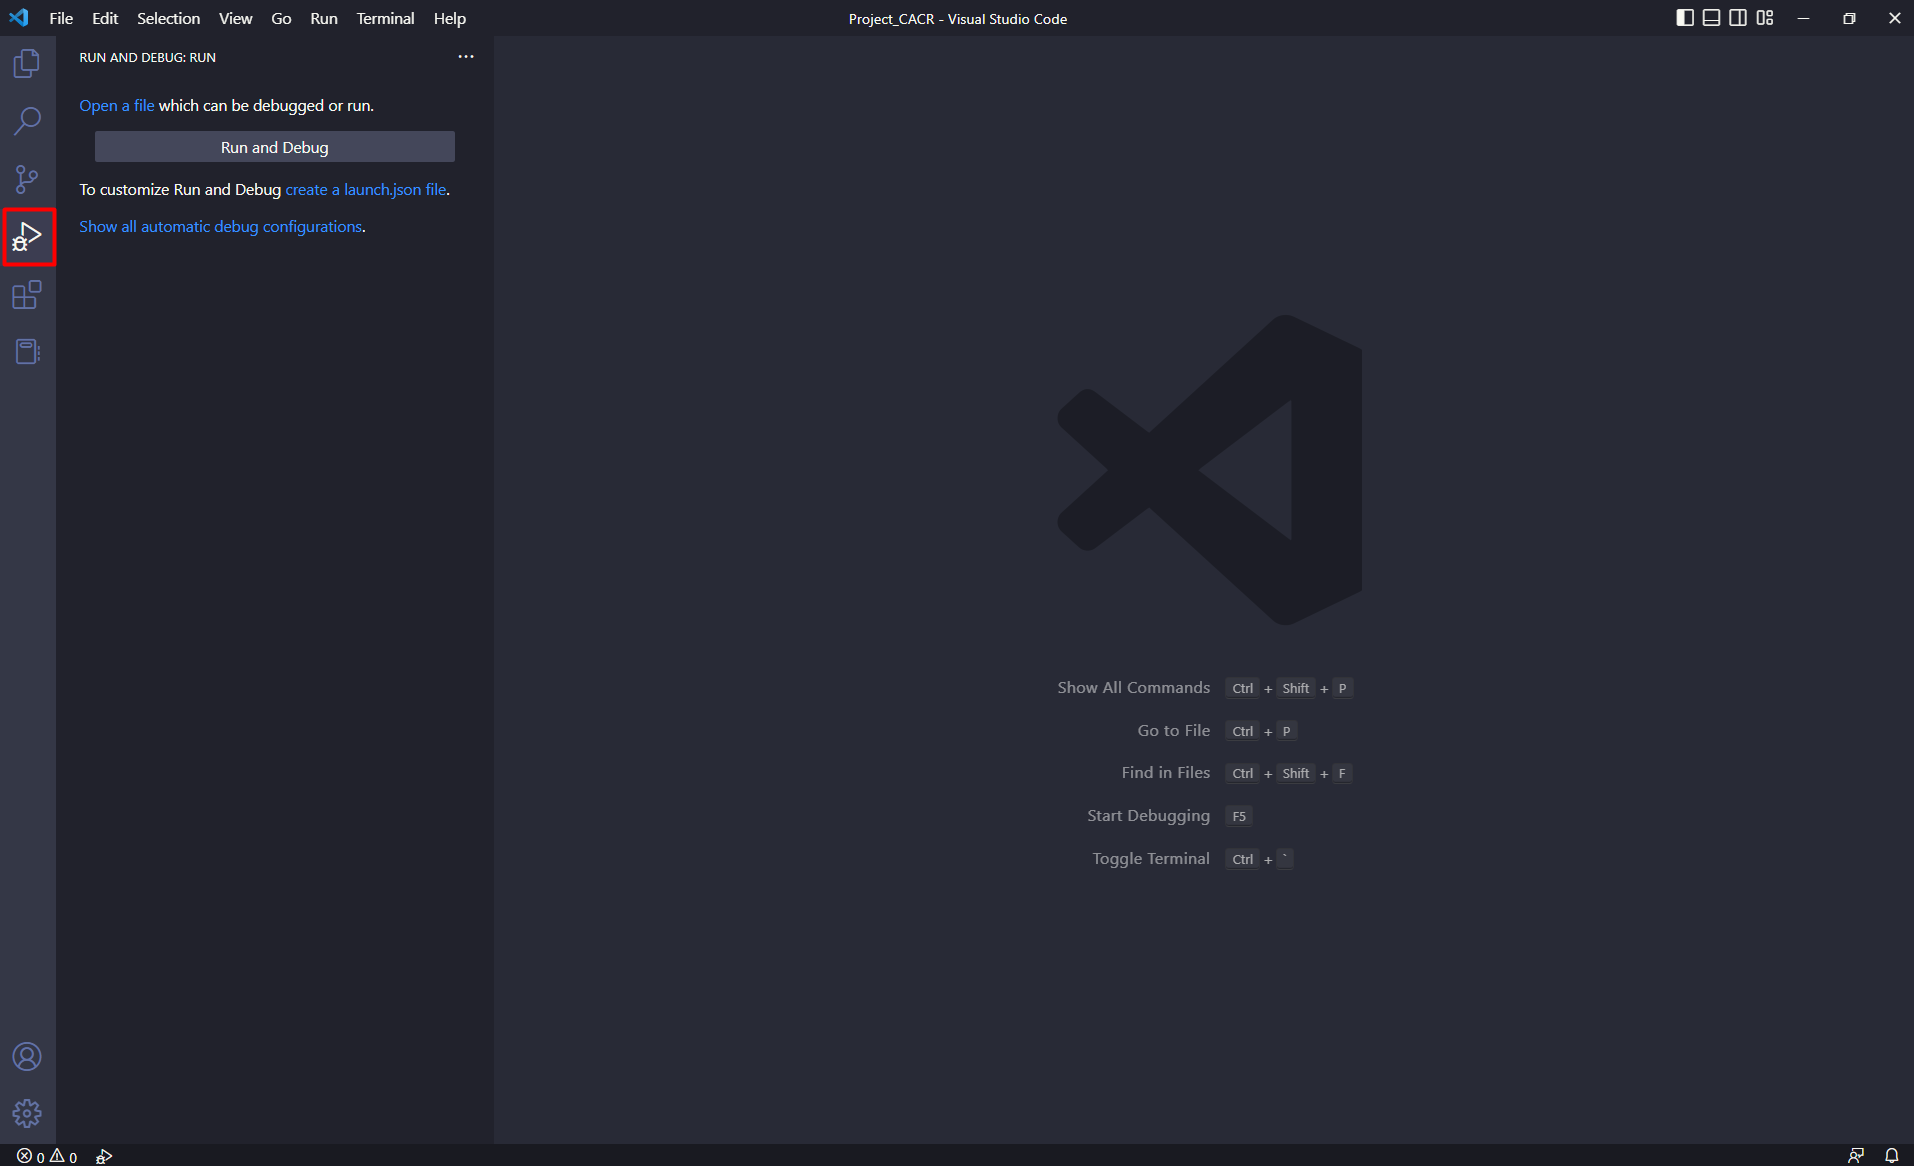
Select [Run and Debug] view.
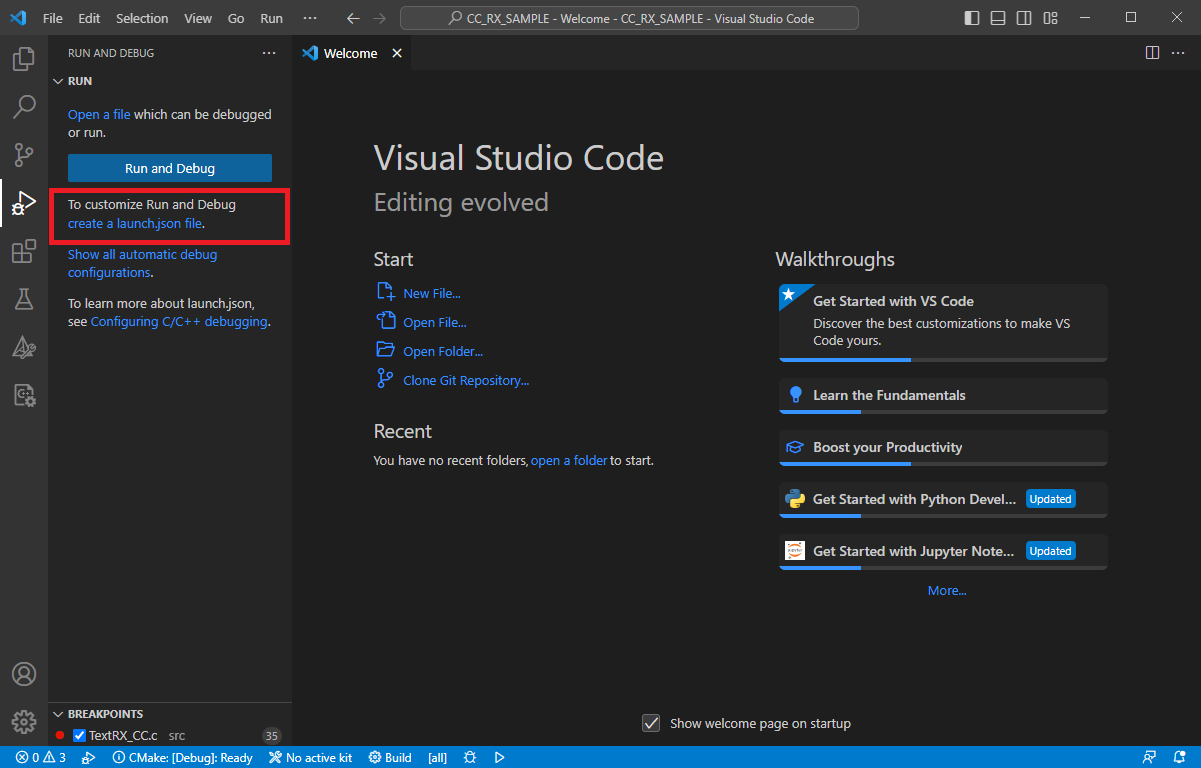
-
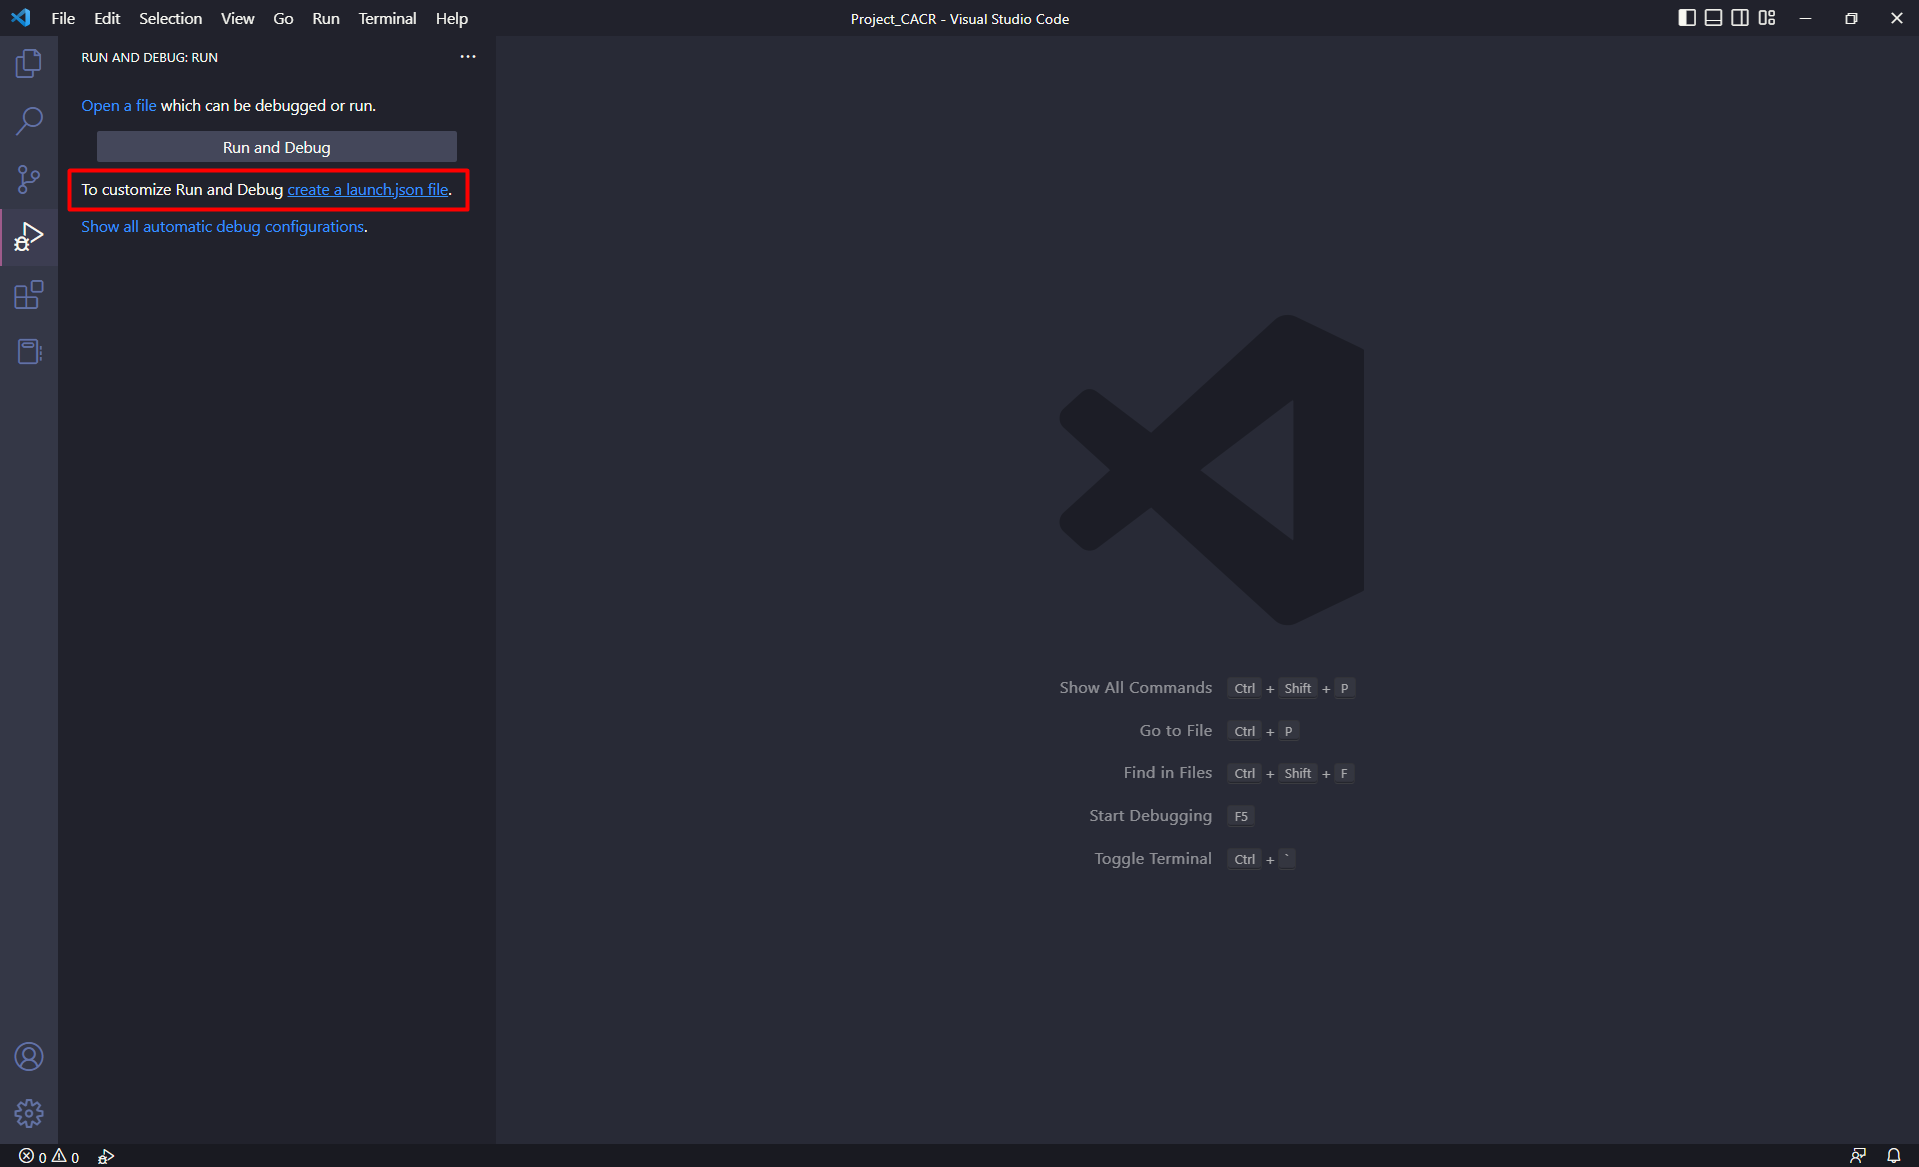
Select [create a launch.json file] link.
-
Select [Renesas GDB Target].
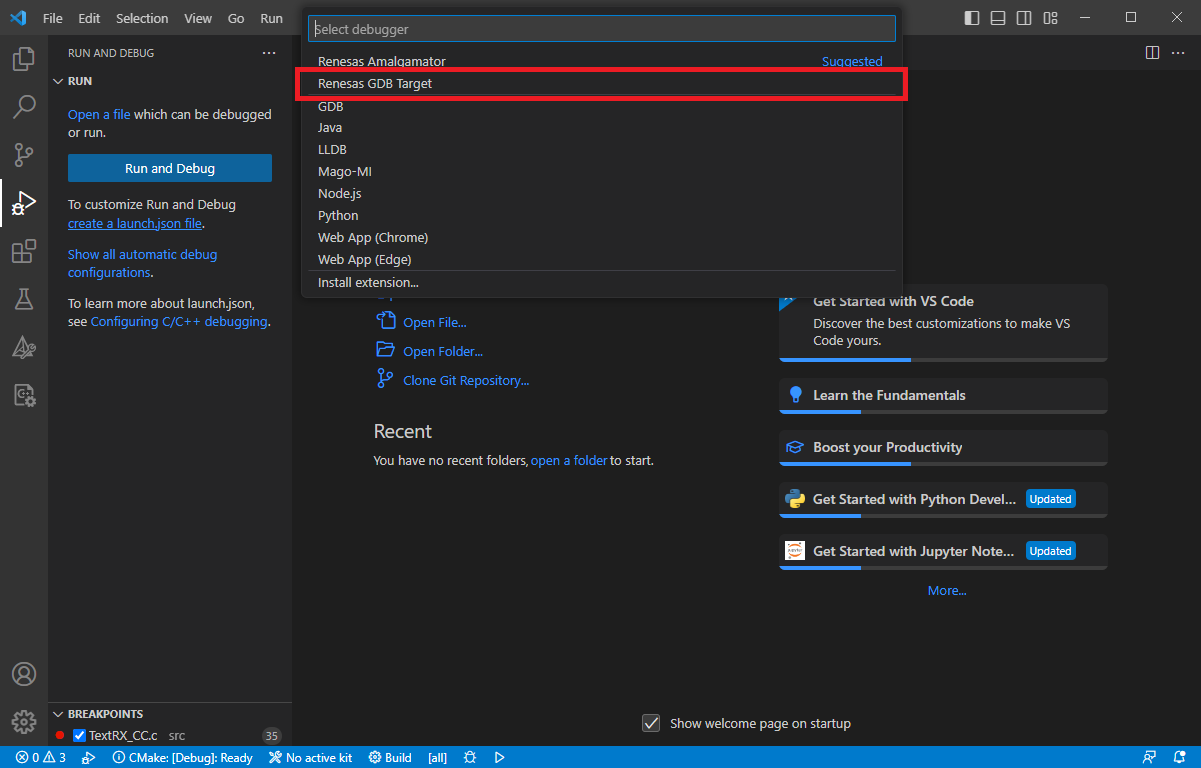
-
A launch.json file will be created inside .vscode folder with some default settings.
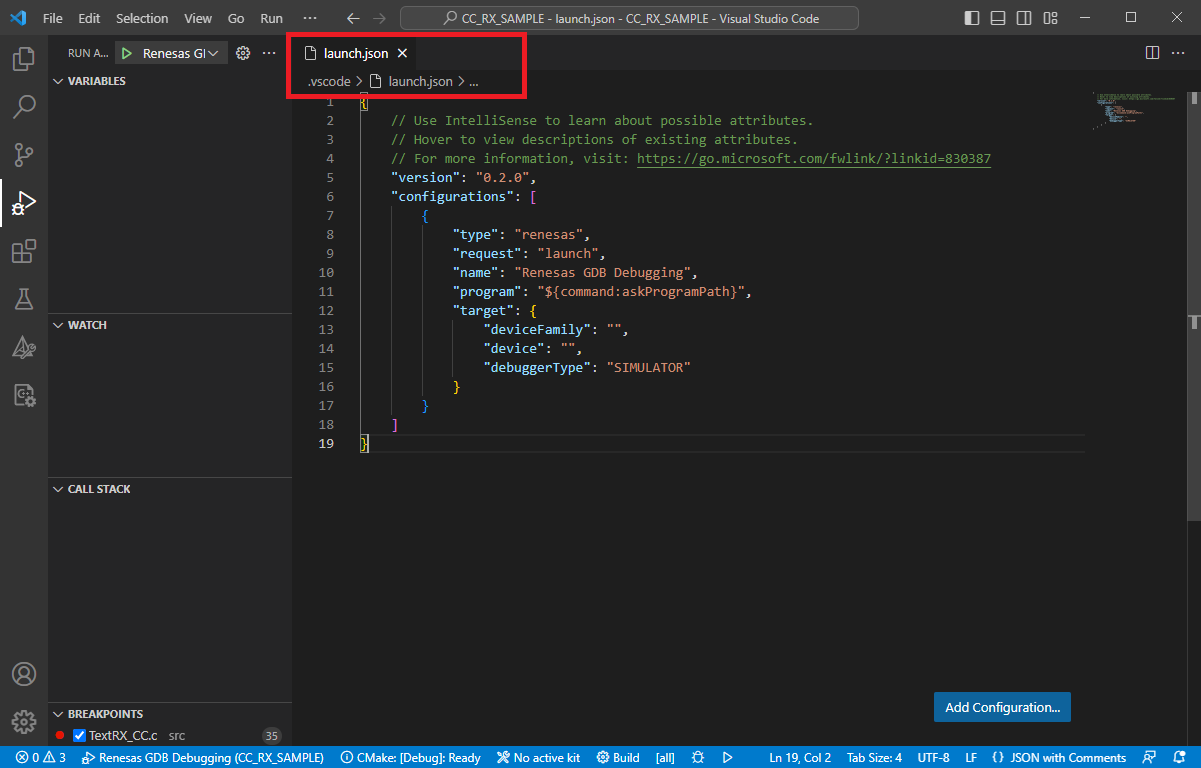
-
Minimum configuration of the launch configuration is defined below:
launch.json format{ // Use IntelliSense to learn about possible attributes. // Hover to view descriptions of existing attributes. // For more information, visit: https://go.microsoft.com/fwlink/?linkid=830387 "version": "0.2.0", "configurations": [ { "type": "renesas", "request": "launch", "name": "<display name of the configuration>", "program": "<absolute path to project's executable file (.x, .elf,...)>", "target": { "deviceFamily": "<device family: RA, RE, RX, RH850, RL78 or RCAR>", "device": "<device code>", "debuggerType": "<debugger type>" } } ] }
This is an example configuration for project build with GCC toolchain.
{
  // Use IntelliSense to learn about possible attributes.
  // Hover to view descriptions of existing attributes.
  // For more information, visit: https://go.microsoft.com/fwlink/?linkid=830387
  "version": "0.2.0",
  "configurations": [
    {
      "type": "renesas",
      "request": "launch",
      "name": "Renesas GDB Debugging",
      "program": "${command:askProgramPath}",
      "target": {
        "deviceFamily": "RX",
        "device": "R5F51101",
        "debuggerType": "SIMULATOR"
      }
    }
  ]
}
For projects built with CC-RL and CC-RX toolchains please modify the path of executable file in "program" field accordingly.
{
  // Use IntelliSense to learn about possible attributes.
  // Hover to view descriptions of existing attributes.
  // For more information, visit: https://go.microsoft.com/fwlink/?linkid=830387
  "version": "0.2.0",
  "configurations": [
    {
      "type": "renesas",
      "request": "launch",
      "name": "Renesas GDB Debugging",
      "program": "${workspaceFolder}/build/name.x",
      "target": {
        "deviceFamily": "RX",
        "device": "R5F51101",
        "debuggerType": "SIMULATOR"
      }
    }
  ]
}
5.2 Start debugging
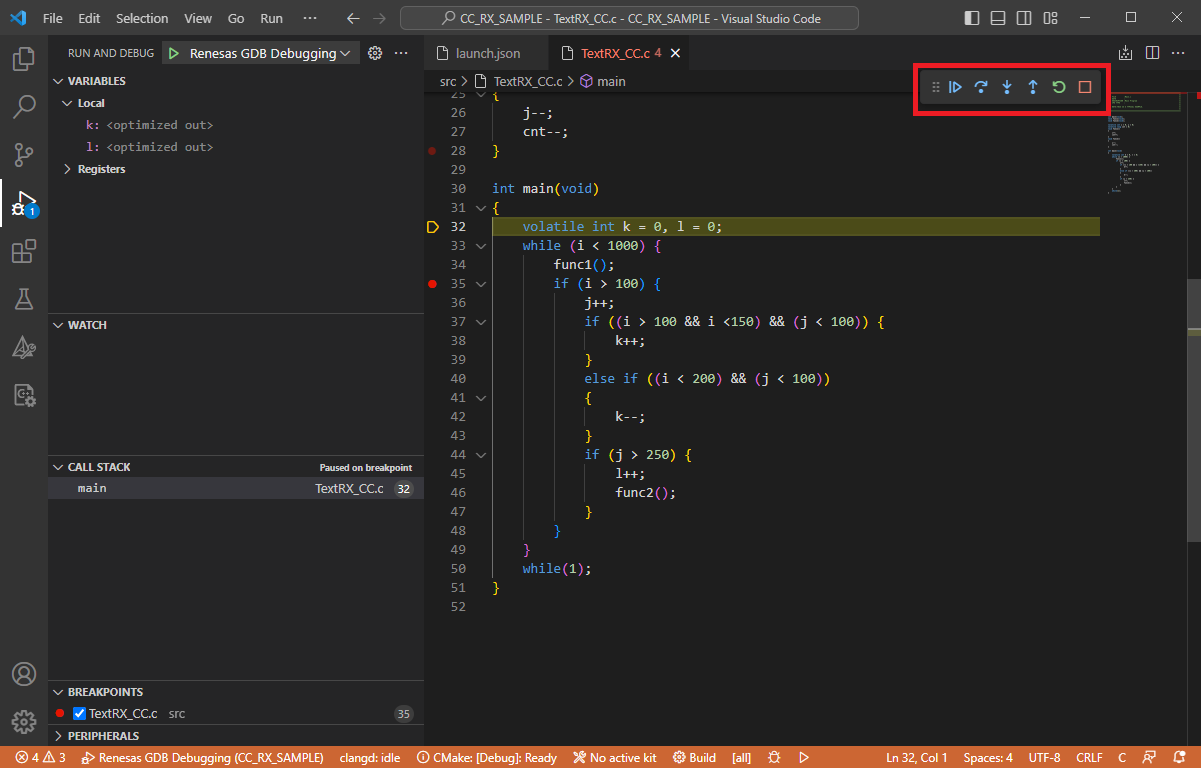
After setting up debugger options, a debug session can be started by selecting the created configuration and click [Start Debugging] button in [Run and Debug] view, or press [F5].

A debug session will be started. Basic debug control flow function (resume, suspend, step into, step over, step out, restart, terminate debug session) can be performed.
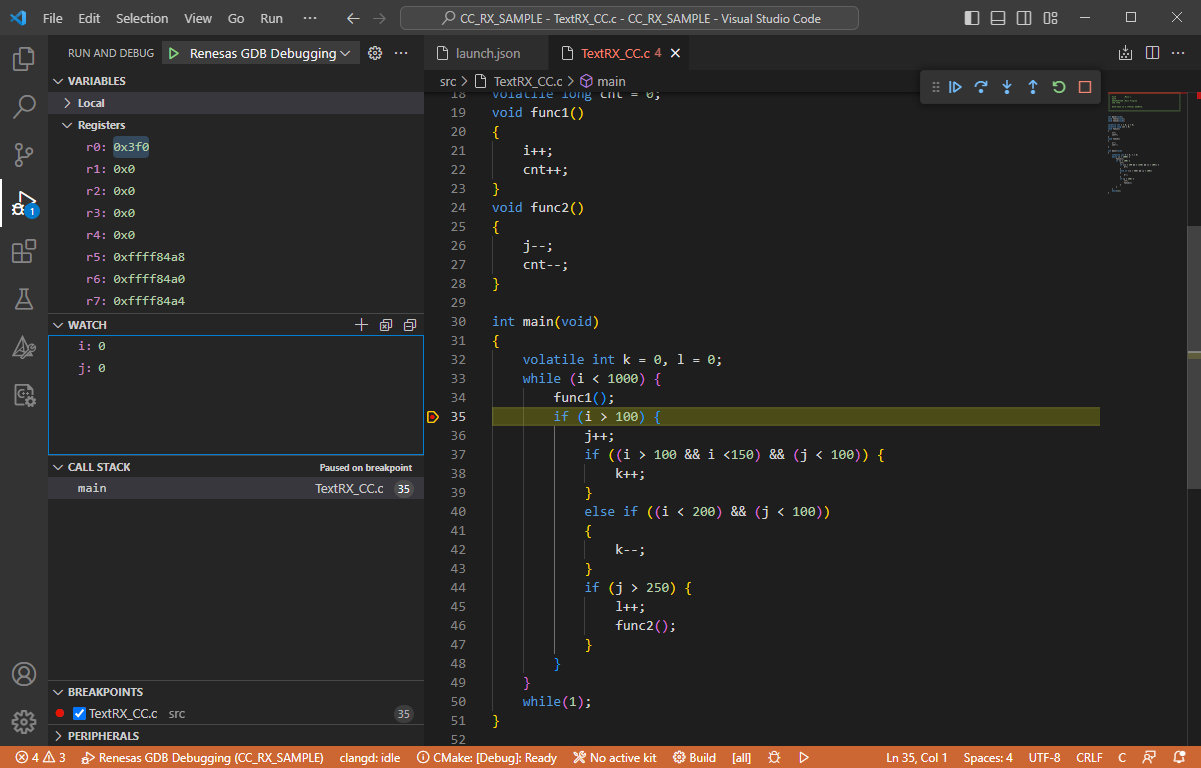
Displaying variables, watch expression and call stack is supported.
6. Appendix
6.1 Productivity Tips
6.1.1 Install an extension from .vsix file
-
Using the [Extensions: Install from VSIX…] command in the [Command Palette]
-
Select [View] menu in title bar.
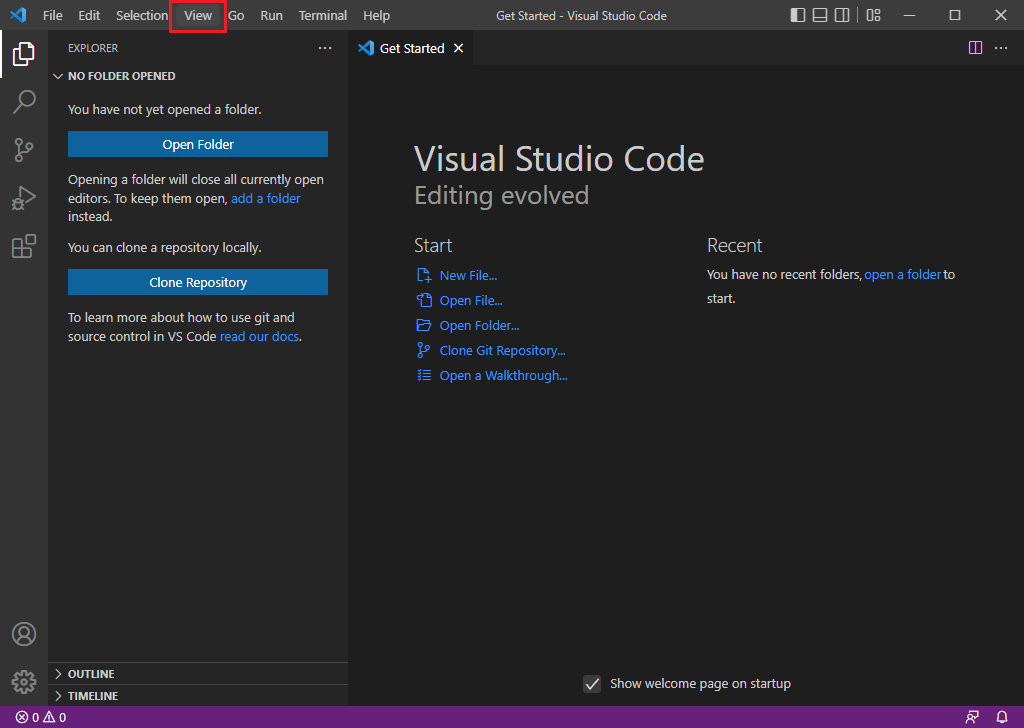
-
Select [Command Palette…] menu item.
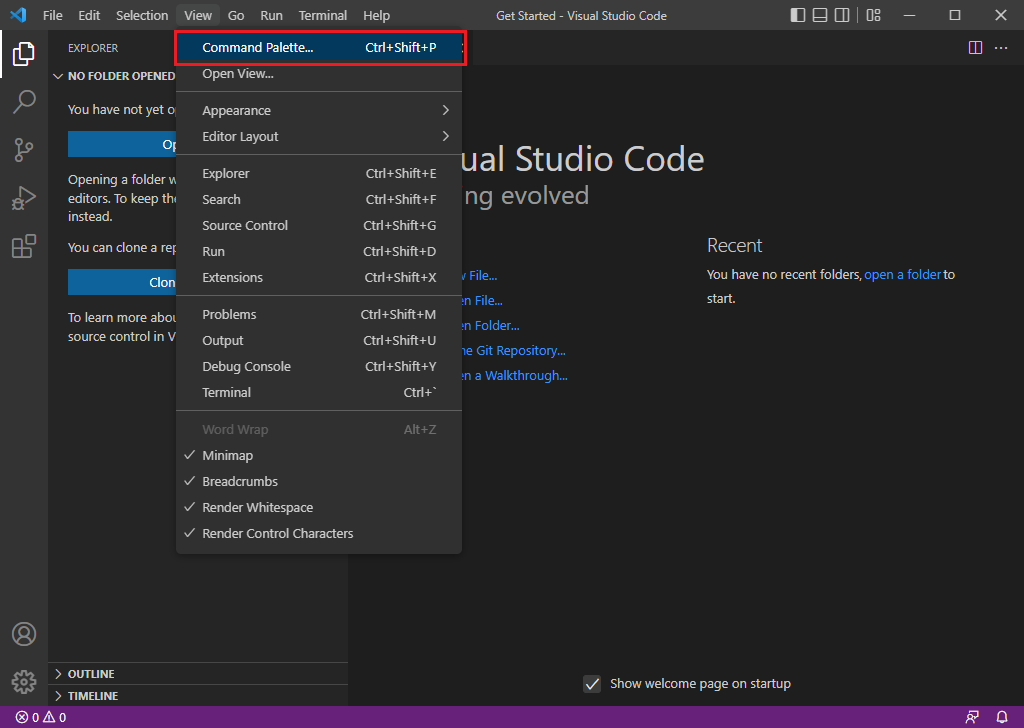
-
Select [Extensions: Install from VSIX…] command (can filter the command list using command name).

-
In the opened [Install from VSIX] dialog, browse to and select the .vsix file of the desired extension, then click [Install] button.
-
-
Using "--install-extension" command-line switch
Extension can be installed using the below command-line option.
code --install-extension <path to .vsix file>E.g. (provide the cmd is opened in the same folder that contains the extension)
code --install-extension renesas-debug-23.6.1.vsix"--install-extension" can be provided multiple times on the command line to install multiple extensions at once.
code --install-extension renesas-build-utilities-23.6.1.vsix --install-extension renesas-debug-23.6.1.vsix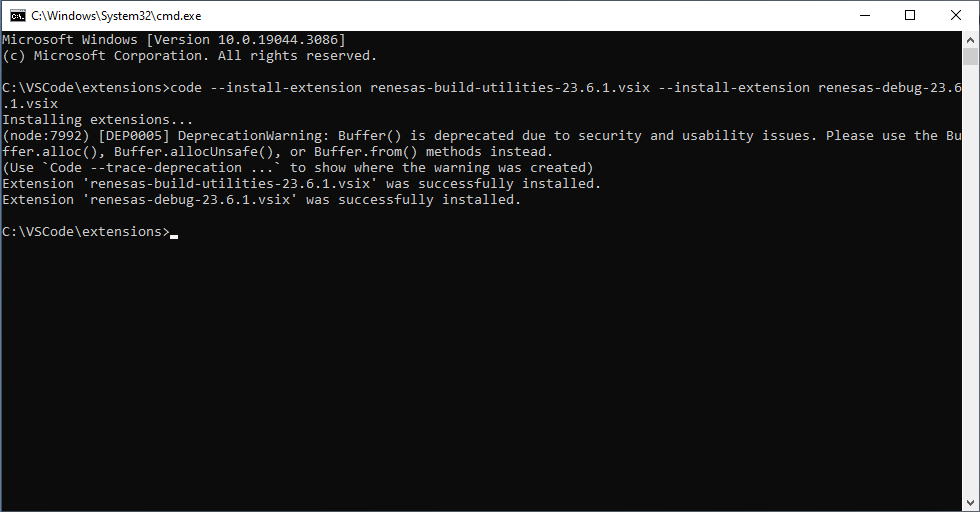
This will install Renesas’s extensions and its dependent extensions.
6.1.2 Open a project
-
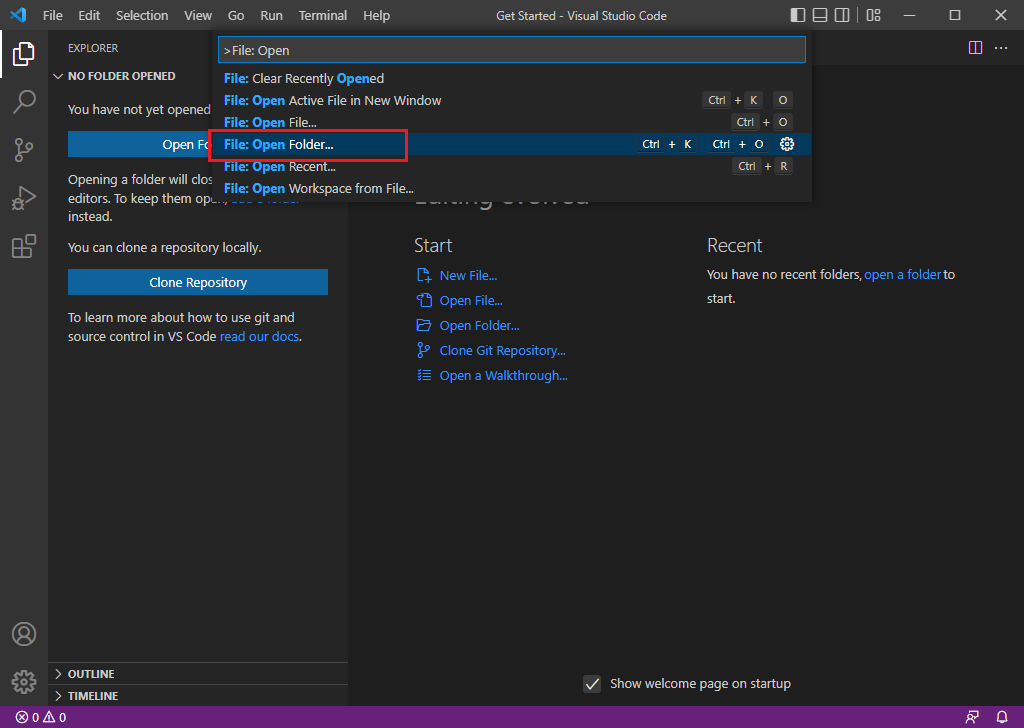
Using the [File: Open Folder…] command in the [Command Palette]
-
Select [View] → [Command Palette…] menu item.
-
Select [File: Open Folder…] command (can filter the command list using command name).
-
In [Open Folder] dialog, browse to project folder and click [Select Folder] button.
-
-
Using command-line
Folder can be opened using the below command-line option.
code <folder path>E.g. (provide the cmd is opened in the folder that contains CCRX_testprj folder)
code CCRX_testprj/Multiple folder paths can be provided on the command line to open multiple folders at once.
code CCRX_testprj/ CCRL_testprj/ RA_testprj/+* Project will be opened and display in [Explorer*] view.
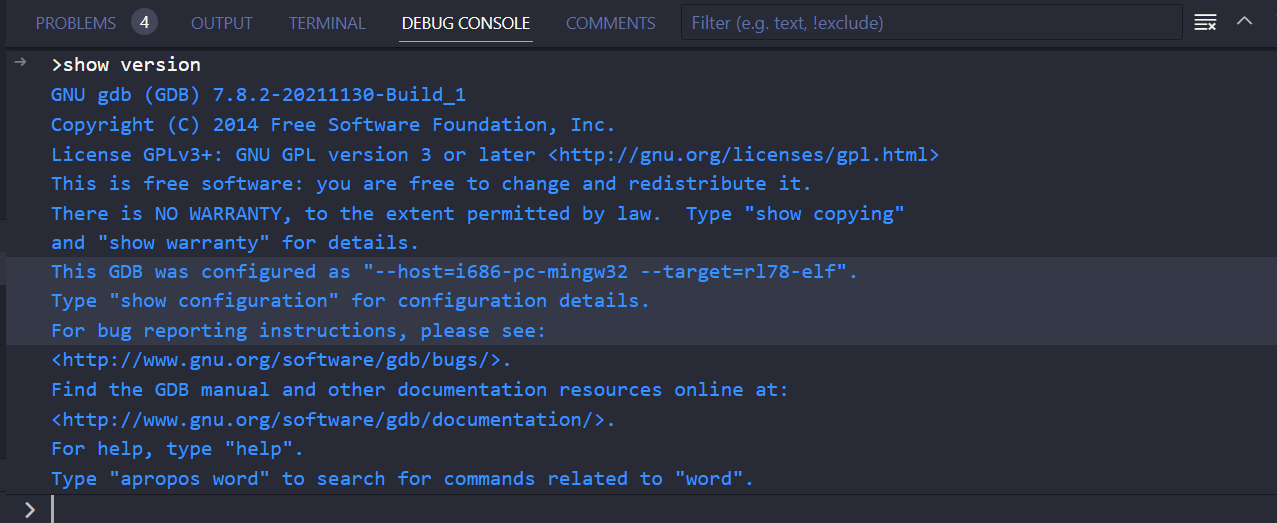
6.1.3 How to use monitor command and MI command to interact directly with GDB
In the Debug Console view you can interact directly with GDB. To display the value of an expression, type that expression which can reference variables that are in scope. For example type '2 + 3' or the name of a variable. Arbitrary commands can be sent to GDB by prefixing the input with a '>', for example type '>show version' or '>help'.
6.1.4 How to install Renesas Support Files Manager
-
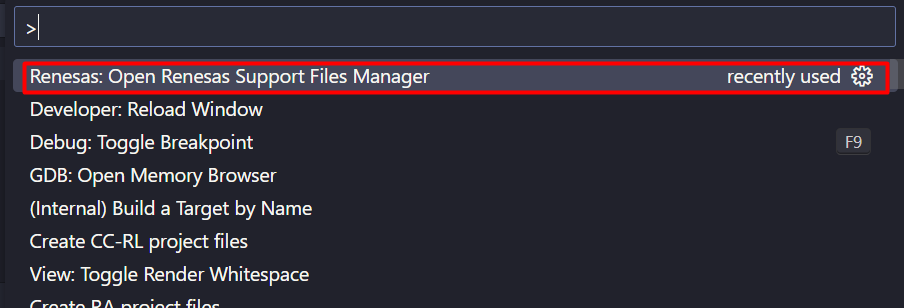
Press Ctrl+Shift+P or select [View] → [Command Palette…] to open Command Palette.
-
Run the command "Renesas: Open Renesas Support Files Manager".
-
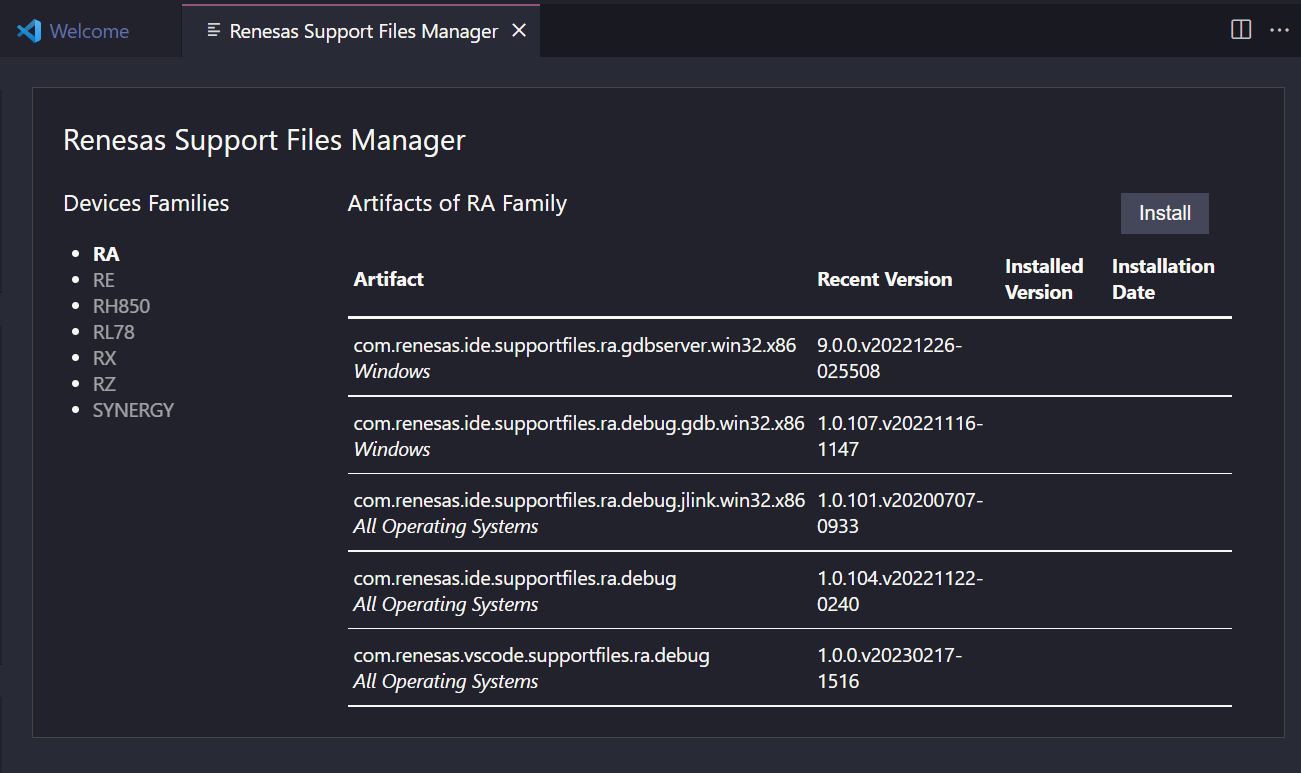
Select Devices Families to use → click Install
Note: Default path when users install Renesas Support Files Manager.
Window host:
%AppData%\Code\User\globalStorage\renesaselectronicscorporation.renesas-debug
Linux host:
~/.config/Code/User/globalStorage/renesaselectronicscorporation.renesas-debug
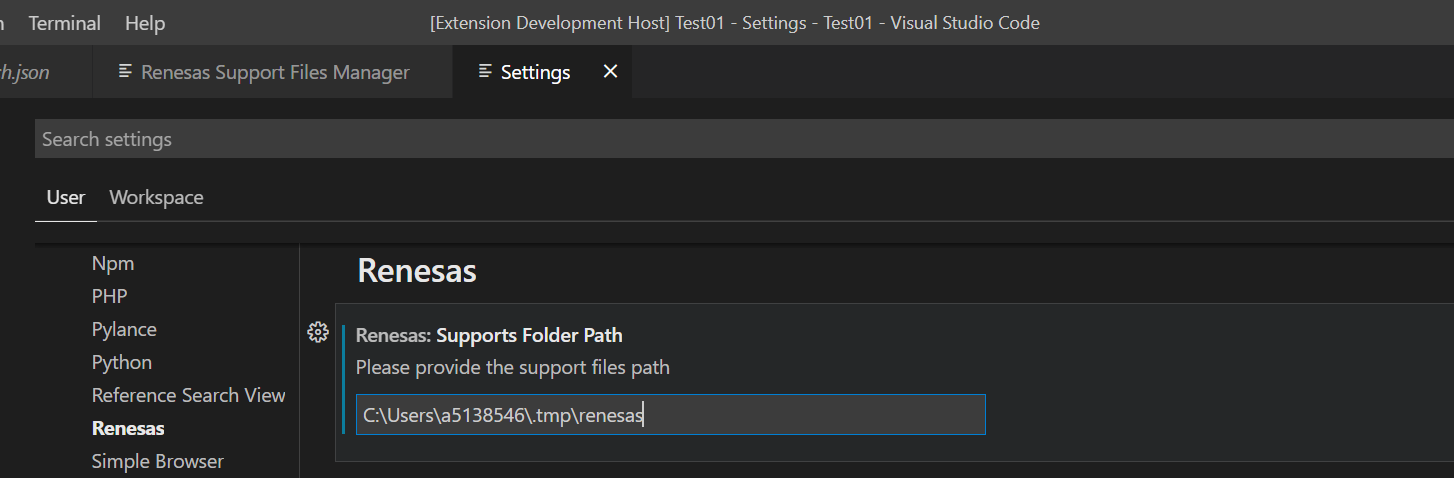
6.1.5 How to change the Support Files Folder configuration
-
Open the VSCode Settings user interface
-
Navigate to Extensions → Renesas menu from the left.
-
UI will show the "Renesas: Supports Folder Path" to the user.
-
Type the custom folder path that they want to prefer to use.
6.1.6 Device Family and Debugger Type lookup table
Here is the device type lookup table and the debugger type of devices for the user to enter the launch.json configuration file:
| Device Famlily | Debugger Type |
|---|---|
RCAR |
E2ARM, E2RH850, IE850ARH850, LAUTERBACHT32 |
RH850 |
E1, E2, IE850ARH850 |
RX |
SIMULATOR, E1, E2, E2LITE, E20, EZ, SEGGERJLINKRX |
RL78 |
SIMULATOR, E1, E2, E2LITE, EZ, IECUBE |
RA |
E2, E2LITE, SEGGERJLINKARM |
RZ |
SEGGERJLINKARM |
DA |
SEGGERJLINKARM |
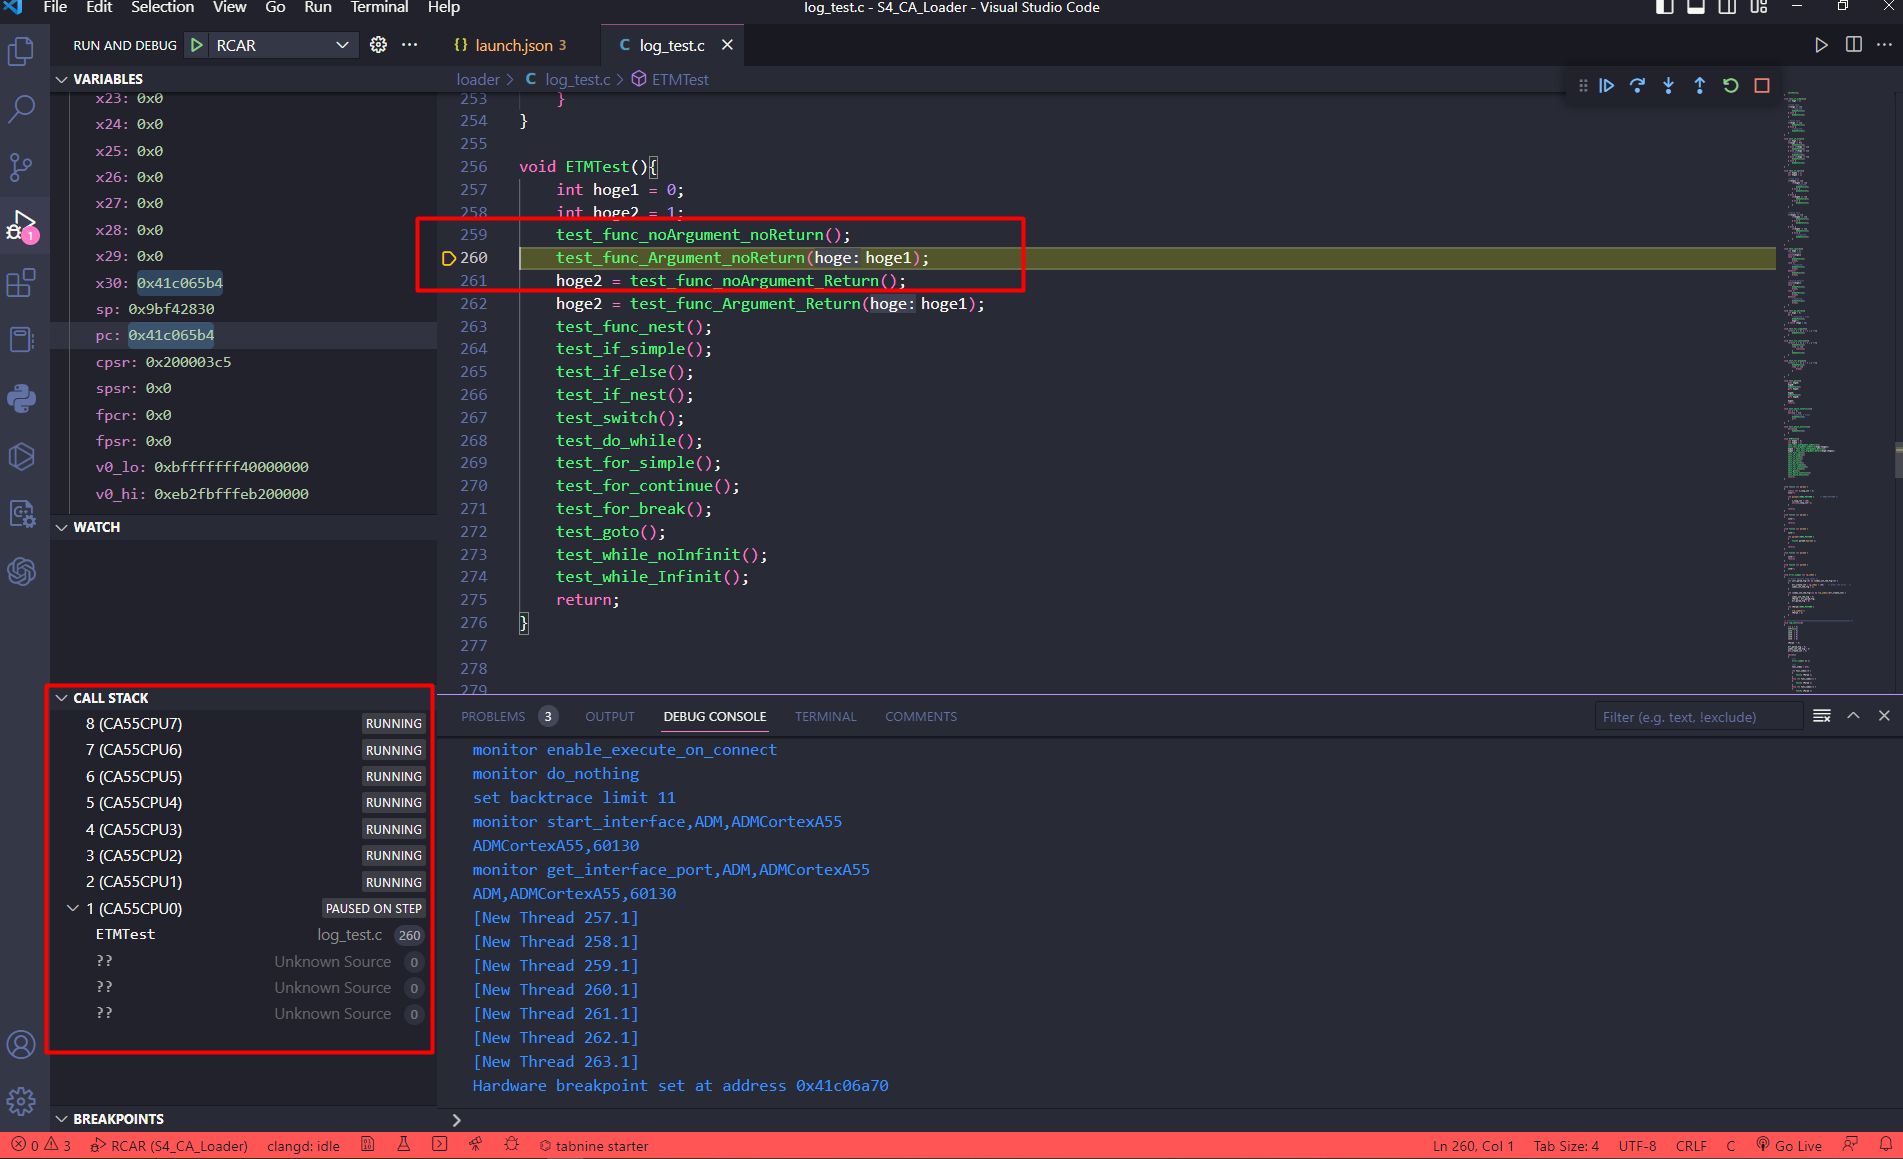
6.1.7 How to enable and disable cores
When debugging with multicore, all cores are enabled by default. The user can configure the 'disabledCores' property in the launch.json configuration file’s target to disable the desired cores.
For instance, in the case of the RCAR S4 ARM CA55 device, there are 8 cores ranging from CA55CPU0 to CA55CPU7. To disable cores CA55CPU4 to CA55CPU7, the following configuration should be applied:
{
// Use IntelliSense to learn about possible attributes.
// Hover to view descriptions of existing attributes.
// For more information, visit: https://go.microsoft.com/fwlink/?linkid=830387
"version": "0.2.0",
"configurations": [
{
"type": "renesas",
"request": "launch",
"name": "RCAR",
"program": "${cwd}/Debug/MR_BAREMETAL_CA55.axf",
"target": {
"deviceFamily": "RCAR",
"device": "R8A779F0_CA55",
"debuggerType": "E2ARM",
"disabledCores": ["CA55CPU4","CA55CPU5","CA55CPU6","CA55CPU7"]
}
}
]
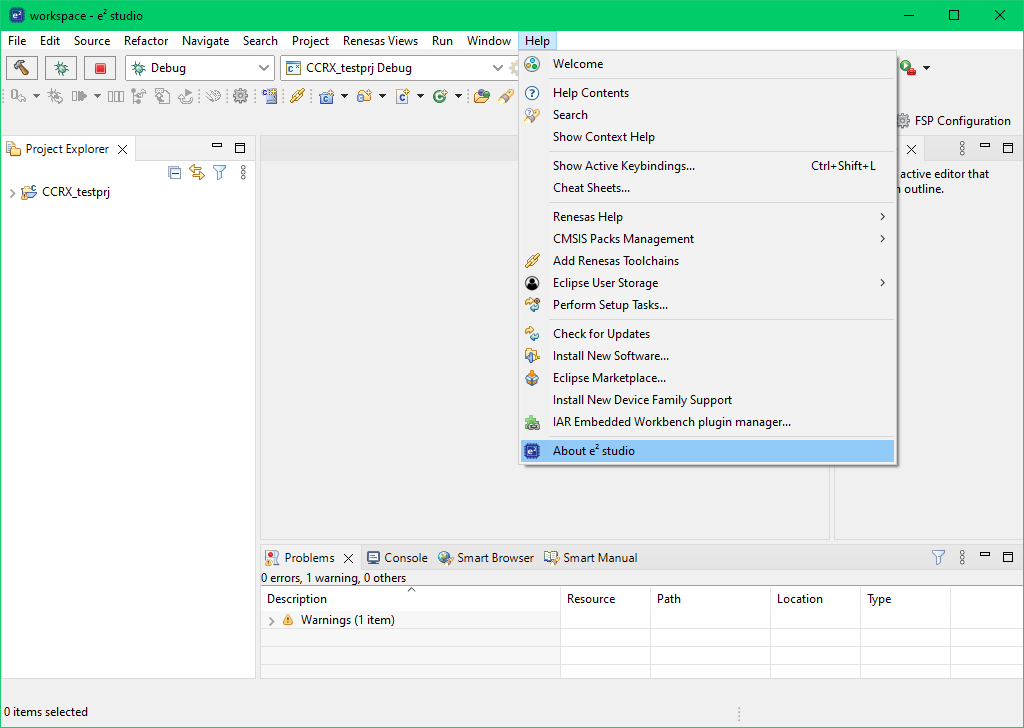
}6.2 How to locate e2 studio resources for building/debugging
-
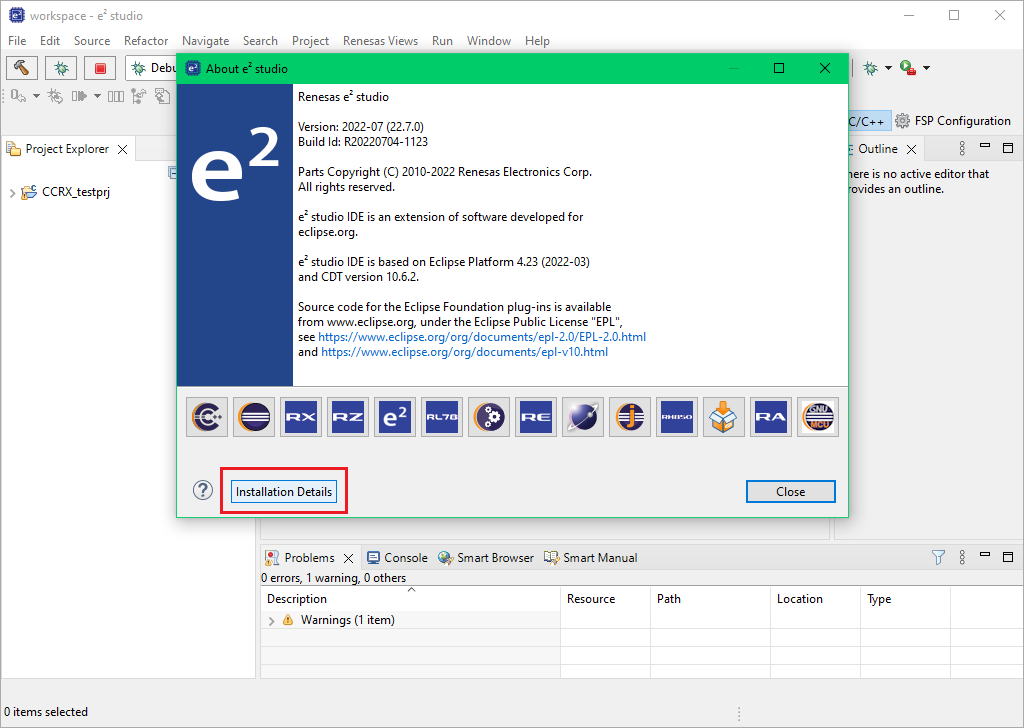
In e2 studio, select [Help] → [About e2 studio].
-
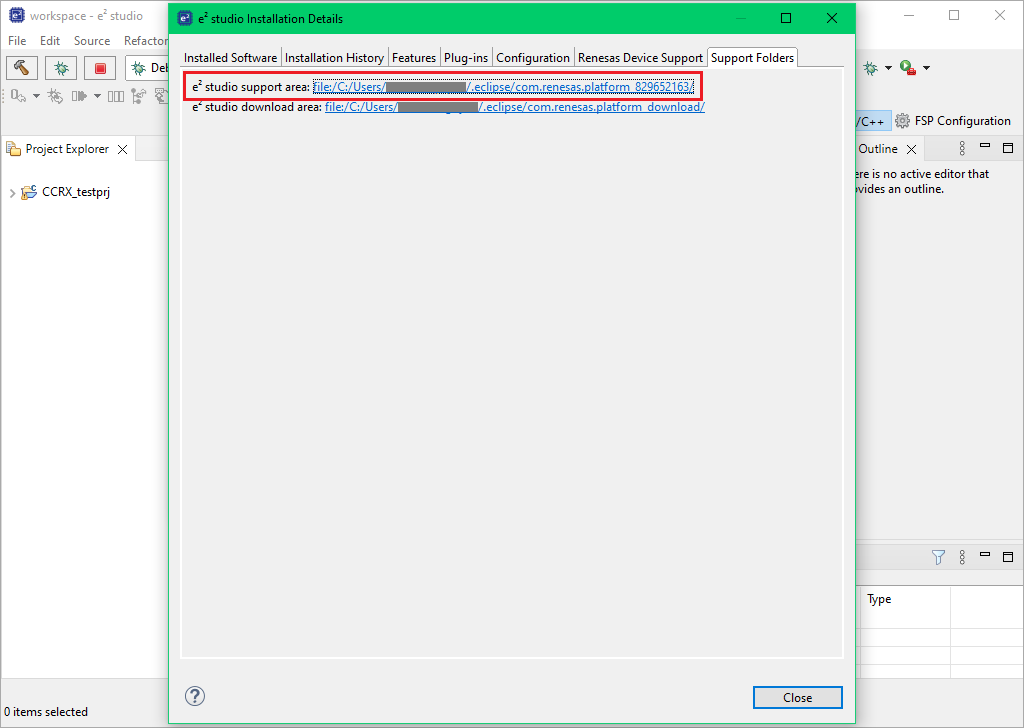
In [About e2 studio] dialog, select [Installation Details] button.
-
In [e2 studio Installation Details] dialog, select [Support Folders] tab and click [e2 studio support area] link to open this location in Window Explorer.
-
Device file for building CC-RL project can be found in "DebugComp/RL78/RL78/Common" folder.
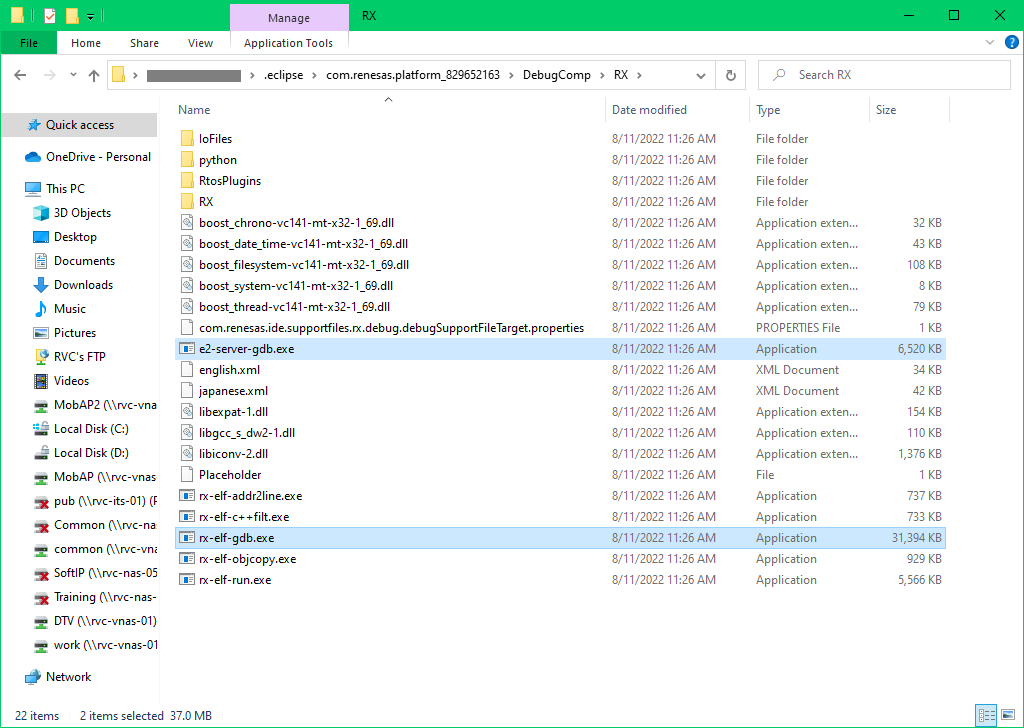
-
GDB and GDB server for debugging can be found in "DebugComp/<family>" folder. E.g. GDB and GDB server for RX (rx-elf-gdb.exe and e2-server-gdb.exe, respectively) can be found in "DebugComp/RX" folder.
-
If the above files/folders does not exist, create a project of the desired family, build and start a debug session to generate those files/folders.
6.3 How to use RA Smart Configurator (RA SC) to generate project for VS Code
-
Open [Command Palette] and select [Renesas: Create RA Project with Smart Configurator] from the commands.

-
VSCode will show installed [RA Smart Configurator] list, select a [Smart Configurator] from the list.

-
Select a [Folder] to create the project.
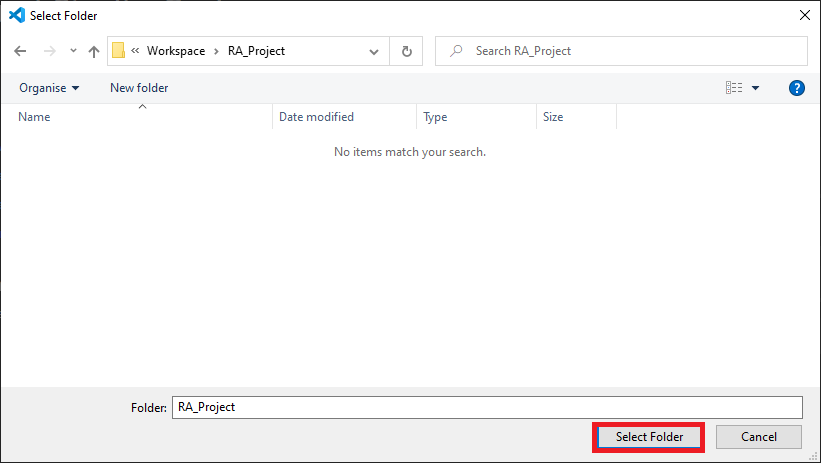
-
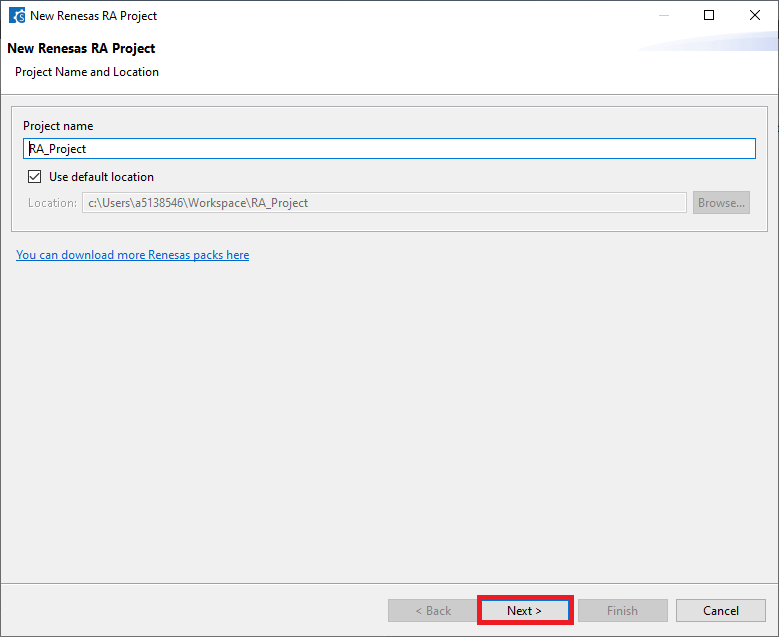
Enter [Project name] and click [Next].
-
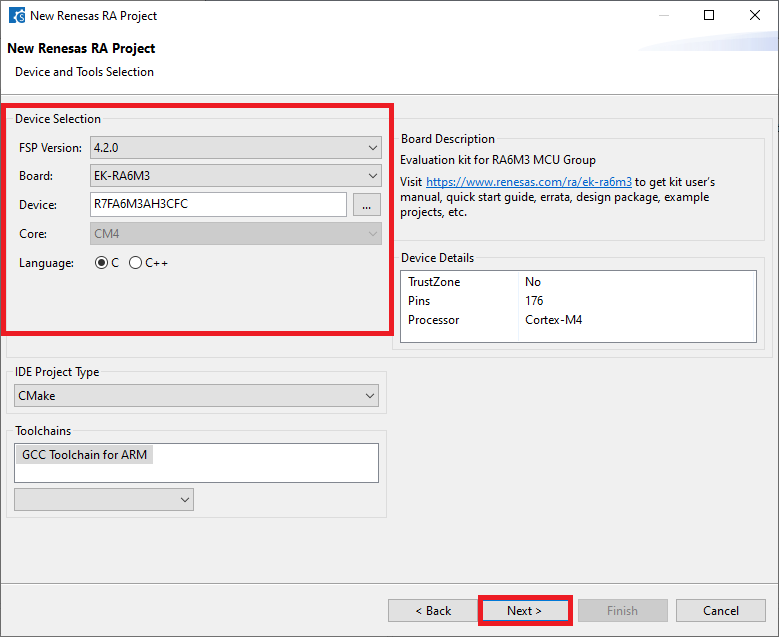
Configure your board and device type and click [Next].
-
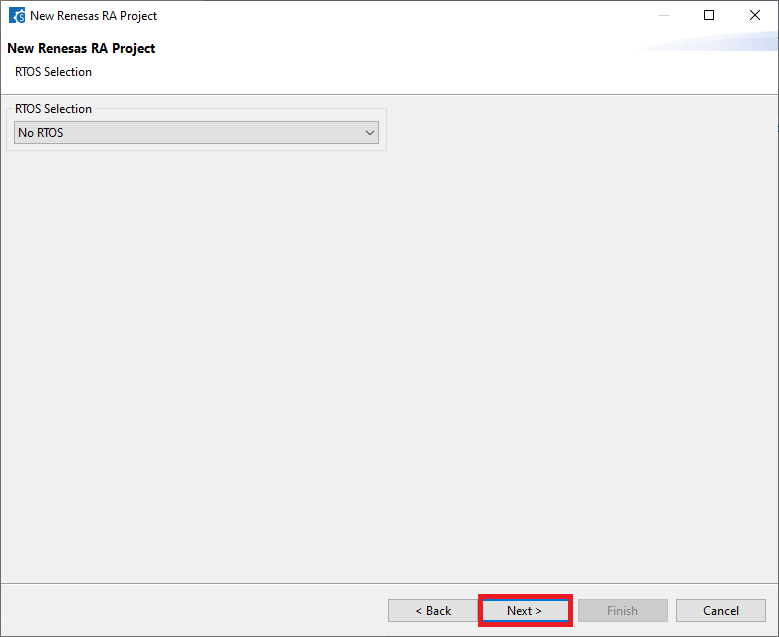
Continue without RTOS selection and click [Next].
-
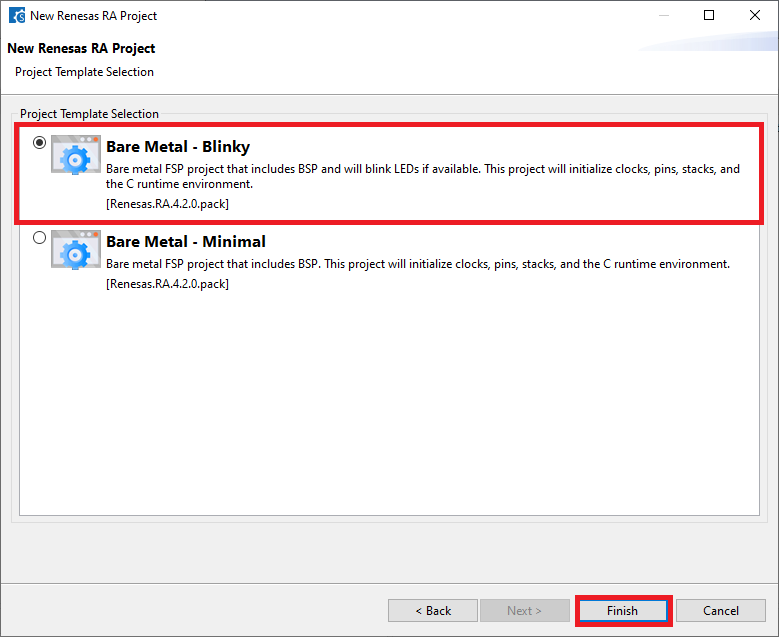
Choose one of the project templates then click [Finish] to complete the project creation steps.
-
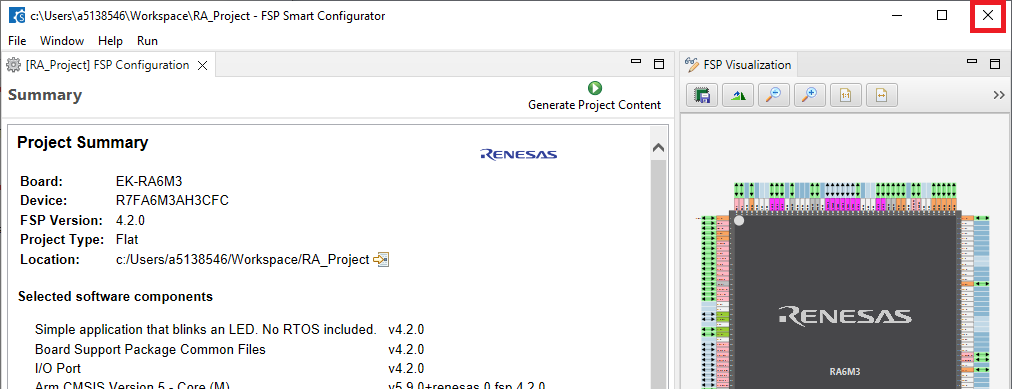
Close [RA Smart Configurator] after generation of the project files completed.
-
Open [Config.cmake] file and set [CMAKE_FIND_ROOT_PATH] variable with the path of toolchain’s bin folder. E.g.
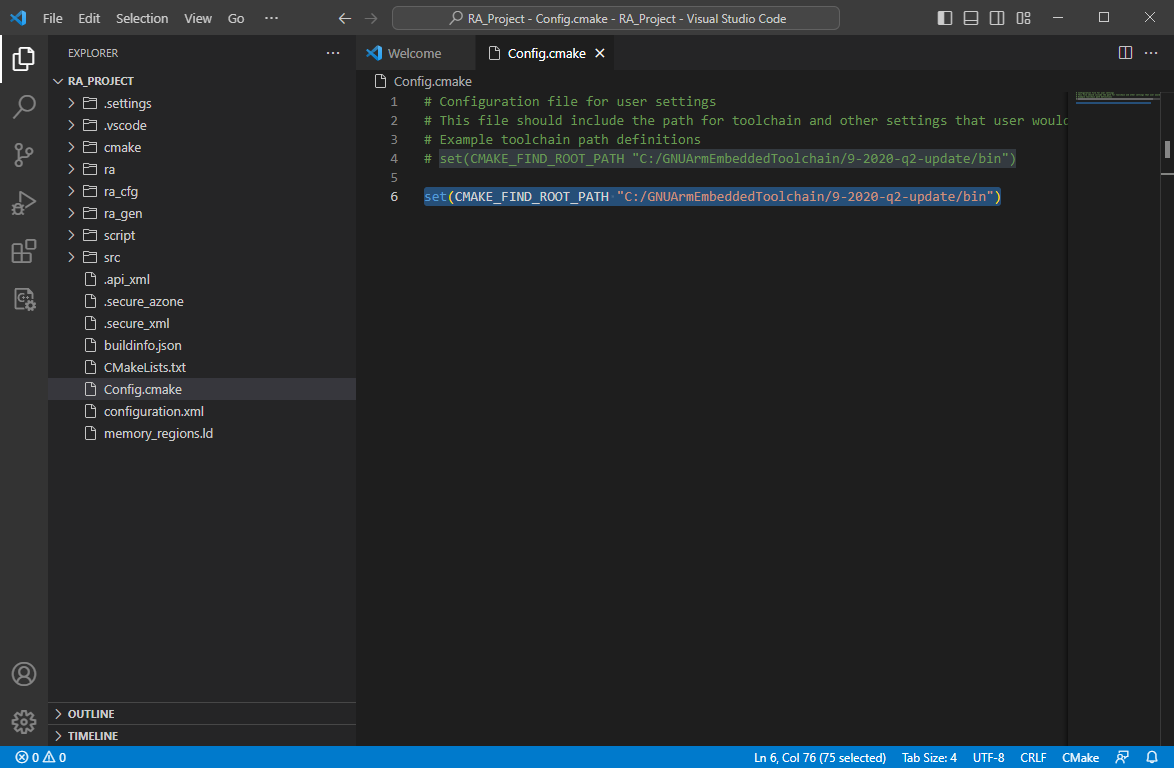
Config.cmake
# Configuration file for user settings
# This file should include the path for toolchain and other settings that user would like to override.
# Example toolchain path definitions
set(CMAKE_FIND_ROOT_PATH "D:/Toolchains/GCC/gcc-arm-none-eabi-9-2019-q4-major-win32/bin")-
In VS Code Command Palete, run "CMake: Delete Cache and Reconfigure" command.

-
In the first time of running, a kit selection is shown. Select "[Unspecified]".

-
Then, run "CMake: Build" command.

-
By default, executable file (<project name>.elf) can be found in "build/CMakeFiles/<project name>.elf.dir/" folder.
-
Refer 5. Debug a project chapter to setup debug configuration and start debugging.
-
For more information about RA Smart Configurator, click here to visit RA Smart Configurator page.
6.4 Setup environment and debug multicore CA55 with CR52 using renesas-amalgamator
6.4.1 Overview
Support debug multicore with CA55 and CR52 for RCAR S4 device on VS code.
This item describes how to connect the S4 board to the PC host, install an extension, import the project, configure file launch.json, run and debug.
6.4.2 Connecting S4 board to PC host
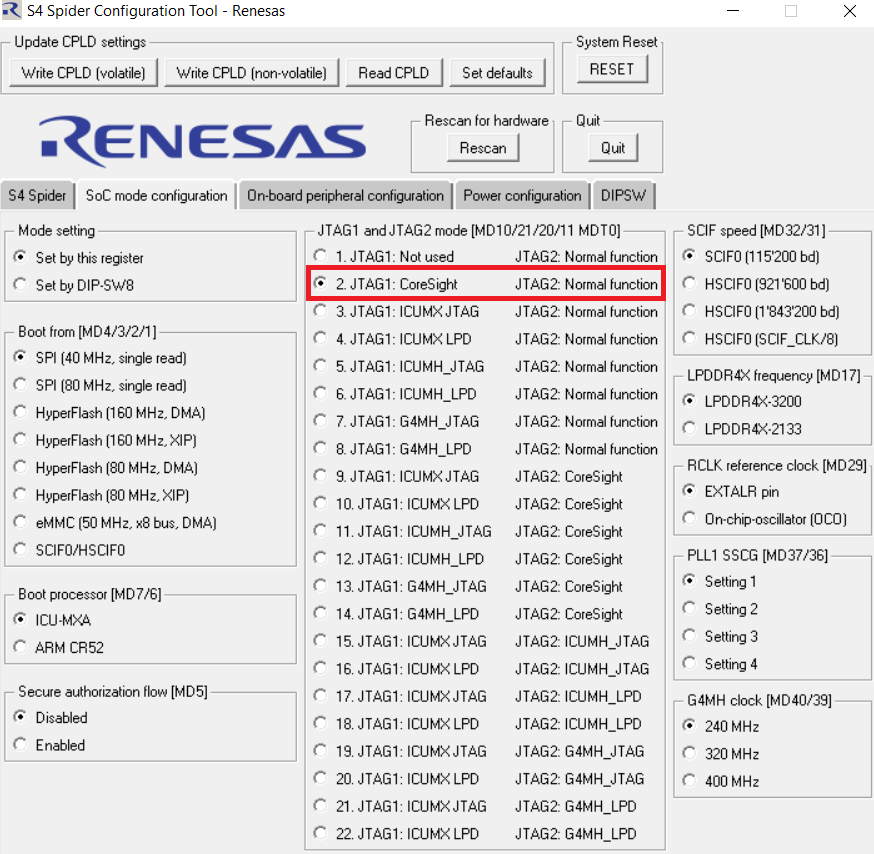
We need to connect between board and PC to debug multicore ARM on VSCode as shown in the picture below:
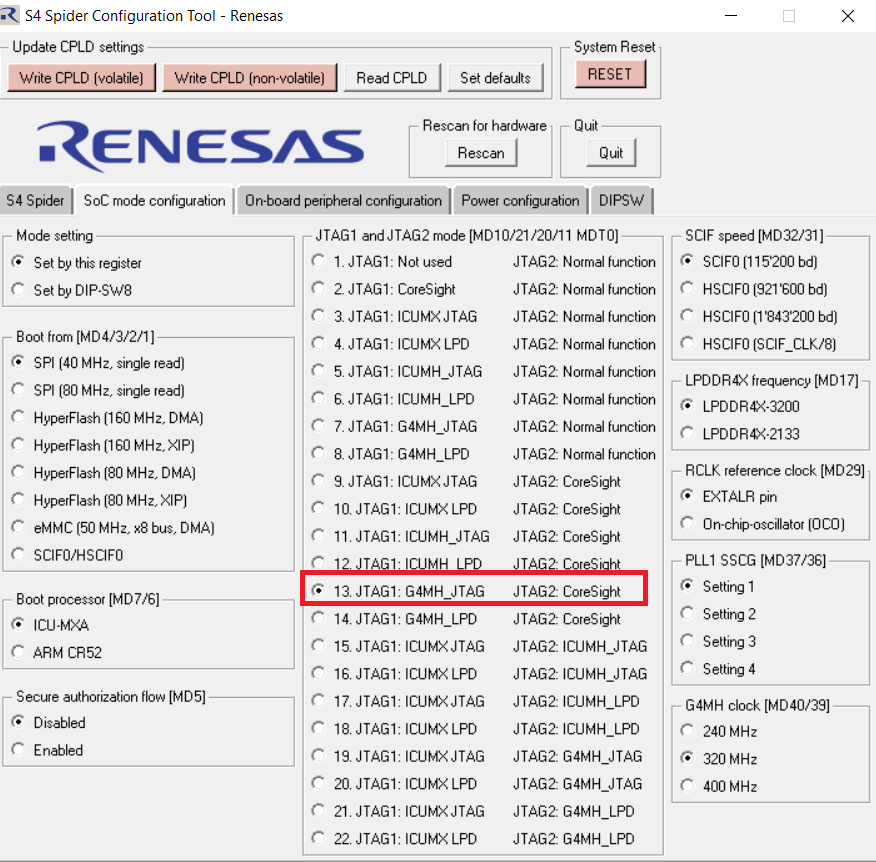
Select the mode for S4 Spider Configuration tool -Renesas as shown below:
6.4.3 Setup debugger options
-
Install the Renesas Debug extension to VSCode. (Refer to section 2.1 Setup VS Code)
-
Import the built CA55 and CR52 projects into VS Code.
-
In order to debug a project using VS Code and the Renesas Debug extension, a configuration file called launch.json needs to be created.
-
Select [Run and Debug] view.
-
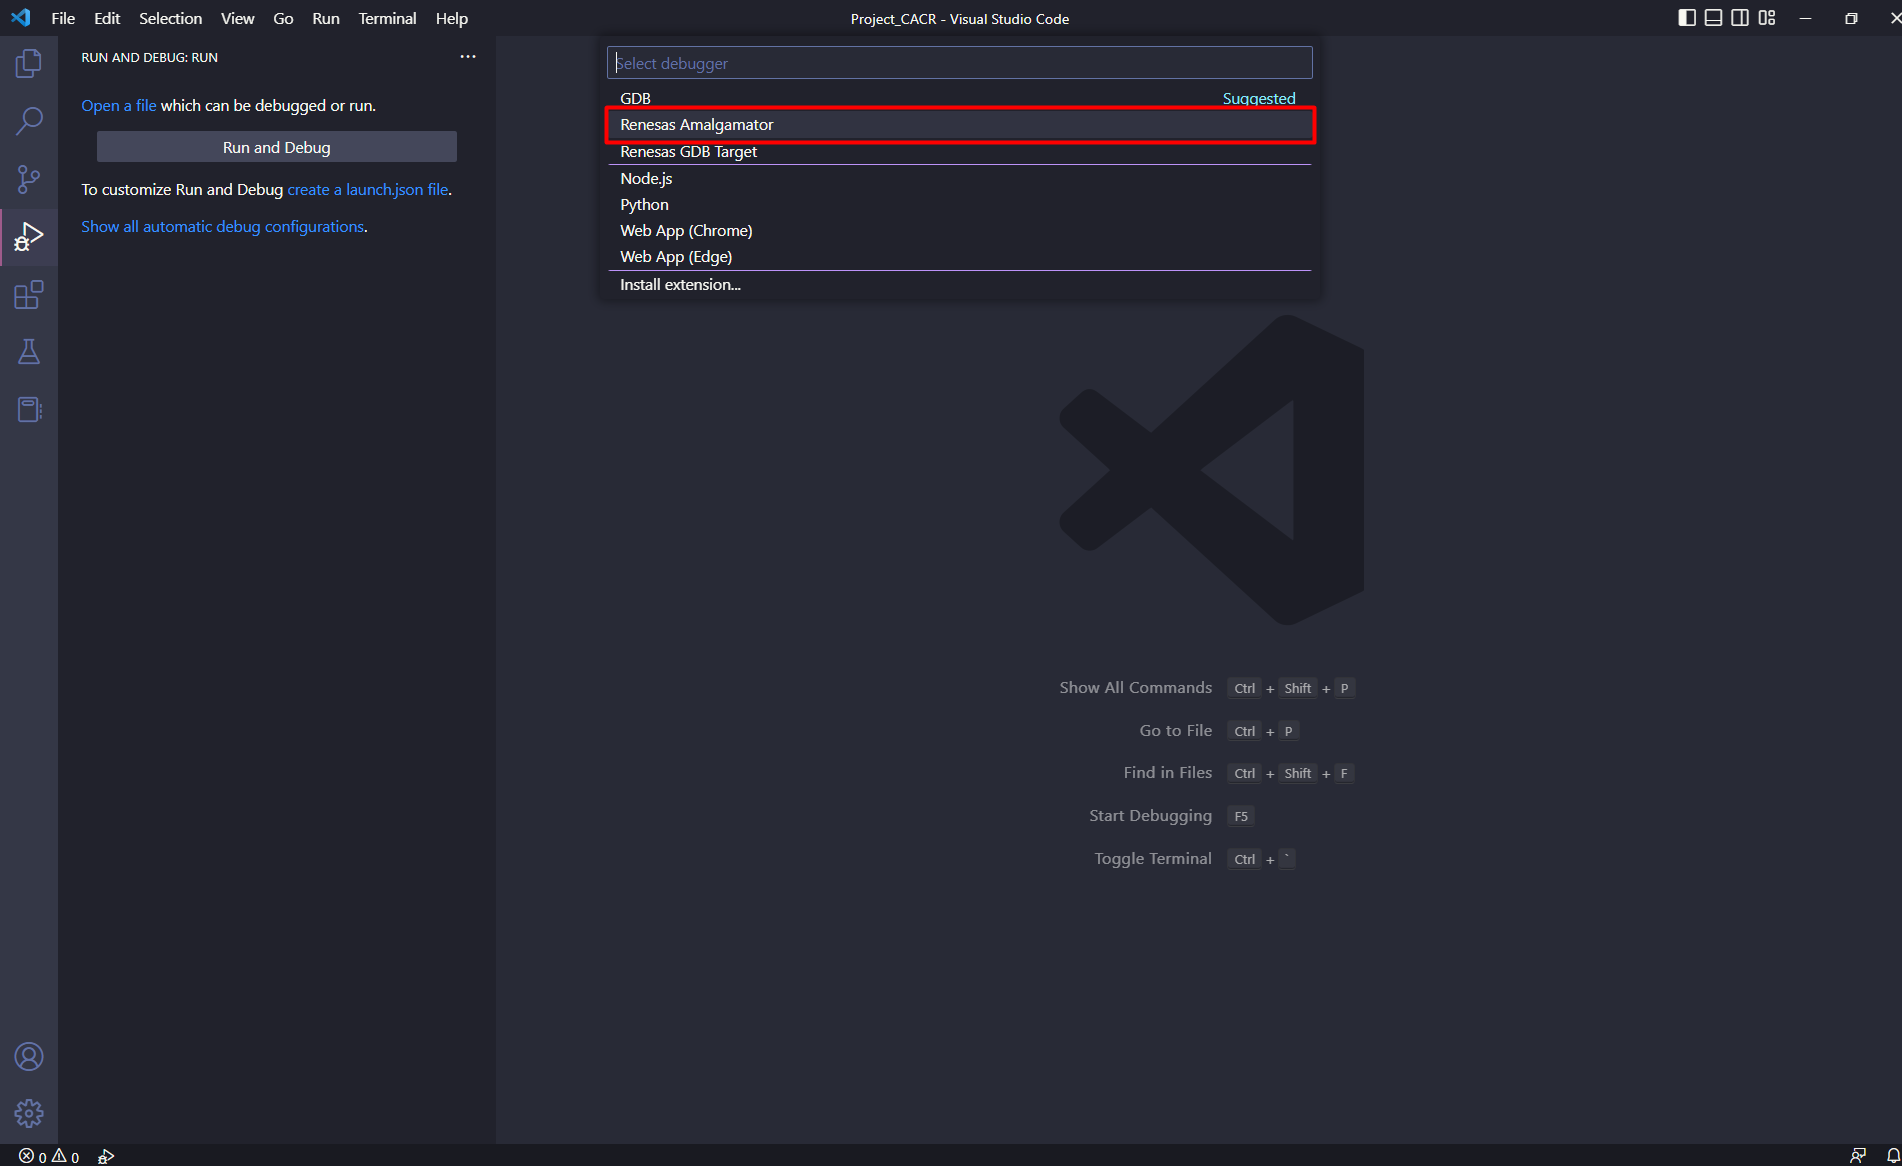
Select [Create a launch.json file] link.
-
Select [Renesas Amalgamator].
-
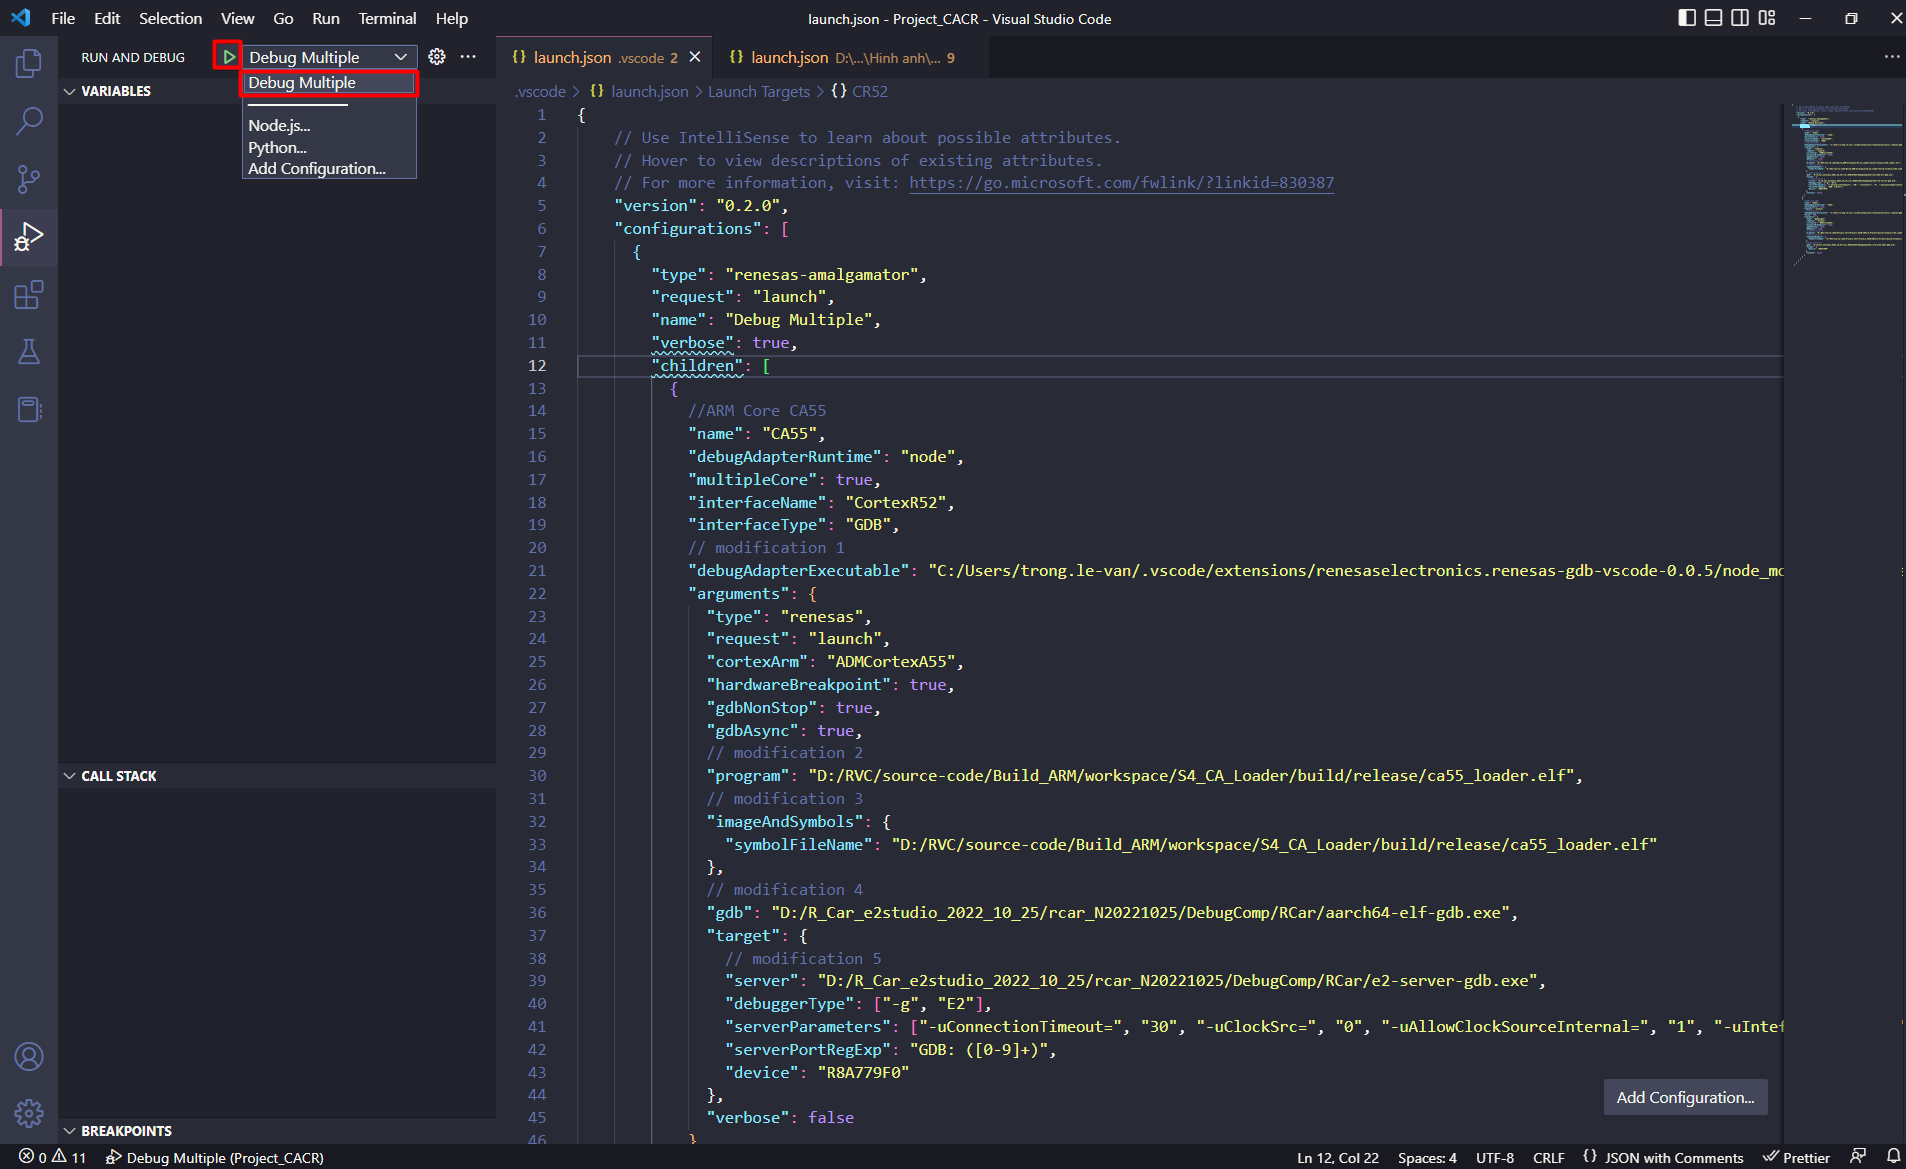
A launch.json file will be created inside .vscode folder with some default settings.
-
In the launch.json file, fill in the following fields.
launch.json
{
  // Use IntelliSense to learn about possible attributes.
  // Hover to view descriptions of existing attributes.
  // For more information, visit: https://go.microsoft.com/fwlink/?linkid=830387
  "version": "0.2.0",
  "configurations": [
    {
      "type": "renesas-amalgamator",
      "request": "launch",
      "name": "<display name of the configuration>",
      "children": [
        {
          "name": "<display name of core>",
          "debugAdapterRuntime": "node",
          "multipleCore": true,
          "interfaceName": "CortexR52",
          "interfaceType": "GDB",
          "arguments": {
            "type": "renesas",
            "request": "launch",
            "hardwareBreakpoint": true,
            "program": "<absolute path to project's executable file (.x, .elf,...)>",
            "target": {
              "deviceFamily": "RCAR",
              "device": "<CPU of the device>",
              "debuggerType": "<type of the debugger>"
            }
          }
        },
        {
          "name": "<display name of core>",
          "debugAdapterRuntime": "node",
          "multipleCore": true,
          "request": "attach",
          "arguments": {
            "type": "renesas",
            "request": "attach",
            "hardwareBreakpoint": true,
            "program": "<absolute path to project's executable file (.x, .elf,...)>",
            "target": {
              "deviceFamily": "RCAR",
              "device": "<CPU of the device>",
              "debuggerType": "<type of the debugger>",
            }
          }
        }
      ]
    }
  ]
}
Example configuration file launch.json:
Example: launch.json
{ // Use IntelliSense to learn about possible attributes. // Hover to view descriptions of existing attributes. // For more information, visit: https://go.microsoft.com/fwlink/?linkid=830387 "version": "0.2.0", "configurations": [ { "type": "renesas-amalgamator", "request": "launch", "name": "Debug Multiple", "children": [ { //ARM Core CA55 "name": "CA55", "debugAdapterRuntime": "node", "multipleCore": true, "interfaceName": "CortexR52", "interfaceType": "GDB", "arguments": { "type": "renesas", "request": "launch", "hardwareBreakpoint": true, "program": "${cwd}/CACore_Project/build/release/ca55_loader.elf", "target": { "deviceFamily": "RCAR", "device": "R8A779F0", "debuggerType": "E2ARM", "serverParameters": ["-uInteface=", "JTAG", "-w", "0", "-uConnectMode=", "RESET", "-uWorkRamAddress=", "0x0", "-uSyncMode=", "async", "--gdbVersion=", "7.2"] }, } }, { //ARM Core CR52 "name": "CR52", "debugAdapterRuntime": "node", "multipleCore": true, "request": "attach", "arguments": { "type": "renesas", "request": "attach", "hardwareBreakpoint": true, "program": "${cwd}/CRCore_Project/build/release/cr52_loader.elf", "target": { "deviceFamily": "RCAR", "device": "R8A779F0_CR52", "debuggerType": "E2ARM" }, } } ] } ] } -
6.4.4 Start debugging
After setting up debugger options, a debug session can be started by selecting the created configuration and click [Start Debugging] button in [Run and Debug] view, or press [F5].
Waiting for the program to launch and debug successfully.
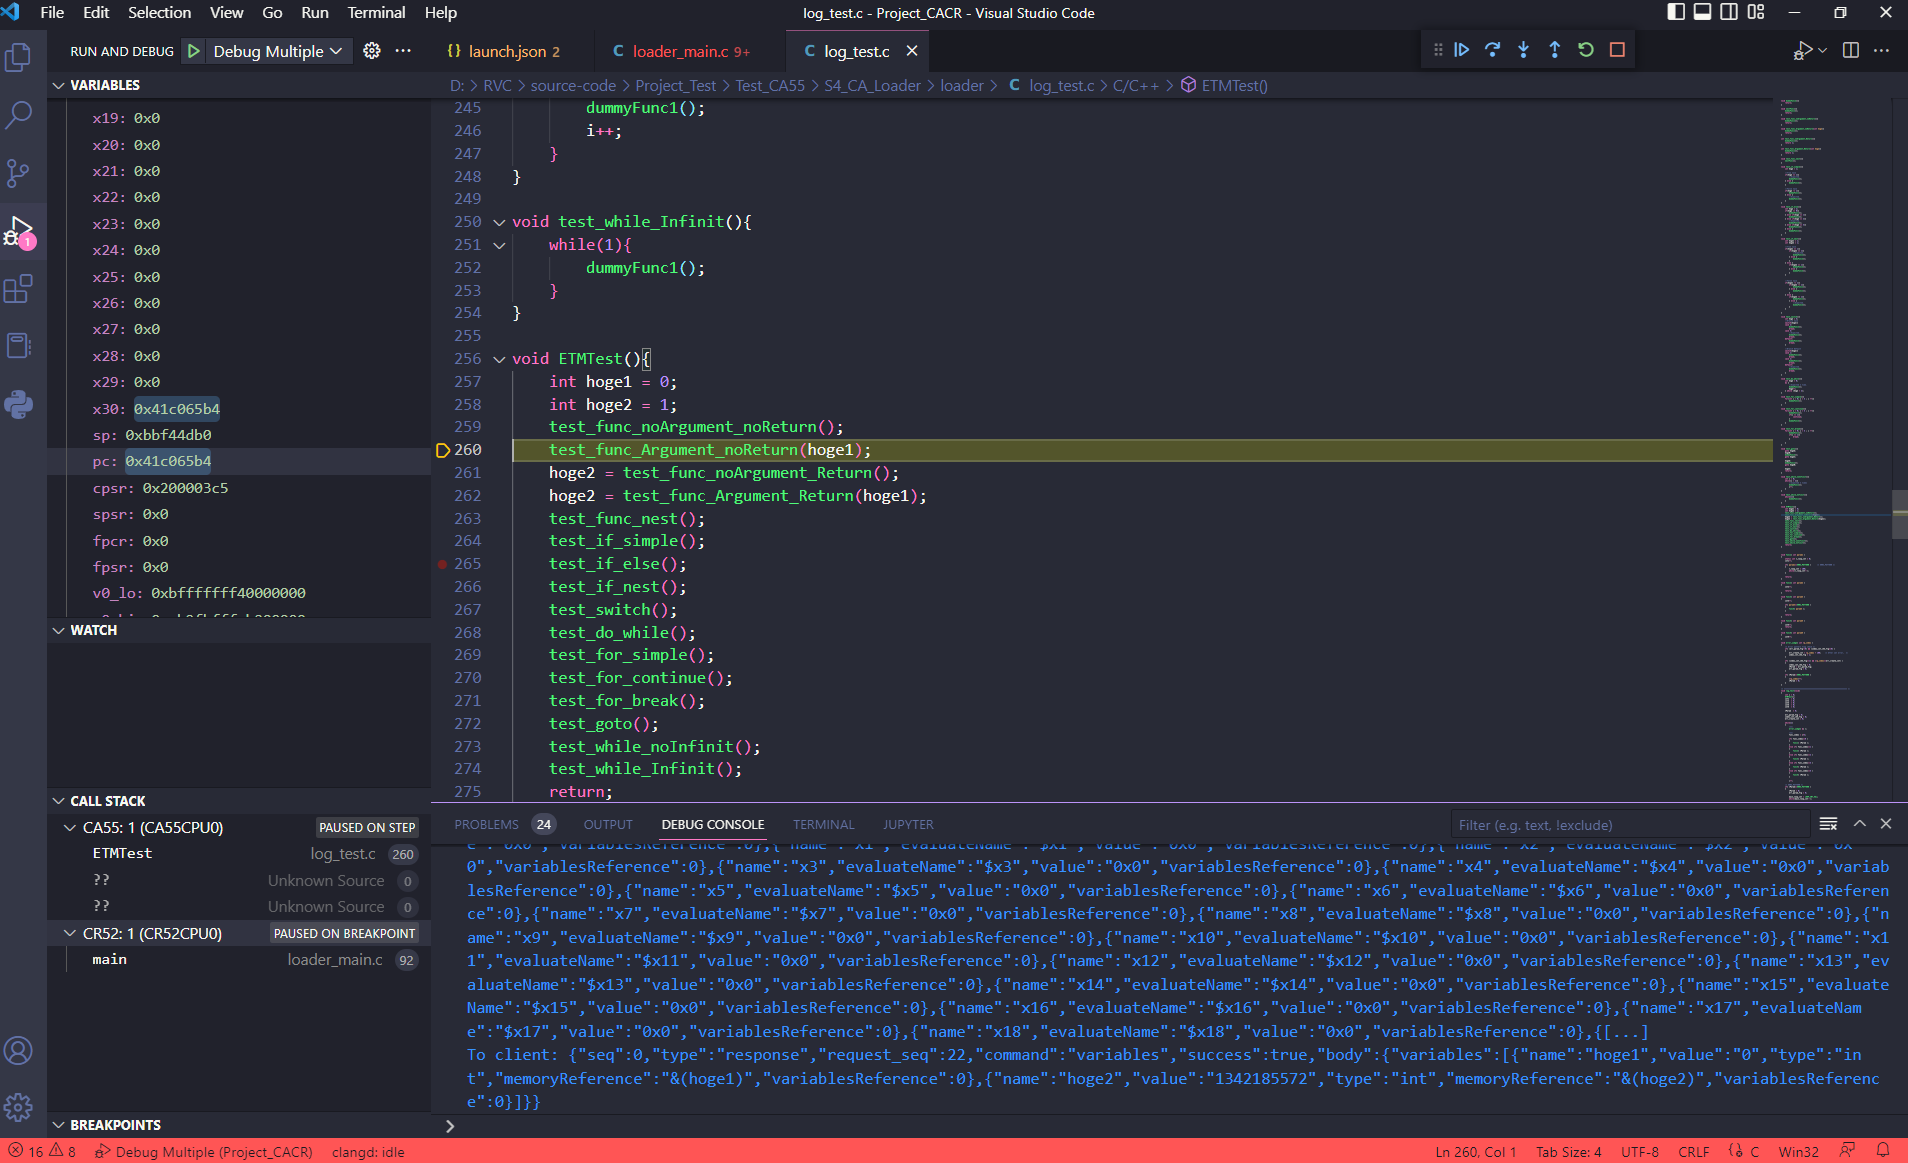
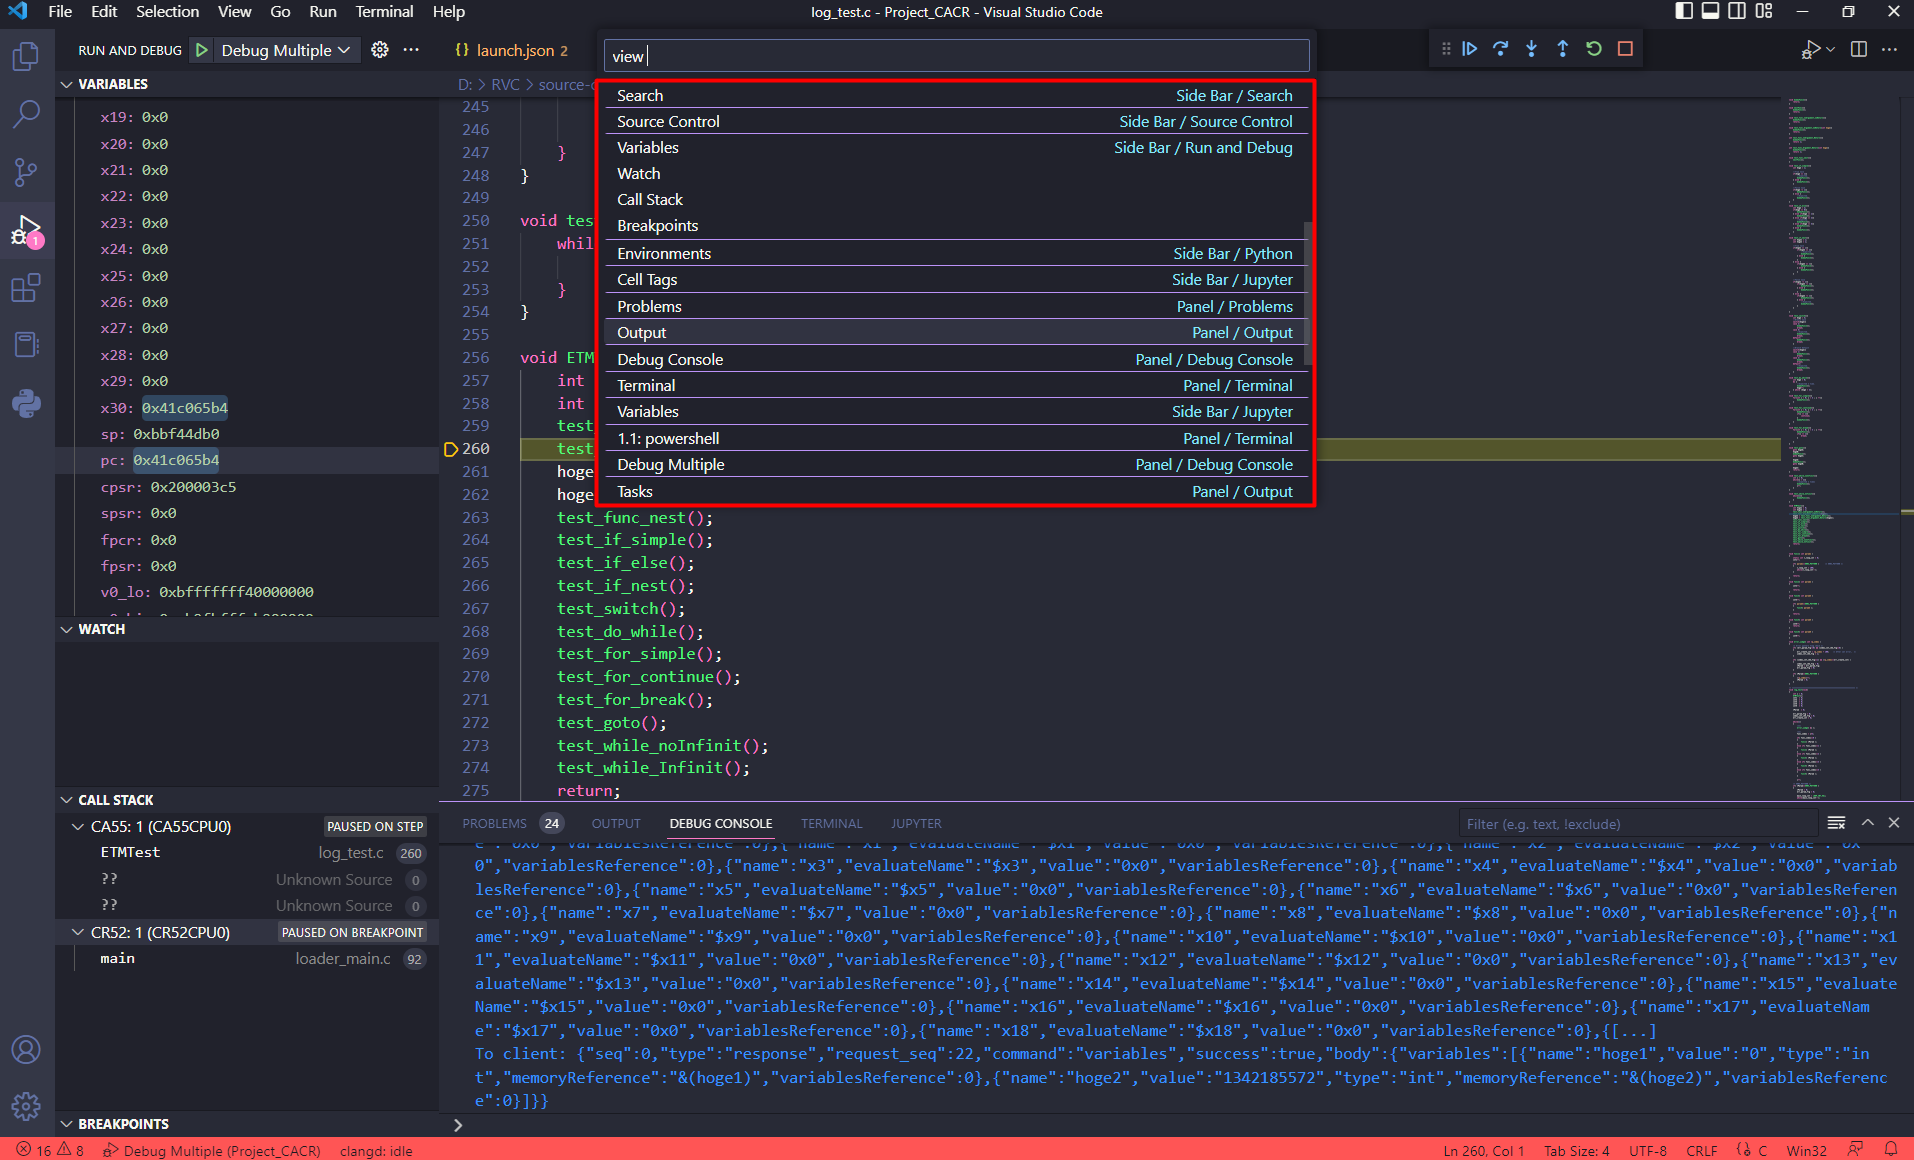
Displaying variables, watch expression, call stack… are supported in VS Code:
-
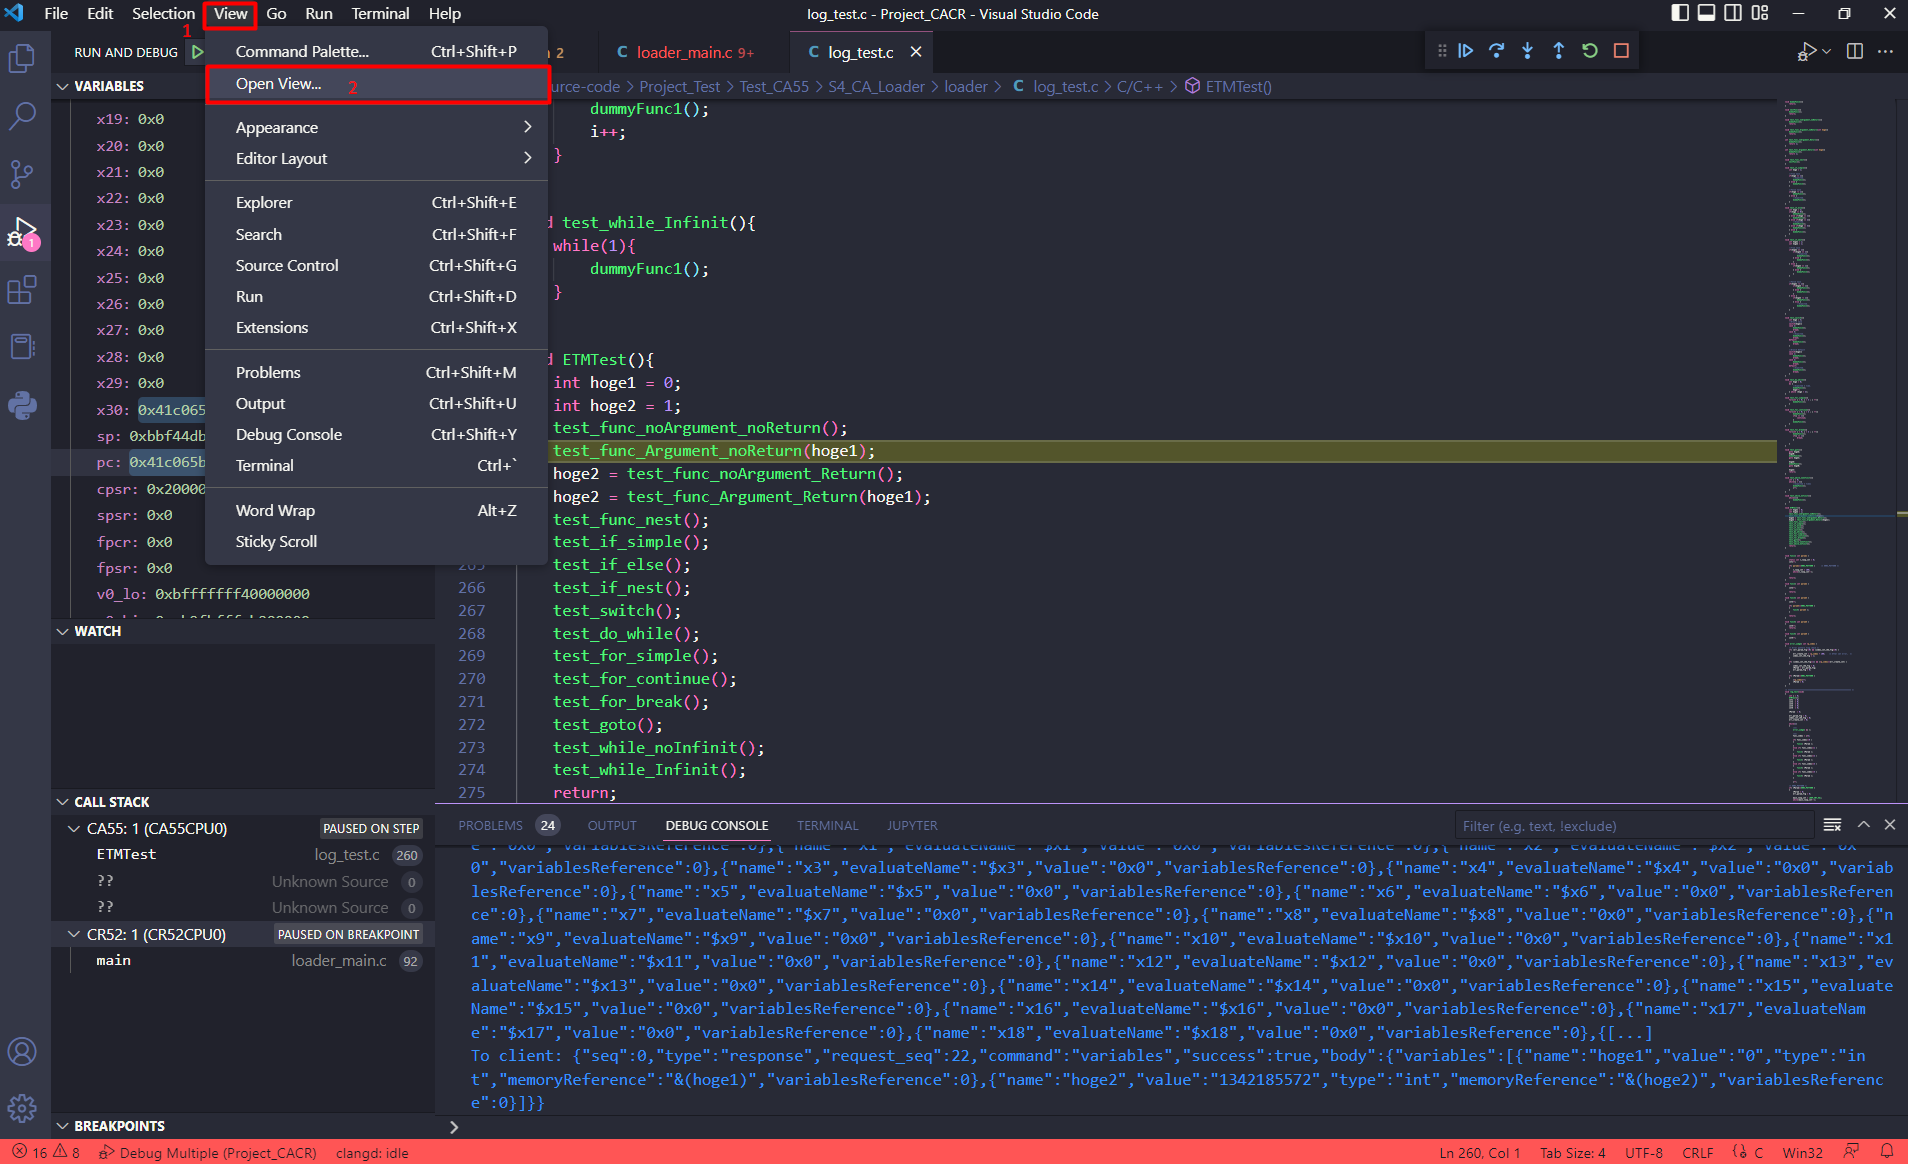
Select [View] → [Open View…]
-
Select the Views to be displayed on the window.
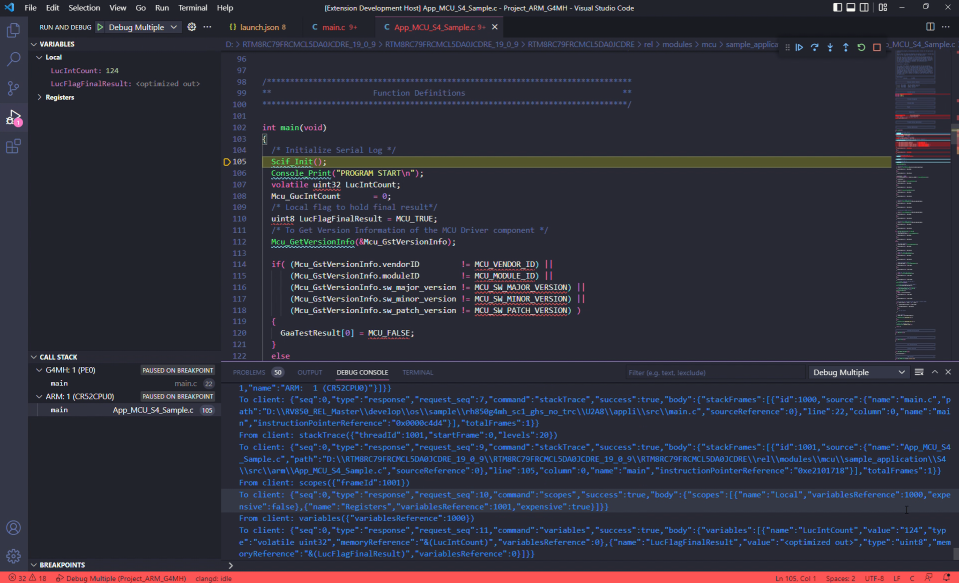
6.5 Setup environment and debug project ARM & G4MH using renesas-amalgamator
6.5.1 Overview
Support multiple different (ARM/G4MH) cores for RCAR S4 device on VS code.
This item describes how to debug (Project ARM+G4MH).
6.5.2 Connecting S4 board to PC host
We need to connect between board and PC to debug ARM and G4MH on VSCode as shown in the picture below:
Select the mode for S4 Spider Configuration tool -Renesas as shown below:
6.5.3 Setup debugger options
-
Install the Renesas Debug extension to VSCode. (Refer to section 2.1 Setup VS Code).
-
Import the built G4MH and CR52 projects into VS Code.
-
In order to debug a project using VS Code and the Renesas Debug extension, a configuration file called launch.json needs to be created.
-
Select [Run and Debug] view.
.png)
-
Select [Create a launch.json file] link.
.png)
-
Select [Renesas Amalgamator].
.png)
-
A launch.json file will be created inside .vscode folder with some default settings.
-
In the launch.json file, fill in the following fields
launch.json
{
  // Use IntelliSense to learn about possible attributes.
  // Hover to view descriptions of existing attributes.
  // For more information, visit: https://go.microsoft.com/fwlink/?linkid=830387
  "version": "0.2.0",
  "configurations": [
    {
      "type": "renesas-amalgamator",
      "request": "launch",
      "name": "<display name of the configuration>",
      "children": [
        {
          //RH850 Core G4MH
          "name": "<display name of core>",
          "debugAdapterRuntime": "node",
          "arguments": {
            "type": "renesas",
            "request": "launch",
            "program": "<absolute path to project's executable file (.x, .elf,...)>",
            "target": {
              "deviceFamily": "RCAR",
              "device": "<CPU of the device>",
              "debuggerType": "<type of the debugger>"
            }
          }
        },
        {
          //Core Arm (CA/CR)
          "name": "<display name of core>",
          "debugAdapterRuntime": "node",
          "arguments": {
            "type": "renesas",
            "request": "launch",
            "program": "<absolute path to project's executable file (.x, .elf,...)>",
            "target": {
              "deviceFamily": "RCAR",
              "device": "<CPU of the device>",
              "debuggerType": "<type of the debugger>"
            }
          }
        }
      ]
    }
  ]
}
Example configuration file launch.json:
Example launch.json
{ // Use IntelliSense to learn about possible attributes. // Hover to view descriptions of existing attributes. // For more information, visit: https://go.microsoft.com/fwlink/?linkid=830387 "version": "0.2.0", "configurations": [ { "type": "renesas-amalgamator", "request": "launch", "name": "Debug Multiple", "children": [ { //RH850 Core G4MH "name": "G4MH", "debugAdapterRuntime": "node", "arguments": { "type": "renesas", "request": "launch", "program": "${cwd}/G4MH/HardwareDebug/G4MH_Debug.x", "target": { "deviceFamily": "RCAR", "device": "R8A779F0", "debuggerType": "E2RH850", "serverParameters": ["-ulpdType=","15","-uJTagClockFreq=","Default","-setOptJtagLpd=","-uocdID=","0000000000000000000000000000000000000000000000000000000000000000","-ucustomerID=","0000000000000000000000000000000000000000000000000000000000000000","-uneedAuthentication=","0","-uWorkRamAddress=","0x0","-uTraceEnable=","PE0|PE1","-uTraceClock=","PE0|400|PE1|400","-uUseSyncTrace=","1","-uSyncTraceStandard=","0","-uTraceCore=","PE0","--gdbVersion=","7.2"] }, } }, { //Core Arm (CA/CR) "name": "ARM", "debugAdapterRuntime": "node", "arguments": { "type": "renesas", "request": "launch", "program": "${cwd}/BAREMETAL_CR52/Debug/MR_BAREMETAL_CR52.axf", "target": { "deviceFamily": "RCAR", "debuggerType": "E2RARM", "device": "R8A779F0_CR52", "serverParameters": ["-uInteface=", "JTAG", "-w", "0", "-uWorkRamAddress=", "0x0", "--gdbVersion=", "7.2"] }, } } ] } ] } -
6.5.4 Start debugging
In the select box RUN AND DEBUG (ctrl+shift+D) select "Debug Multiple" option then click [Start Debugging] (F5) button.
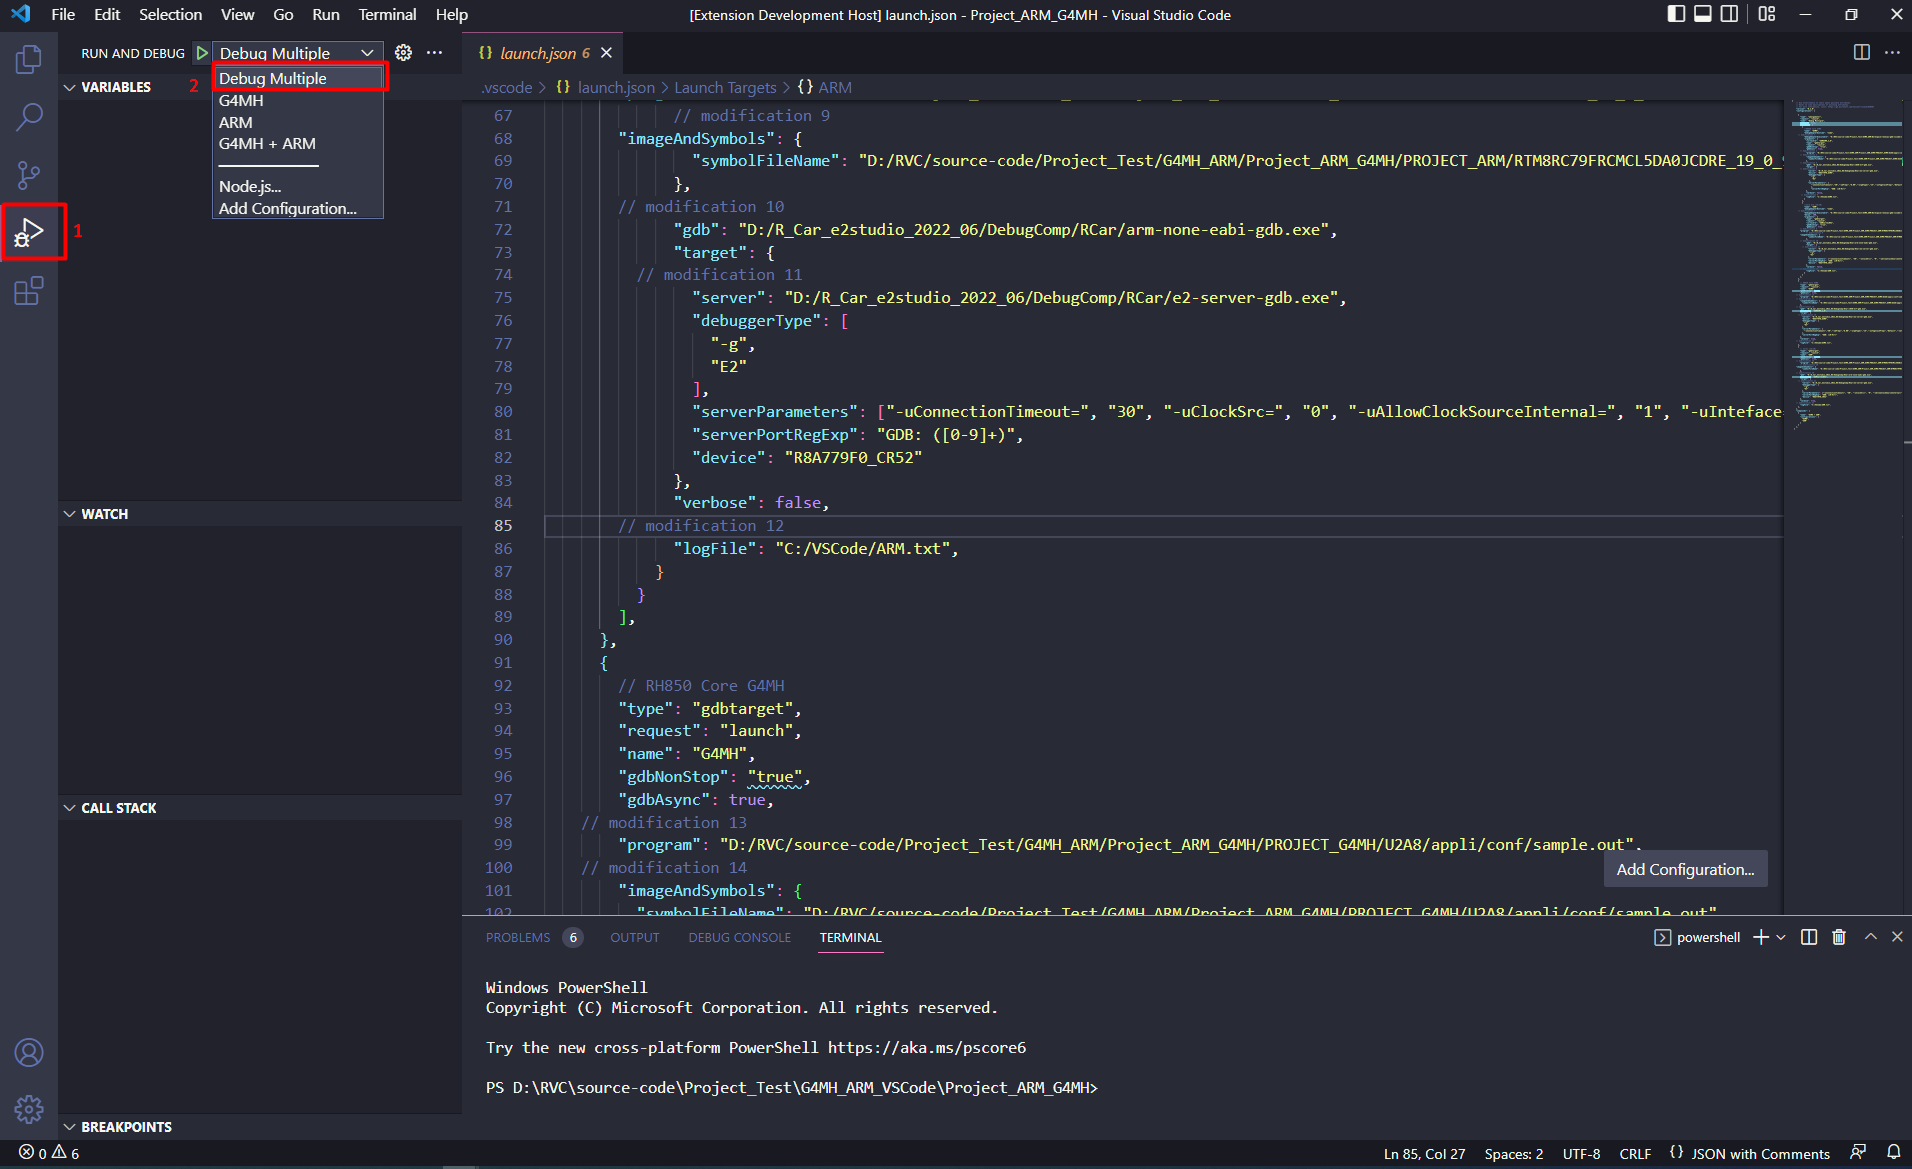
Waiting for program to launch and debug successfully.
6.6 Setup environment and debug multi-core ARM device RCAR-S4 (CA55: CPU0 to CPU7)
6.6.1 Overview
Support debug multicore with CA55 (CPU0 → CPU7) for RCAR S4 device on VS code.
This item describes how to connect the S4 board to the PC host, install an extension, import the project, configure file launch.json, run and debug.
6.6.2 Connecting S4 board to PC host
We need to connect between board and PC to debug multicore ARM on VSCode as shown in the picture below:
Select the mode for S4 Spider Configuration tool -Renesas as shown below:
6.6.3 Setup debugger options
-
Install the Renesas Debug extension to VSCode. (Refer to section 2.1 Setup VS Code)
-
Import the built CA55 projects into VS Code.
-
In order to debug a project using VS Code and the Renesas Debug extension, a configuration file called launch.json needs to be created.
-
Select [Run and Debug] view.
-
Select [Create a launch.json file] link.
-
Select [Renesas Amalgamator].
-
A launch.json file will be created inside .vscode folder with some default settings.
-
In the launch.json file, fill in the following fields.
launch.json
{
  // Use IntelliSense to learn about possible attributes.
  // Hover to view descriptions of existing attributes.
  // For more information, visit: https://go.microsoft.com/fwlink/?linkid=830387
  "version": "0.2.0",
  "configurations": [
    {
      "type": "renesas",
      "request": "launch",
      "name": "<display name of the configuration>",
      "program": "<absolute path to project's executable file (.x, .elf,...)>",
      "target": {
        "debuggerType": "<type of the debugger>",
        "device": "<CPU of the device>",
        "deviceFamily": "RCAR",
      }
    }
  ]
}
Example configuration file launch.json:
Example: launch.json
{ // Use IntelliSense to learn about possible attributes. // Hover to view descriptions of existing attributes. // For more information, visit: https://go.microsoft.com/fwlink/?linkid=830387 "version": "0.2.0", "configurations": [ { "type": "renesas", "request": "launch", "name": "RCAR Multicore CA55", "program": "${cwd}/Debug/MR_BAREMETAL_CA55.axf", "target": { "deviceFamily": "RCAR", "device": "R8A779F0_CA55", "debuggerType": "E2ARM", "serverParameters": ["-uInteface=", "JTAG", "-w", "0", "-uConnectMode=", "RESET", "-uWorkRamAddress=", "0x0", "-uSyncMode=", "async", "--gdbVersion=", "7.2"] }, }, ] } -
6.6.4 Start debugging
After setting up debugger options, a debug session can be started by selecting the created configuration and click [Start Debugging] button in [Run and Debug] view, or press [F5].
Waiting for the program to launch and debug successfully.
6.7 Setup environment and debug multi-core G4MH device RCAR-S4 or device RH850
6.7.1 Overview
Support debug multicore with multi-core G4MH for RCAR S4 device (PE0, PE1) or device RH850 (PE0,PE1,PE2,PE3) on VS code.
This item describes how to connect the S4 board or RH850 board to the PC host, install an extension, import the project, configure file launch.json, run and debug.
6.7.2 Connecting S4 board to PC host
We need to connect between board and PC to debug multicore ARM on VSCode.
Select the mode for S4 Spider Configuration tool -Renesas if debug with RCAR S4 device.
6.7.3 Setup debugger options
-
Install the Renesas Debug extension to VSCode. (Refer to section 2.1 Setup VS Code)
-
Import the built CA55 projects into VS Code.
-
In order to debug a project using VS Code and the Renesas Debug extension, a configuration file called launch.json needs to be created.
-
Select [Run and Debug] view.
-
Select [Create a launch.json file] link.
-
Select [Renesas Amalgamator].
-
A launch.json file will be created inside .vscode folder with some default settings.
-
In the launch.json file, fill in the following fields.
launch.json
{
  // Use IntelliSense to learn about possible attributes.
  // Hover to view descriptions of existing attributes.
  // For more information, visit: https://go.microsoft.com/fwlink/?linkid=830387
  "version": "0.2.0",
  "configurations": [
    {
      "type": "renesas",
      "request": "launch",
      "name": "<display name of the configuration>",
      "program": "<absolute path to project's executable file (.x, .elf,...)>",
      "target": {
        "deviceFamily": "<the device family name Eg.RCAR>",
        "device": "<CPU of the device>",
        "debuggerType": "<type of the debugger>"
      }
    }
  ]
}
Example configuration file launch.json:
Example: launch.json multi-core G4MH for RCAR S4 device (PE0, PE1)
{
  // Use IntelliSense to learn about possible attributes.
  // Hover to view descriptions of existing attributes.
  // For more information, visit: https://go.microsoft.com/fwlink/?linkid=830387
  "configurations": [
    {
      "name": "G4MH",
      "type": "renesas",
      "request": "launch",
      "hardwareBreakpoint": true,
      "program": "${cwd}/HardwareDebug/G4MH_Debug.x",
      "target": {
        "deviceFamily": "RCAR",
        "device": "R8A779F0",
        "debuggerType": "E2RH850",
        "serverParameters": ["-ulpdType=","15","-uJTagClockFreq=","Default","-setOptJtagLpd=","-uocdID=","0000000000000000000000000000000000000000000000000000000000000000","-ucustomerID=","0000000000000000000000000000000000000000000000000000000000000000","-uneedAuthentication=","0","-uWorkRamAddress=","0x0","-uTraceEnable=","PE0|PE1","-uTraceClock=","PE0|400|PE1|400","-uUseSyncTrace=","1","-uSyncTraceStandard=","0","-uTraceCore=","PE0","--gdbVersion=","7.2"]
      }
    }
  ]
}
Example: launch.json multi-core G4MH for device RH850 (PE0,PE1,PE2,PE3)
{ // Use IntelliSense to learn about possible attributes. // Hover to view descriptions of existing attributes. // For more information, visit: https://go.microsoft.com/fwlink/?linkid=830387 "configurations": [ { "name": "RH850", "type": "renesas", "request": "launch", "hardwareBreakpoint": true, "program": "${cwd}/HardwareDebug/Project_RH850.x", "target": { "deviceFamily": "RH850", "device": "R7F702Z19A", "debuggerType": "E2RH850", "serverParameters": ["-ulpdType=", "15", "-uJTagClockFreq=", "Default", "-setOptJtagLpd=", "0", "-w", "1", "-usupplyVoltage=", "0", "-uocdID=", "FFFFFFFFFFFFFFFFFFFFFFFFFFFFFFFFFFFFFFFFFFFFFFFFFFFFFFFFFFFFFFFF", "-usvrParameter=", "|||||||", "-uMultiDeviceSync=", "0", "-usupplyVoltageASP=", "0", "-usetDebugContext=", "0", "-uTraceClock=", "PE0|400|PE1|400|PE2|400|PE3|400", "-uUseSyncTrace=", "0", "-uTraceCore=", "PE0", "--gdbVersion=", "7.2"] } } ] } -
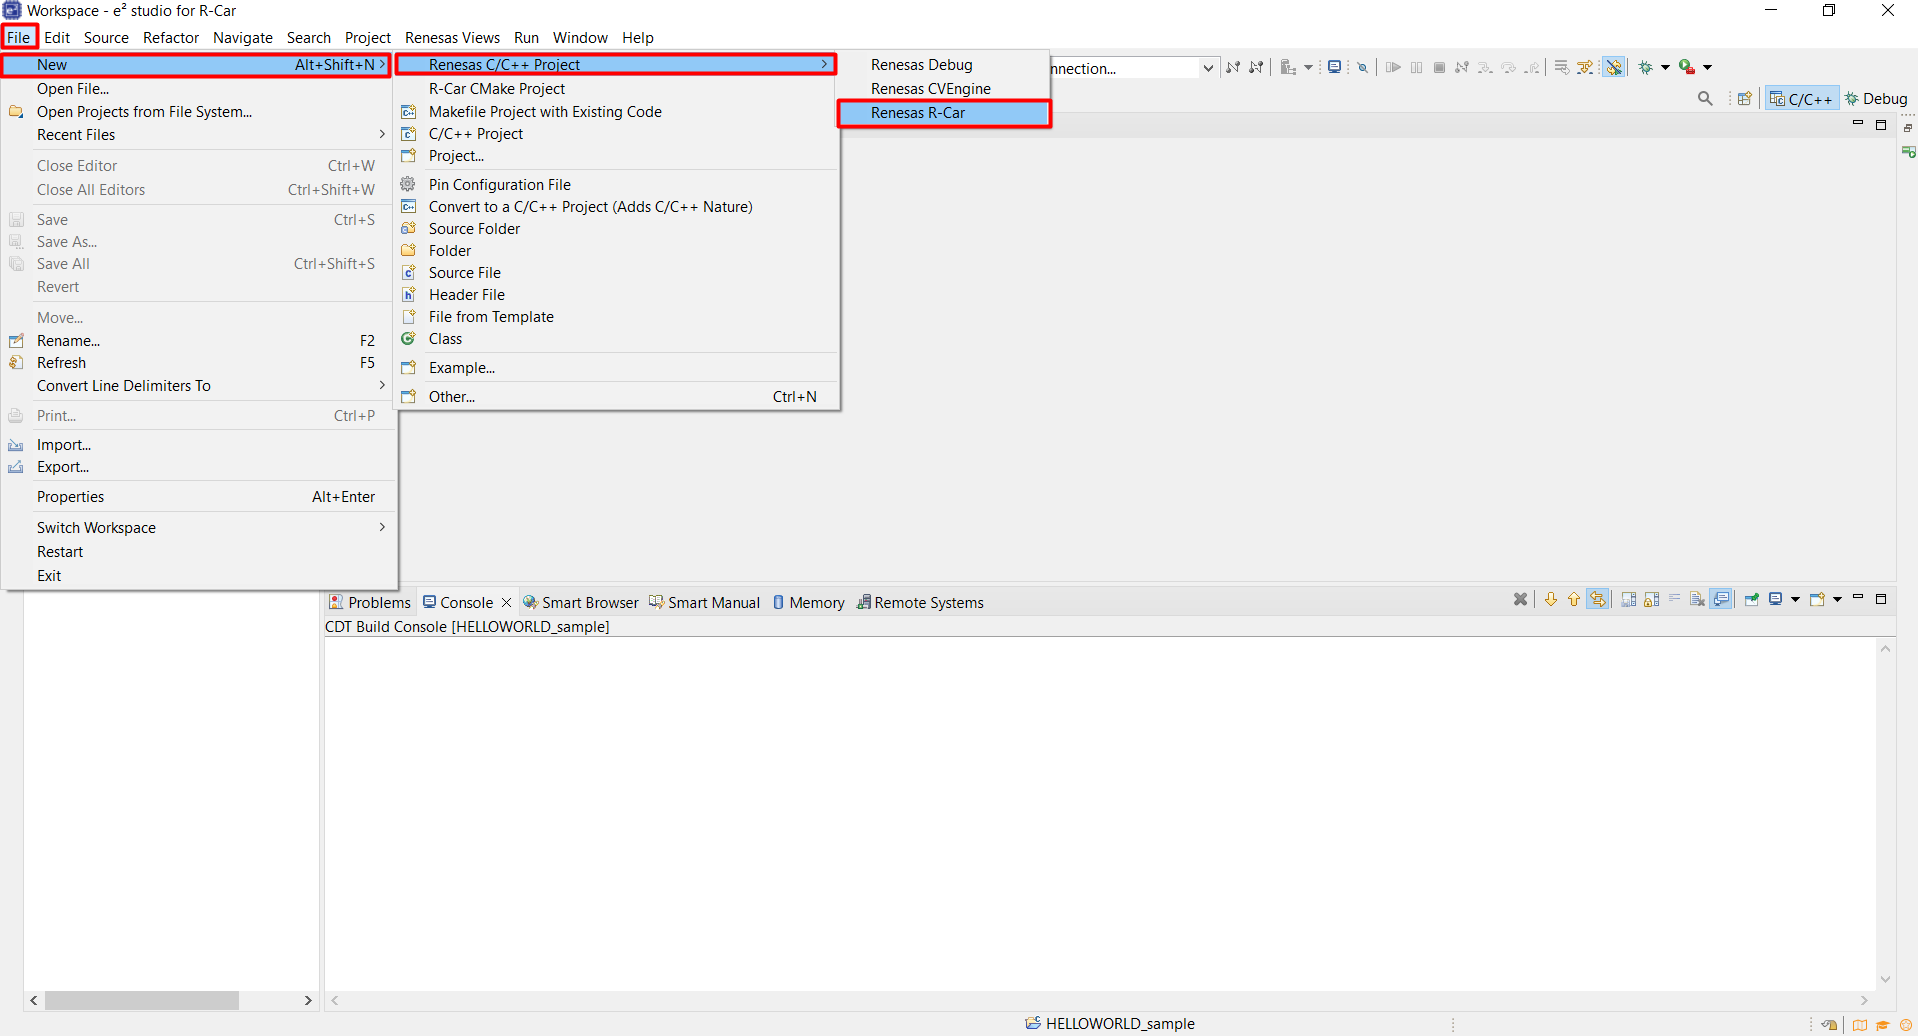
6.8 Create and build G4MH project on R-Car SDK
6.8.1 Create G4MH project
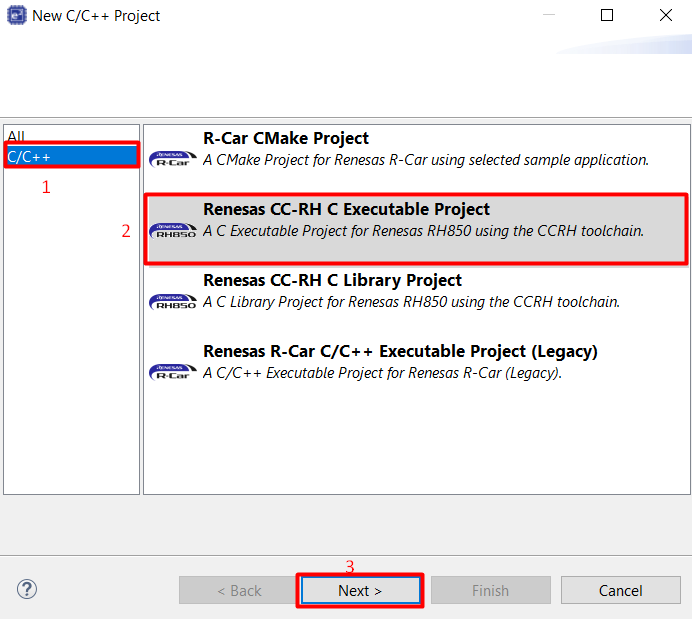
From the menu bar select File > New > Renesas C/C++ Project > Renesas R-Car
Select R-Car project template "Renesas CC-RH C Executable Project", then click Next button
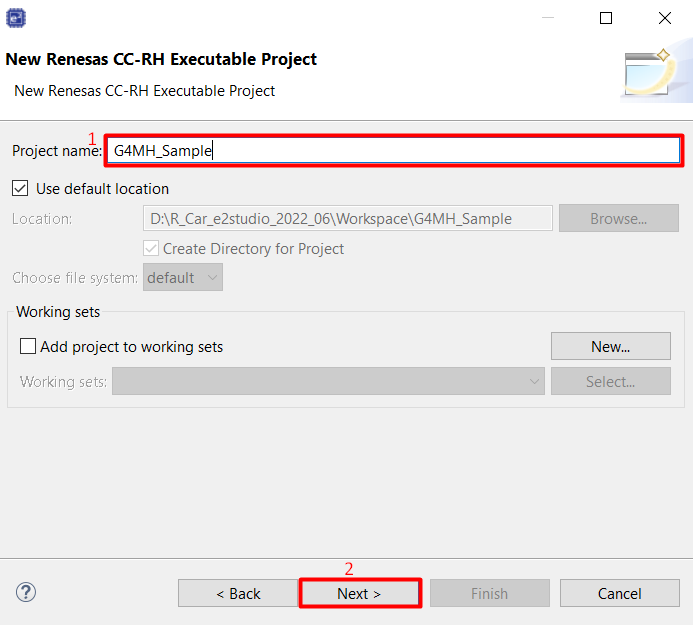
Input the project name then click Next button.
In New Renesas CC-RH Executable Project select Create Hardware Debug Configuration "E2 (RH850)", then click Finish button
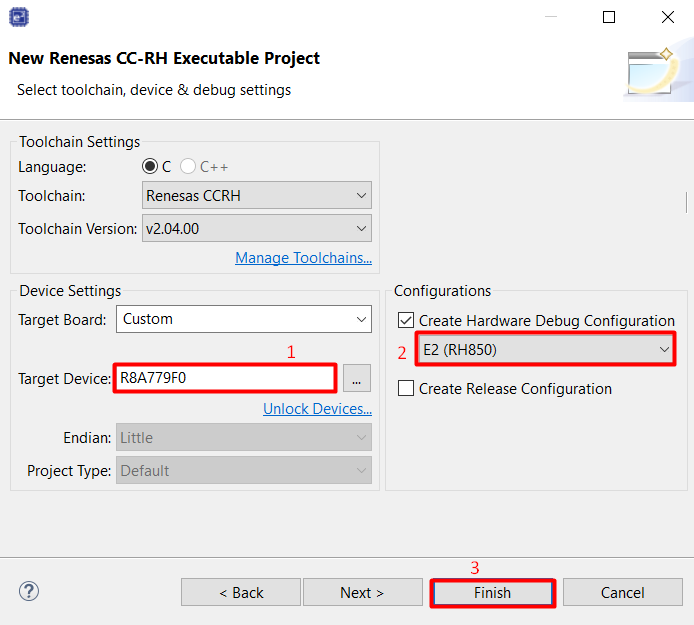
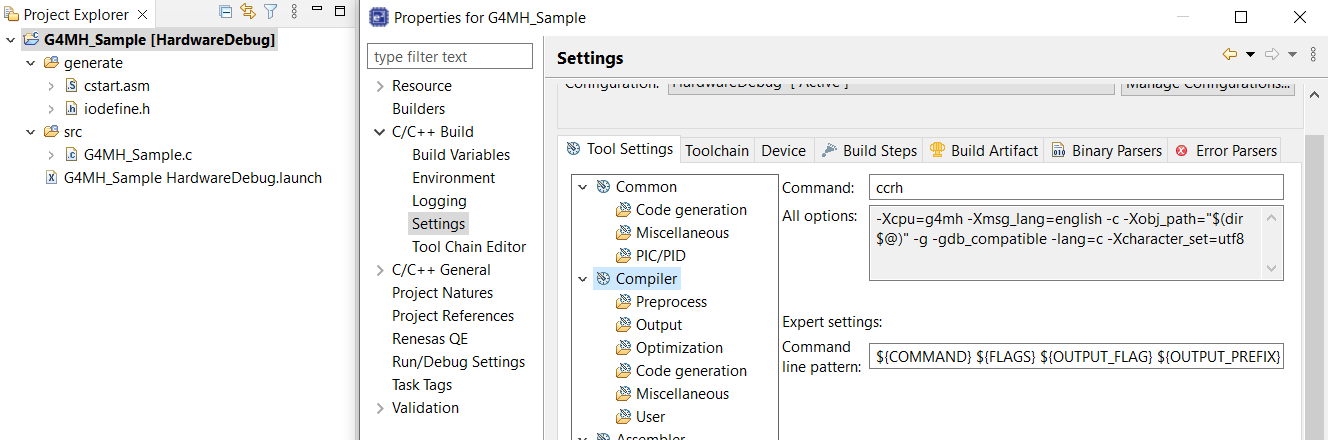
Projects will be created.
6.8.2 Build project G4MH
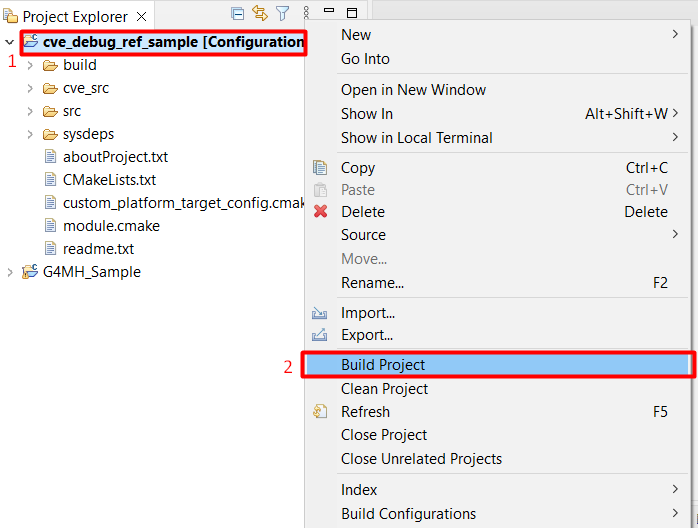
Right-click on the project and select "Build Project"

Or can click on the "Build" icon on the toolbar.

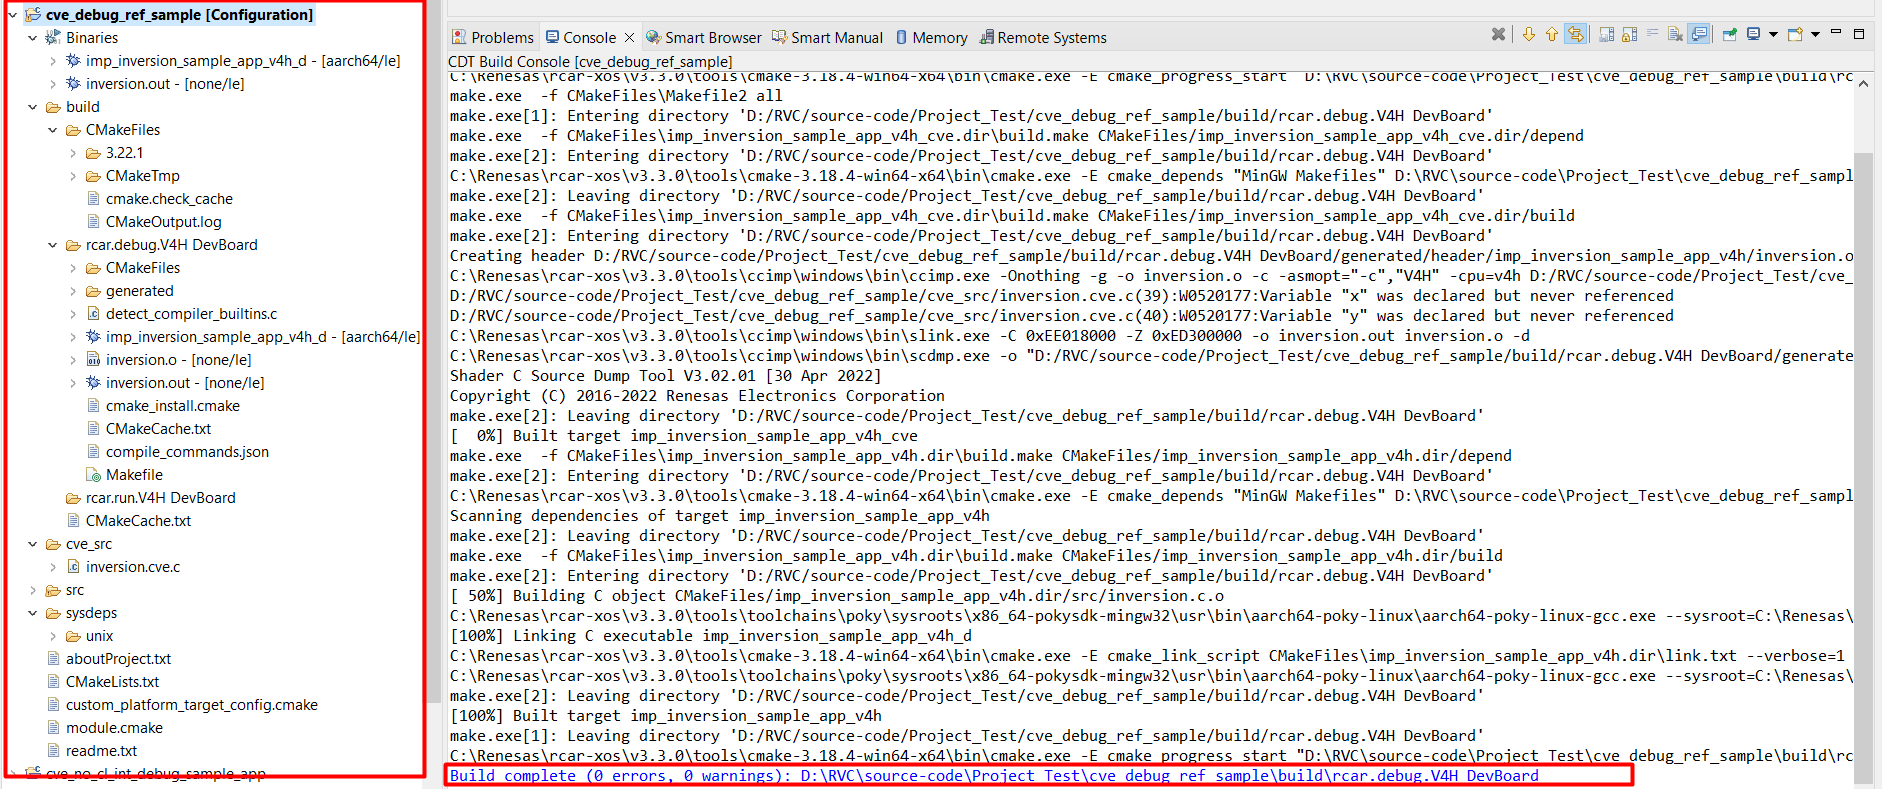
Project after built.
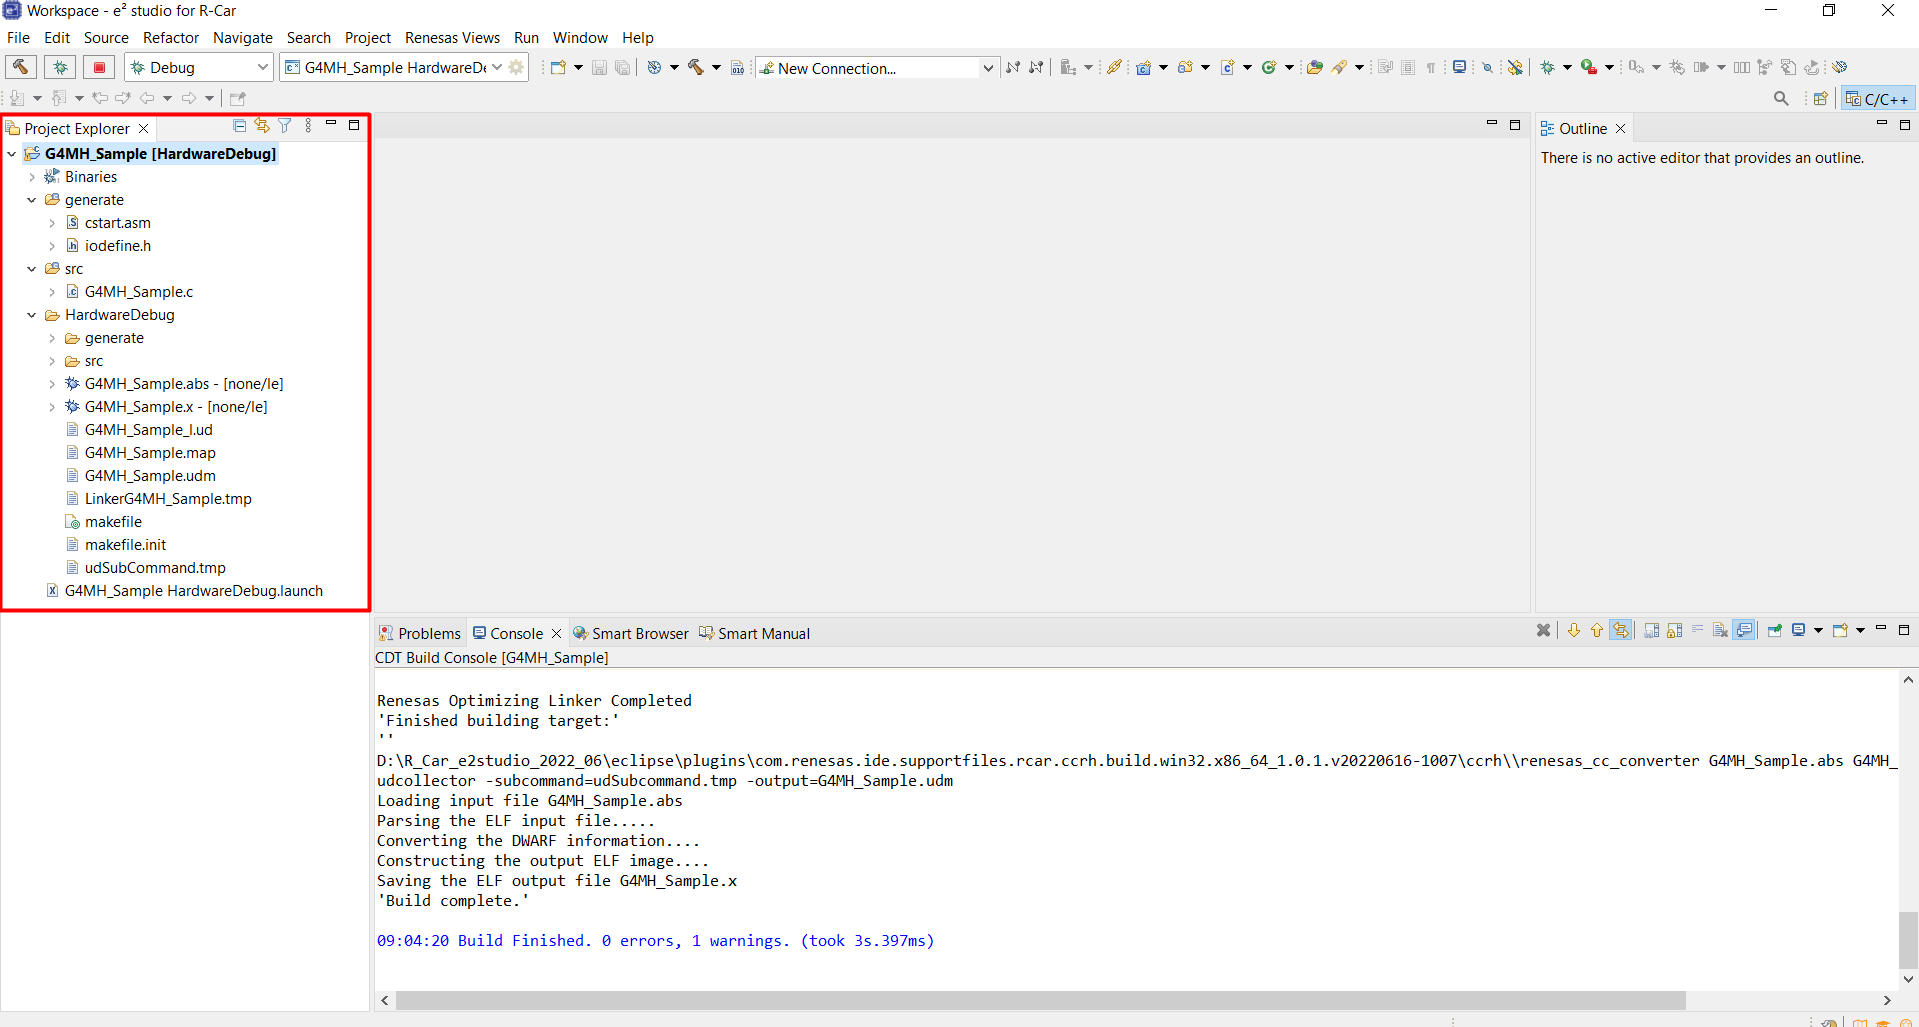
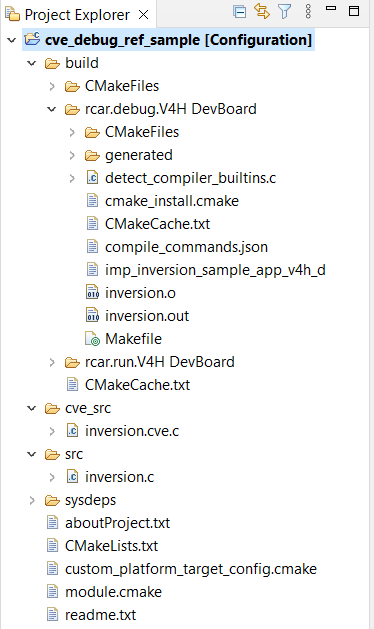
6.9 Build CVEngine project on R-Car SDK
6.9.1 Build CVEngine project on R-Car SDK
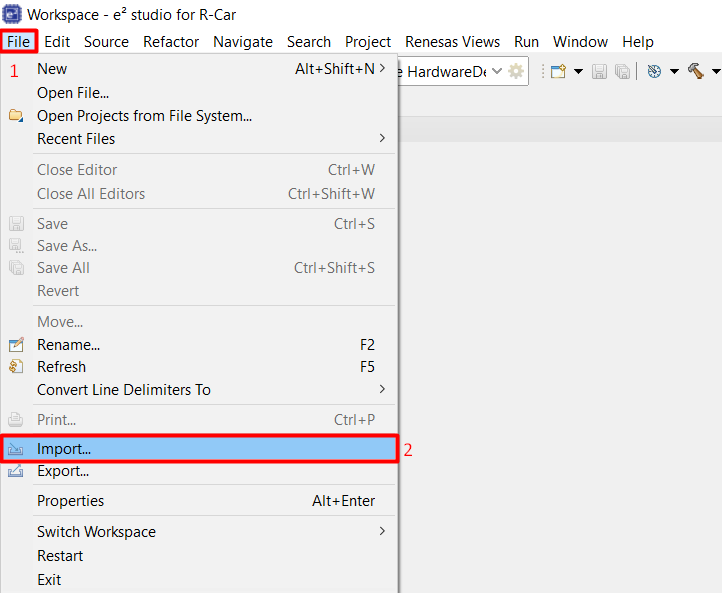
From the menu bar select File > Import…
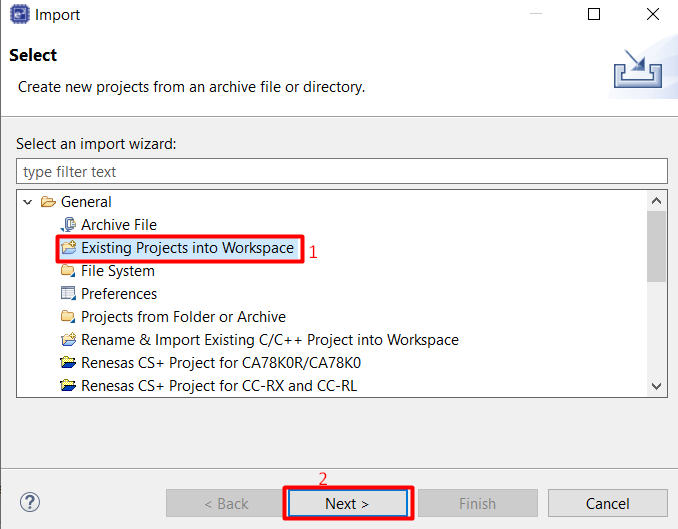
Select Dialog Import "Existing Projects into Workspace", then click Next button
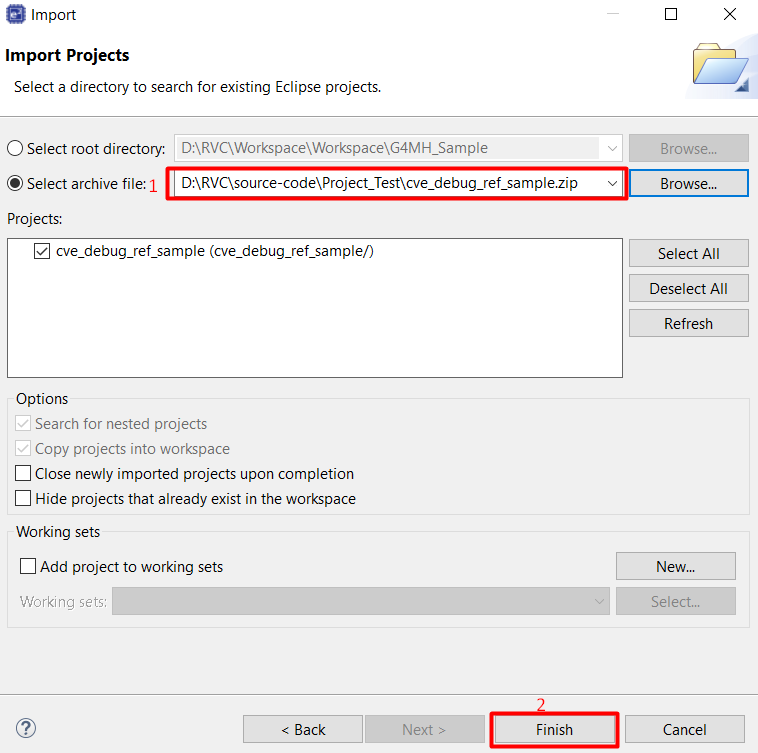
Select Dialog Import "Select archive file" > Select Browse… > Select the project you want to build in your directory, then click Finish button.
Project after imported
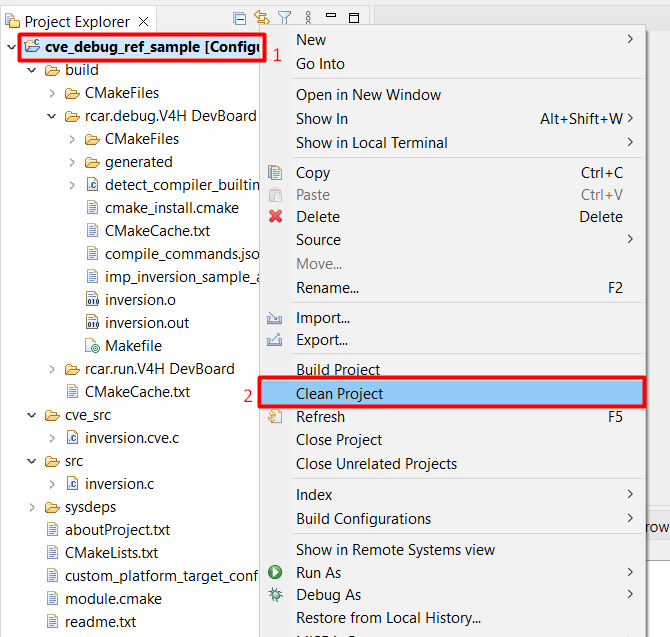
6.9.2 Build project
Right-click on the project and select "Clean Project"
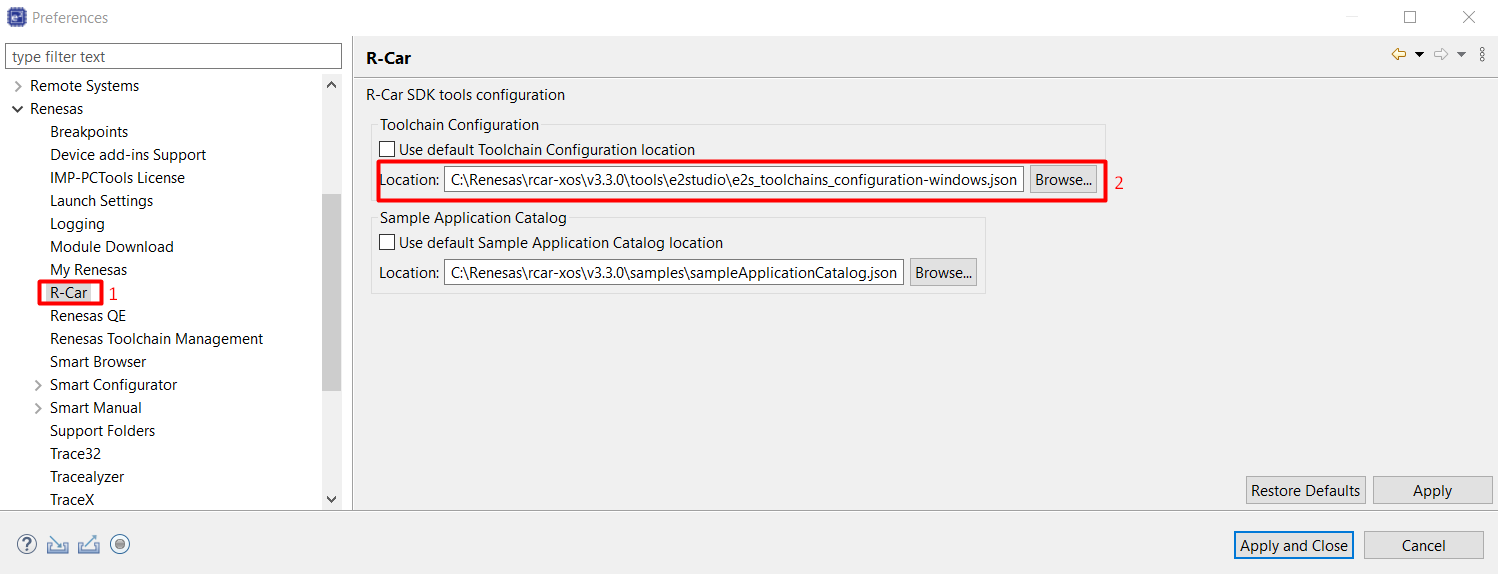
Check Toolchain Configuration: From the menu bar select File > Window > Preferences
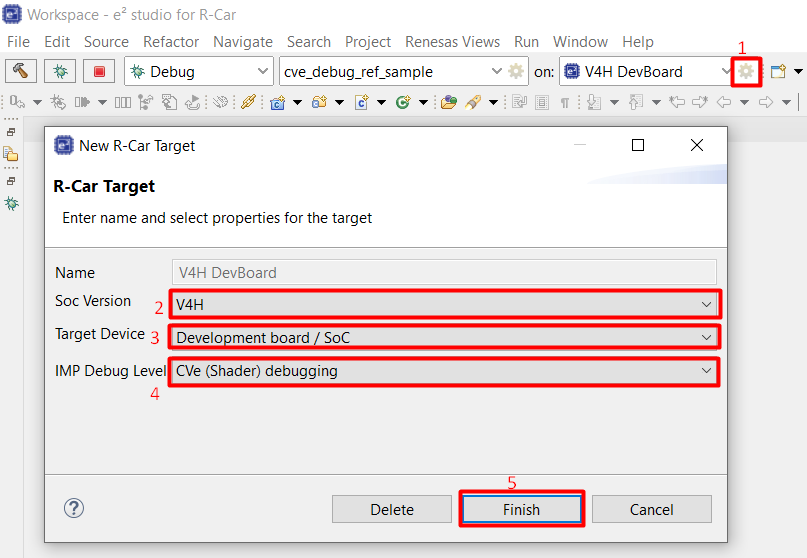
Select Launch Configuration (the name of the project is imported), and Launch Target "V4H DevBoard" on the toolbar.

Select "Edit" icon of Launch Target "V4H DevBoard" on the toolbar, then select Target Device "Development board / SoC" and IMP Debug Level "CVe (Shader debugging)", then click Finish button.
Right-click on the project and select "Build Project"
Project after built
6.10 How to specify custom GDB server parameters
Renesas VS Code extensions will automatically inject default values required to be passeed to GDB server in debug session. On the other hand, it is possible to override GDB server parameters passed in debug session. For this purpose, "serverParameters" option could be used to pass the custom GDB server parameters.
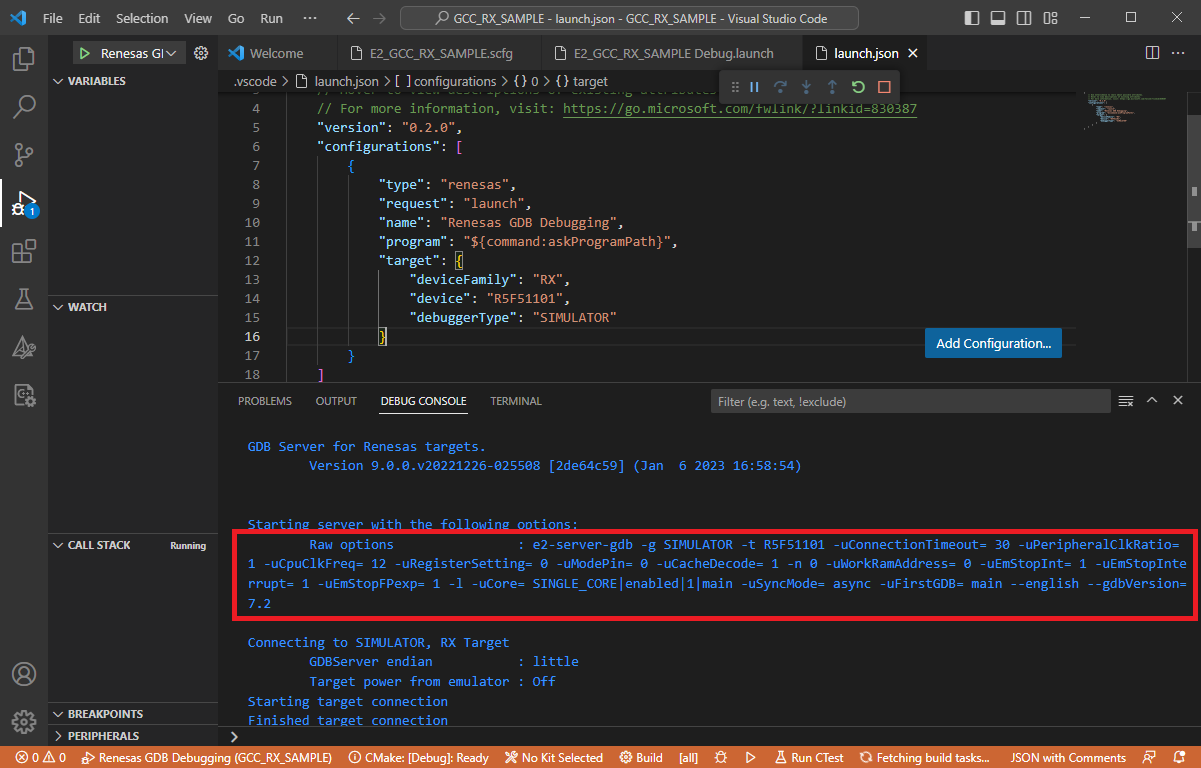
First, developer need to find the device family/device specific parameters and their default values. It could accessed by starting debug session started with a default configuration like shown below in VS Code. After the start of the debug session, the server parameters shown in the flow of [DEBUG CONSOLE] panel, with line starting with [Raw options] text.
Then, the raw options list needs to be converted to "serverParameters" array. The example for this operation is shown below:
Raw options |
-g SIMULATOR -t R5F51101 -uConnectionTimeout= 30 -uPeripheralClkRatio= 1 -uCpuClkFreq= 12 -uRegisterSetting= 0 -uModePin= 0 -uCacheDecode= 1 -n 0 -uWorkRamAddress= 0 -uEmStopInt= 1 -uEmStopInterrupt= 1 -uEmStopFPexp= 1 -l -uCore= SINGLE_CORE|enabled|1|main -uSyncMode= async -uFirstGDB= main --english --gdbVersion= 7.2 |
"serverParameters" array |
["-uConnectionTimeout=", "30", "-uPeripheralClkRatio=", "1", "-uCpuClkFreq=", "12", "-uRegisterSetting=", "0", "-uModePin=", "0", "-uCacheDecode=", "1", "-n", "0", "-uWorkRamAddress=", "0", "-uEmStopInt=", "1", "-uEmStopInterrupt=", "1", "-uEmStopFPexp=", "1", "-l", "-uSyncMode=", "async", "-uFirstGDB=", "main", "--english", "--gdbVersion=", "7.2"] |
Note: Please note that -g parameter which is defined as debuggerType, and -t parameter which is defined as device on target parameters of launch configuration; and -uCore= parameter which is injected by Renesas VS Code Extension itself removed from the list and they should not be passed in "serverParameters" array.
At last, the parameter array could be passed via "serverParameters" in "target" configuration.
{
  // Use IntelliSense to learn about possible attributes.
  // Hover to view descriptions of existing attributes.
  // For more information, visit: https://go.microsoft.com/fwlink/?linkid=830387
  "version": "0.2.0",
  "configurations": [
    {
      "type": "renesas",
      "request": "launch",
      "name": "Renesas GDB Debugging",
      "program": "${command:askProgramPath}",
      "target": {
        "deviceFamily": "RX",
        "device": "R5F51101",
        "debuggerType": "SIMULATOR",
        "serverParameters": ["-uConnectionTimeout=", "30", "-uPeripheralClkRatio=", "1", "-uCpuClkFreq=", "12", "-uRegisterSetting=", "0", "-uModePin=", "0", "-uCacheDecode=", "1", "-n", "0", "-uWorkRamAddress=", "0", "-uEmStopInt=", "1", "-uEmStopInterrupt=", "1", "-uEmStopFPexp=", "1", "-l", "-uSyncMode=", "async", "-uFirstGDB=", "main", "--english", "--gdbVersion=", "7.2"]
      }
    }
  ]
}
It is not required to pass all the parameters in the launch.json file while overriding the parameters. Developer can choose necessary parameters and override their values by passing them with their new values through "serverParameters", parameters that do not require value change does not need to be defined again.
For example, to only change -uConnectionTimeout= parameter the following configration could be used:
{
  // Use IntelliSense to learn about possible attributes.
  // Hover to view descriptions of existing attributes.
  // For more information, visit: https://go.microsoft.com/fwlink/?linkid=830387
  "version": "0.2.0",
  "configurations": [
    {
      "type": "renesas",
      "request": "launch",
      "name": "Renesas GDB Debugging",
      "program": "${command:askProgramPath}",
      "target": {
        "deviceFamily": "RX",
        "device": "R5F51101",
        "debuggerType": "SIMULATOR",
        "serverParameters": ["-uConnectionTimeout=", "120"]
      }
    }
  ]
}
Alternatively, it is also possible for to use a project created and built in e2 studio to get the GDB server parameters. For this purpose, start a debug session in e2 studio, then, the GDB server parameters will be displayed in [Console] with line starting with [Raw options] text.

6.11 Common issues
6.11.1 Setup environment when using renesas-amalgamator
When debugging with renesas-amalgamator users need to install Node.js. You can download and install Node.js from Node v16.20.0 (LTS).
6.11.2 Debugging failed with message: Don’t know how to attach. Try "help target".
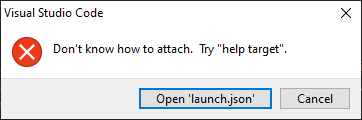
If the debug session failed with the error message [Don’t know how to attach. Try "help target".], then open the launch.json file and control the serverParameters array. There shouldn’t be any -uCore= parameter in the "serverParameters" array. Any definition of -uCore= needs to be removed from the "serverParameters" array.
7. Website and Support
Renesas Electronics Website: http://www.renesas.com/
Inquiries: http://www.renesas.com/contact/
7.1 Web Access and Privacy Policy
Collection of User Information Applications included in this package may access the Renesas Web site. In such cases, the following information is collected and recorded to Renesas server as a log.
-
Date and time of access
-
Access to URLs and files
-
The unique certificate number linked to your account for MyRenesas (only when you log in to MyRenesas)
-
The unique identification number linked to cookies for the Web browser (for cookies, refer to the privacy policy page stated below).
Logs are managed based on our privacy policy.
Refer to our privacy policy on the following Web page.
Privacy Policy:
All trademarks and registered trademarks are the property of their respective owners.
Notice
-
Descriptions of circuits, software and other related information in this document are provided only to illustrate the operation of semiconductor products and application examples. You are fully responsible for the incorporation or any other use of the circuits, software, and information in the design of your product or system. Renesas Electronics disclaims any and all liability for any losses and damages incurred by you or third parties arising from the use of these circuits, software, or information.
-
Renesas Electronics hereby expressly disclaims any warranties against and liability for infringement or any other claims involving patents, copyrights, or other intellectual property rights of third parties, by or arising from the use of Renesas Electronics products or technical information described in this document, including but not limited to, the product data, drawings, charts, programs, algorithms, and application examples.
-
No license, express, implied or otherwise, is granted hereby under any patents, copyrights or other intellectual property rights of Renesas Electronics or others.
-
You shall be responsible for determining what licenses are required from any third parties, and obtaining such licenses for the lawful import, export, manufacture, sales, utilization, distribution or other disposal of any products incorporating Renesas Electronics products, if required.
-
You shall not alter, modify, copy, or reverse engineer any Renesas Electronics product, whether in whole or in part. Renesas Electronics disclaims any and all liability for any losses or damages incurred by you or third parties arising from such alteration, modification, copying or reverse engineering.
-
Renesas Electronics products are classified according to the following two quality grades: “Standard” and “High Quality”. The intended applications for each Renesas Electronics product depends on the product’s quality grade, as indicated below.
-
"Standard": Computers; office equipment; communications equipment; test and measurement equipment; audio and visual equipment; home electronic appliances; machine tools; personal electronic equipment; industrial robots; etc.
-
"High Quality": Transportation equipment (automobiles, trains, ships, etc.); traffic control (traffic lights); large-scale communication equipment; key financial terminal systems; safety control equipment; etc.
Unless expressly designated as a high reliability product or a product for harsh environments in a Renesas Electronics data sheet or other Renesas Electronics document, Renesas Electronics products are not intended or authorized for use in products or systems that may pose a direct threat to human life or bodily injury (artificial life support devices or systems; surgical implantations; etc.), or may cause serious property damage (space system; undersea repeaters; nuclear power control systems; aircraft control systems; key plant systems; military equipment; etc.). Renesas Electronics disclaims any and all liability for any damages or losses incurred by you or any third parties arising from the use of any Renesas Electronics product that is inconsistent with any Renesas Electronics data sheet, user’s manual or other Renesas Electronics document.
-
-
No semiconductor product is absolutely secure. Notwithstanding any security measures or features that may be implemented in Renesas Electronics hardware or software products, Renesas Electronics shall have absolutely no liability arising out of any vulnerability or security breach, including but not limited to any unauthorized access to or use of a Renesas Electronics product or a system that uses a Renesas Electronics product. RENESAS ELECTRONICS DOES NOT WARRANT OR GUARANTEE THAT RENESAS ELECTRONICS PRODUCTS, OR ANY SYSTEMS CREATED USING RENESAS ELECTRONICS PRODUCTS WILL BE INVULNERABLE OR FREE FROM CORRUPTION, ATTACK, VIRUSES, INTERFERENCE, HACKING, DATA LOSS OR THEFT, OR OTHER SECURITY INTRUSION (“Vulnerability Issues”). RENESAS ELECTRONICS DISCLAIMS ANY AND ALL RESPONSIBILITY OR LIABILITY ARISING FROM OR RELATED TO ANY VULNERABILITY ISSUES. FURTHERMORE, TO THE EXTENT PERMITTED BY APPLICABLE LAW, RENESAS ELECTRONICS DISCLAIMS ANY AND ALL WARRANTIES, EXPRESS OR IMPLIED, WITH RESPECT TO THIS DOCUMENT AND ANY RELATED OR ACCOMPANYING SOFTWARE OR HARDWARE, INCLUDING BUT NOT LIMITED TO THE IMPLIED WARRANTIES OF MERCHANTABILITY, OR FITNESS FOR A PARTICULAR PURPOSE.
-
When using Renesas Electronics products, refer to the latest product information (data sheets, user’s manuals, application notes, “General Notes for Handling and Using Semiconductor Devices” in the reliability handbook, etc.), and ensure that usage conditions are within the ranges specified by Renesas Electronics with respect to maximum ratings, operating power supply voltage range, heat dissipation characteristics, installation, etc. Renesas Electronics disclaims any and all liability for any malfunctions, failure or accident arising out of the use of Renesas Electronics products outside of such specified ranges.
-
Although Renesas Electronics endeavors to improve the quality and reliability of Renesas Electronics products, semiconductor products have specific characteristics, such as the occurrence of failure at a certain rate and malfunctions under certain use conditions. Unless designated as a high reliability product or a product for harsh environments in a Renesas Electronics data sheet or other Renesas Electronics document, Renesas Electronics products are not subject to radiation resistance design. You are responsible for implementing safety measures to guard against the possibility of bodily injury, injury or damage caused by fire, and/or danger to the public in the event of a failure or malfunction of Renesas Electronics products, such as safety design for hardware and software, including but not limited to redundancy, fire control and malfunction prevention, appropriate treatment for aging degradation or any other appropriate measures. Because the evaluation of microcomputer software alone is very difficult and impractical, you are responsible for evaluating the safety of the final products or systems manufactured by you.
-
Please contact a Renesas Electronics sales office for details as to environmental matters such as the environmental compatibility of each Renesas Electronics product. You are responsible for carefully and sufficiently investigating applicable laws and regulations that regulate the inclusion or use of controlled substances, including without limitation, the EU RoHS Directive, and using Renesas Electronics products in compliance with all these applicable laws and regulations. Renesas Electronics disclaims any and all liability for damages or losses occurring as a result of your noncompliance with applicable laws and regulations.
-
Renesas Electronics products and technologies shall not be used for or incorporated into any products or systems whose manufacture, use, or sale is prohibited under any applicable domestic or foreign laws or regulations. You shall comply with any applicable export control laws and regulations promulgated and administered by the governments of any countries asserting jurisdiction over the parties or transactions.
-
It is the responsibility of the buyer or distributor of Renesas Electronics products, or any other party who distributes, disposes of, or otherwise sells or transfers the product to a third party, to notify such third party in advance of the contents and conditions set forth in this document.
-
This document shall not be reprinted, reproduced or duplicated in any form, in whole or in part, without prior written consent of Renesas Electronics.
-
Please contact a Renesas Electronics sales office if you have any questions regarding the information contained in this document or Renesas Electronics products.
(Note1) “Renesas Electronics” as used in this document means Renesas Electronics Corporation and also includes its directly or indirectly controlled subsidiaries.
(Note2) “Renesas Electronics product(s)” means any product developed or manufactured by or for Renesas Electronics.
(Rev.5.0-1 October 2020)
Corporate Headquarters TOYOSU FORESIA, 3-2-24 Toyosu, Koto-ku, Tokyo 135-0061, Japan www.renesas.com |
Contact information For further information on a product, technology, the most up-to-date version of a document, or your nearest sales office, please visit: www.renesas.com/contact/. |
Trademarks Renesas and the Renesas logo are trademarks of Renesas Electronics Corporation. All trademarks and registered trademarks are the property of their respective owners. |