AI Navigator: How to Implement AI model (RA8)
Overview
This page briefly explains how to implement AI models converted using RUHMI Framework AI Compiler for MCU (hereafter, RUHMI) through Conversion Tool and how to run inference in your AI application.
To implement the converted AI model, follow the steps below:
- Copy RUHMI output files into the src directory
- Implement the AI Model and Inference
- Build & Run
Please refer to them for details for each software.
In general, we recommend using the latest compatible versions of RUHMI (mera) and RA FSP for better AI processing performance.
| RUHMI (mera) release and version | Compatible RA FSP version |
|---|---|
| Release-2026-09-04 (mera-2.7.1+pkg.6102) or later | RA FSP 6.6.0 or later |
| Release-2026-06-19 (mera-2.6.0+pkg.4815) or earlier | RA FSP 6.5.0 or earlier |
To check or update the RUHMI (mera) and RA FSP versions, click one of the following buttons.
Checking the Version
- Open the "Conversion Tool" from AI Navigator or from the e2 studio menu bar.
- Select "Device" and set "Tools" to "RUHMI Framework AI Compiler".
- The version check log will be displayed in the "Console" tab, where you can find the RUHMI (mera) version.
- Click the [Update...] button to update to the latest version.
To use the latest RUHMI (mera) version, update RA FSP to a compatible version listed in the table above.
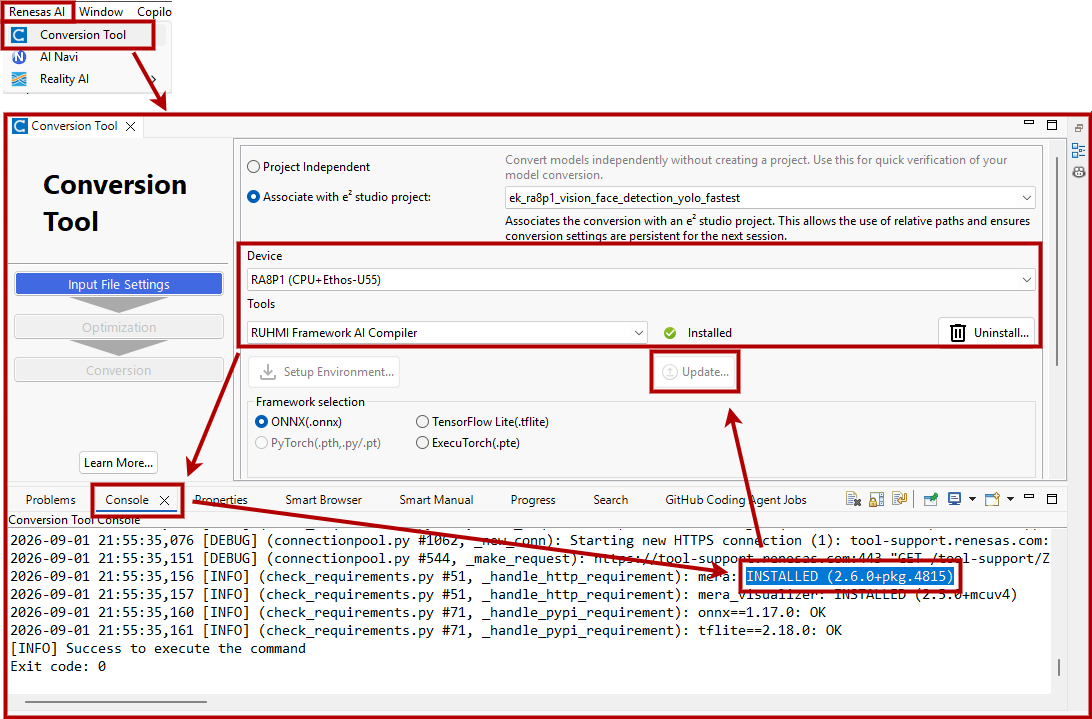
Checking the Version
- Open the "configuration.xml" file in your FSP project.
- Select the "BSP" tab.
- The FSP version will be displayed in the "FSP version:" field.
- Select one of the "FSP versions" already installed in e2 studio.
- If you need to install another version, please refer to "Setup Instructions" > "For existing user that using FSP with e2 studio" on GitHub.
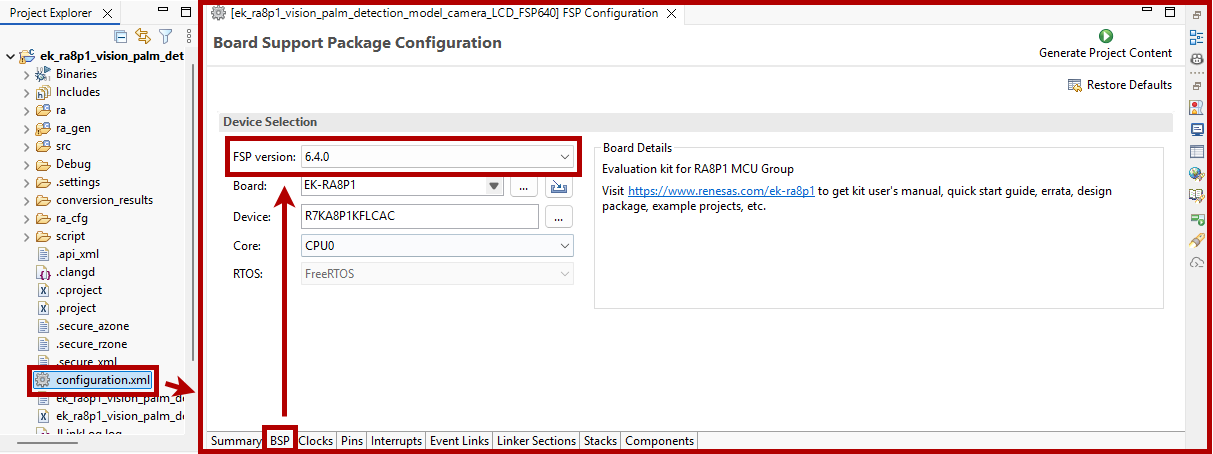
1. Copy RUHMI output files into the src directory
RUHMI outputs the following files including the converted AI models.
- Output directory:
{output_directory}/converted/build/MCU/compilation/src/ - File contents: Click the button that matches your use case.
Please copy these files into your directory, excluding hal_entry.c, model_io_data.h, and model_io_data.c, as they are provided only for reference or validation purposes.
hal_entry.c is an example code, and runs the inference and compares the result with the dummy in model_io_data and actual output.
*If you want to run this hal_entry.c as is, you need to prepare the files for RTT Viewer. Go to this page to download the SEGGER_RTT folder.
.
├── ethosu_common.h
├── hal_entry.c     # HAL entry example
├── model.c     # AI Model file
├── model.h
├── model_io_data.c # dummy AI Model I/O data file
├── model_io_data.h
├── sub_0000_command_stream.c   # Ethos-U55 subgraph generated C source code
├── sub_0000_command_stream.h
├── sub_0000_invoke.c
├── sub_0000_invoke.h
├── sub_0000_io_data.c
├── sub_0000_io_data.h
├── sub_0000_model_data.c
├── sub_0000_model_data.h
├── sub_0000_tensors.c
├── sub_0000_tensors.h
└── ...
Please copy these files into your directory, excluding model_io_data.h and model_io_data.c, as they are provided only for reference or validation purposes.
.
├── compute_sub_0000.c  # CPU subgraph generated C source code, including inference process.
├── compute_sub_0000.h
├── ...
├── kernel_library_int.c    # kernel library if CPU subgraphs are present
├── kernel_library_int.h
├── kernel_library_utils.c
├── kernel_library_utils.h
├── model_io_data.c  # dummy AI Model I/O data file (*)
└── model_io_data.h
(*) Some models may not generate model_io_data.h and model_io_data.c during conversion.
2. Implement the AI Model and Inference
The following explains how to implement AI models and the inference process based on an AI application generated by RUHMI.
Click the button that matches your use case.
- Initialize Memory
- Initialize Ethos-U
- Add AI inference
- Stop Ethos-U
i. Initialize Memory
Initialize the memory used to store data such as the model, if required by your system configuration.To initialize and configure SDRAM, follow the steps below:
- Open configuration.xml in your project.
- Select the BSP tab and open Properties.
- In Properties, go to RA8P1 Family > SDRAM > SDRAM Support, and set the value to Enable to generate the project contents.
ii. Initialize Ethos-U (NPU)
Initialize and start Ethos-U usingRM_ETHOSU_Open() as shown below.
/* Ethos-U Initialization */
fsp_err_t status = FSP_SUCCESS;
status = RM_ETHOSU_Open(&g_rm_ethosu0_ctrl, &g_rm_ethosu0_cfg);
if (status != FSP_SUCCESS) {
    /* Error Handling */
}RM_ETHOSU_Open() fails, check the heap size setting.Click "FSP Configuration" and select "BSP" tab. Then, in RA Common, enter an appropriate value in the "Heap size (bytes)" field.
iii. Add AI inference
You need to prepare the input data in the model input buffer first, and then run the inference.The inference process is executed by
RunModel(), which is defined in model.h.#include "model.h"
...
/* Set the input model to the pointer */
memcpy(GetModelInputPtr_input_0(), model_input0, model_input_SIZE0);
/* Run inference */
RunModel();- GetModelInputPtr_input_0: Model input pointer
- model_input0: Model input buffer
- model_input_SIZE0: Model input size
iv. Stop Ethos-U
After completing the entire inference process, stop Ethos-U withRM_ETHOSU_Close().
/* Stop Ethos */
status = RM_ETHOSU_Close(&g_rm_ethosu0_ctrl);
if (status != FSP_SUCCESS) {
    /* Error Handling */
}- Allocate the I/O buffers
- Allocate the intermediate buffer
- Run inference
i. Allocate the I/O buffers
Opencompute_sub_0000.h and check the size of the input and output buffers./* File: compute_sub_0000.h */
void compute_sub_0000(
/* buffer for intermediate results */
uint8_t* main_storage, /* should provide at least <intermediate_buffers_size> bytes of storage */
/* inputs */
const int8_t <input_name>[XXX],
/* outputs */
int8_t <output_name>[YYY]
); /* Input buffer */
static int8_t input_buffer[XXX];
/* Output buffer */
static int8_t output_buffer[YYY];ii. Allocate the intermediate buffer
Reopencompute_sub_0000.h and check the size of the intermediate buffer./* File: compute_sub_0000.h */
enum BufferSize_sub_0000 {
kBufferSize_sub_0000 = <intermediate_buffers_size>
};#include "compute_sub_0000.h"
...
/* Intermediate buffer */
static uint8_t compute_buffer[kBufferSize_sub_0000];iii. Run inference
Run the inference withcompute_sub_0000().
#include "compute_sub_0000.h"
/* Input buffer */
static int8_t input_buffer[XXX];
/* Output buffer */
static int8_t output_buffer[YYY];
/* Intermediate buffer */
static uint8_t compute_buffer[kBufferSize_sub_0000];
/* Run inference */
compute_sub_0000(compute_buffer, input_buffer, output_buffer);3. Build & Run
Click “Build” in the AI Application view of AI Navigator to build your project.
Then, click “Run on the Board” in the AI Navigator menu and click “Run the AI App”.
Wrapping up
That’s all for the explanation of how to implement the converted AI models into your project.
For more information, please refer to RUHMI GitHub.