You configure the basic settings of the debug tool for each one of the following categories.
(2) [Access Memory While Running]

Current memory mapping status is displayed for each type of memory area by expanding this property.
The [Access width[bits]] property appears only when the memory type is [External Memory].
Select [Access width[bits]] from the drop-down list.
[External Memory] appears only when the selected microcontroller supports the external memory area.
The external memory area can be accessed only when a target board mounted with memory (e.g., RAM) other than flash memory is used for the external memory area. |
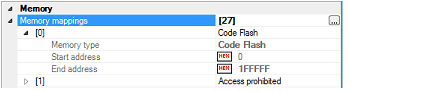
When the selected microcontroller supports multi-core, this property displays the memory mapping status regarding a core (PE) by switching selection between the target cores (see "2.7 Select a Core (PE)"). |
Select whether to perform a verify check when writing to the memory.
Select [Yes] to perform verification after download or when values are changed in the Memory panel/Watch panel (default).
You can configure the memory access while executing a program (the real-time display update function). See "2.10.1.4 Display/modify the memory contents during program execution" for details on the real-time display update function.

Select whether to allow access to the internal RAM area during execution of a program.
Select [Yes] to allow access (default: [No]).
Select whether to automatically update the contents in the Memory panel/Watch panel display during execution of a program.
Select [Yes] to update the display (default).
This property appears only when the [Update display during the execution] property is set to [Yes].
Specify the interval to automatically update the contents in the Memory panel/Watch panel display during execution of a program.
Directly specify the Integer number between 100 and 65500 (rounding up the fractions less than 100ms) (default: [500]).
You can configure the setting of events while executing a program in this category.

Select whether to forcibly pause the execution for events that cannot be set while executing a program or operating the tracer/timer.
For details on the event types that are affected by this property, see "2.17.6.2 Event types that can be set and deleted during execution".
Select [Yes] to set events above while execution (default: [No]).
You can configure the reset operation while executing a program in this category.

Select whether to apply a forced reset when a reset or forced break fails during execution of the user program.
When a reset fails for either of the following reasons, a forced reset is automatically applied.
After a forced reset succeeds, all cores (PE) enter the break state after the reset.
Select [Yes] to apply a forced reset (default: [No]).
You can configure the break function.
See "2.9 Stop Programs (Break)" for details on the break function and this category configuration.
You can configure the trace function.
See "2.12 Collect Execution History of Programs" for details on the trace function and this category configuration.
You can configure the input signal masking.

Select whether to mask the WAIT signal.
Select [Yes] so that the WAIT pin signal is not input to Full-spec emulator (default: [Yes]).
If the [Connecting with target board] property in the [Connect Setting] tab is set to [No], this property is fixed to [Yes] (changes not allowed). |
Select whether to mask the RESET signal.
Select [Yes] so that the RESET pin signal is not input to Full-spec emulator (default: [Yes]).
If the [Connecting with target board] property in the [Connect Setting] tab is set to [No], this property is fixed to [Yes] (changes not allowed). |
This property appears only when the [Mask RESET signal] property is set to [Yes].
Select the type of RESET signal to be masked, from the following drop-down list.
If this property cannot be set as [TARGET RESET signal] in the POD, it is fixed to [TARGET RESET signal and INTERNAL RESET signal] after connection to the debug tool (changing from this setting is not allowed). |
Select whether to mask the PWRGD signal.
Select [Yes] so that the PWRGD pin signal on the target board is not input to Full-spec emulator (default: [Yes]).
If the [Connecting with target board] property in the [Connect Setting] tab is set to [No], this property is fixed to [Yes] (changes not allowed). |
You can configure the control method of a multi-core.

Select the debug mode of a multi-core from the following drop-down list.
The cores that can collect trace data differ depending on the selection of this property. |
|
Synchronizes execution and stop of all cores mounted in the microcontroller (default). For the cores that can collect trace data, [Debug core only] or [All core] can be selected by the [Trace target] property in the [Trace] category on the [Debug Tool Settings] tab of the Property panel. |
|
|
Controls execution and stop of only the core that is selected to be debugged. The core that can collect trace data is only the core selected by the [Trace target] property in the [Trace] category on the [Debug Tool Settings] tab of the Property panel. |
See "2.7 Select a Core (PE)" for selecting the debug target.
This property appears only when the selected microcontroller is a multi-core.
This property can be changed only while all cores are stopped.
Select whether to debug the initial stop state.
Select [Yes] to debug the initial stop state (default: [No]).
See 2.8.2.2 Execute after resetting microcontroller (CPU) (Initial stop debug) for detail.
This property appears only when the selected microcontroller is a multi-core.
This property can be changed only for microcontrollers that support debugging of the initial stop state.
You can configure the control method of step execution.

Select whether to skip the target section.
Select [Yes] to skip the target section (default: [No]).
This property appears only when the [Skip target section] property is set to [Yes].
To specify a section, select the target property, then open the Specified Section dialog box by clicking the [...] button that appears on the right edge of the field.