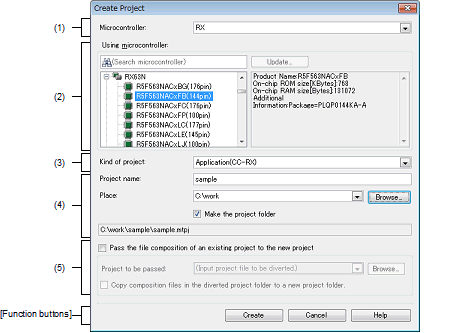
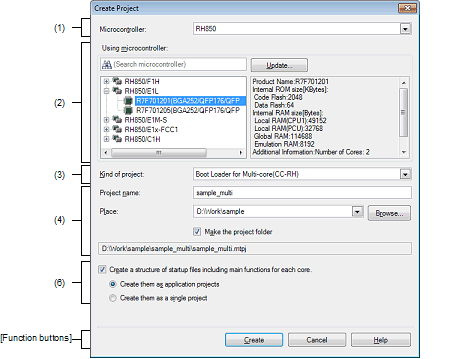
This dialog box is used to create new projects or subprojects.
Create Project Dialog Box (Opened From Other Area than [Create New Multi-core Project] On Start Panel) |

Create Project Dialog Box (Opened From [Create New Multi-core Project] Area On Start Panel) |

The following items are explained here.
Click the [Start] button in the toolbar to open the Start panel and then click the [GO] button in the [Create New Project] area or [Create New Multi-core Project] area. |
On the Project Tree panel, select project or subproject, and then select [Add] >> [Add New Subproject...] from the context menu. |
Select the microcontroller type to use in the project.
You can select the item below.
Select a microcontroller to use in the project.
You can search a microcontroller selected in the list of microcontrollers simply.
The microcontrollers that correspond to the microcontroller type selected in [Microcontroller] are listed and categorized by their nicknames.
If this dialog box is opened from the [Create New Multi-core Project] area on the Start panel, only the microcontrollers for RH850 multi-core are displayed. |
The following information on the selected microcontroller that is used in the project is shown in the box at right.
|
Displays the CS+ Update Manager window. When the microcontroller to be used does not appear in the list, you can search for the microcontroller via the network. |
This button is only enabled when this product is installed using the installer. It is disabled when a packaged item is being used. |
Select the project type to create on [Kind of project].
You can select the item below.
Only [Boot Loader for Multi-core(CC-RH)] can be selected when this dialog box is opened from the [Create New Multi-core Project] area on the Start panel. |
Select this to generate the load module file and hex file from C source files, by using the build tool provided by CS+.
The generated file will be the debug target.
This item is not displayed when microcontrollers for RH850 multi-core are selected in the [Using microcontroller] area. |
If the build tool is CC-RH, the following start-up source files are generated in the project folder. |
If the build tool is CC-RX, the following start-up source files are generated in the project folder. |
If the build tool is CC-RL, the following start-up source files are generated in the project folder. |
Select this to generate the load module file and hex file from a C++ source file (only a file that has a main function) and C source files, by using build tool CC-RX provided by CS+.
The generated file will be the debug target.
The following start-up source files are generated in the project folder. |
Select this to generate the load module file, by using build tool CC-RH/CC-RX/CC-RX/CC-RL or build-tool plugin for GHS CCRH850 provided by CS+.
The generated file will be the debug target.
Sample startup programs are not generated when the project is created.
Select this to create a boot loader project for multi-core, by using build tool CC-RH provided by CS+.
A boot loader project is used to set application projects configuring a project for multi-core.
This item is displayed only when microcontrollers for RH850 multi-core are selected in the [Using microcontroller] area. |
The following start-up source files are generated in the project folder. |
When [Create a structure of startup files including main functions for each core.] check box is not selected or when [Create a structure of startup files including main functions for each core.] check box and [Create them as application projects] radio button are selected |
|
For defining the processing from the occurrence of a reset to a branch to each application project and defining the interrupt vector table |
|
When [Create a structure of startup files including main functions for each core.] check box and [Create them as a single project] radio button are selected |
|
For defining the processing from the occurrence of a reset to a branch to each application project and defining the interrupt vector table |
|
The core number n is sometimes included in the file name of a startup file (bootn.asm, cstartn.asm, or mainn.c) for a core.
Select this to create an application project for multi-core, by using build tool CC-RH provided by CS+.
This item is displayed only when microcontrollers for RH850 multi-core are selected in the [Using microcontroller] area. |
The following start-up source files are generated in the project folder. |
The core number n is sometimes included in the file name of a startup file (cstartn.asm) for a core.
Select this to debug a load module file built by the GHS compiler.
This makes it easier to build based on existing GHS project files.
Select this to generate a library file for a user library, by using build tool CC-RH/CC-RX/CC-RL or build-tool plugin for GHS CCRH850 provided by CS+.
Select this to debug a load module file or hex file generated with a build tool other than the one provided by CS+ (i.e. creates a debug-dedicated project).
See "E. USING AN EXTERNAL BUILD TOOL" for details on how to create and use the debug-dedicated project.
Directly enter the name of the project to create.
The entered project name is followed by the extension, ".mtpj" and this forms the project file name.
When the subproject is created, the entered project name is followed by the extension, ".mtsp" and forms the subproject name. |
Designate the location to create the project file by directly entering it with absolute path or selecting from the [Browse...] button.
The last designated location is shown in the box. "C:\Users\User name\Documents" is shown by default when the project is created for the first time.
|
Opens the Browse For Folder dialog box. When a folder is selected, an absolute path of the folder is shown in [Place]. |
Use this check box to select whether to create a folder with the project name under the location specified in [Place].
The check box is selected by default.
The full path of the project file (specified via [Project name] and [Place]) is shown.
The number of characters that can be entered in [Project name] and [Place] is up to 259 both for the path name and file name together. |
When the input for [Project name] violates any restriction, the following messages are shown in the tooltip. |
When the input for [Place] violates any restriction, the following messages are shown in the tooltip. |
When the project name and the path name is too long to be shown in each text area, |
Set this area when reusing the file composition of the existing project (main or subproject) to create a new project.
This area is not displayed when this dialog box is opened from the [Create New Multi-core Project] area on the Start panel. |
When you create a project, only the settings for the default debug tool will be imported. |
Select this check box when reusing the file composition of the existing project to create a new project.
The check box is unselected by default.
The category of the file can be also reused.
[RX] The settings of the properties of the build tool are changed to those for the specified microcontroller. iodefine.h and the start-up source files of the specified microcontroller are copied as sample source files. For the start-up files, create a folder named "<device name after change>.nnn" (nnn = 000, 001, …) and copy them to that folder. The details of the changes are displayed in the Output panel. |
Designate the name of the source project when diverting the file composition of the existing project to create a new project.
Designate the name of the source project by directly entering it with absolute path or selecting with the Open Project dialog box after pressing the [Browse...] button.
The last designated location is shown in the box. "C:\Users\User name\Documents" is the default location when the file is created for the first time.
This field is enabled only when the [Pass the file composition of an existing project to the new project] check box is selected.
When the path name is too long to be shown in the text area, |
|
Open Project dialog box appears. When a project file is selected, an absolute path of the project file is shown in [Project to be passed]. |
Select this check box when copying composition files in the project folder of the project specified in [Project to be passed] to a new project folder.
The check box is unselected by default.
This field is enabled only when the [Pass the file composition of an existing project to the new project] check box is selected.
When the version of the build tool used in the source project is different from the version of the build tool in the project to be created, it is automatically diverted (except for a debug-dedicated project). |
When the build tool for the project to be created does not support a node of the source project, the node will be displayed as a normal Category node on the project tree (e.g., Startup node or Download files node etc.). |
Set this area when simultaneously creating a structure of startup files for each core.
This area is displayed only when this dialog box is opened from the [Create New Multi-core Project] area on the Start panel. |
Select this check box when simultaneously creating a structure of startup files for each core.
The check box is selected by default.
Select this radio button when a structure of startup files for each core is created as an application project for the number of cores.
The radio button is selected by default.
This field is enabled only when the [Create a structure of startup files including main functions for each core.] check box is selected.
Select this radio button when a single project that includes structures of all startup files is created
This field is enabled only when the [Create a structure of startup files including main functions for each core.] check box is selected.
|
Creates a project according to the designated condition and closes the dialog box. When the [Pass the file composition of an existing project to the new project] check box is selected, creates a project by diverting the file composition of the project (main or subproject) designated in [Project to be passed]. If the build tool of the source project is CA78K0R or CA78K0, and the build tool of the project to create is CC-RL, opens the Source Convert Setting dialog box [CC-RL] to select whether to convert the source files and the like. |
|
 is displayed. The absolute path pops up when the mouse cursor is hovered over
  .
. is displayed. The absolute path pops up when the mouse cursor is hovered over
  .
.