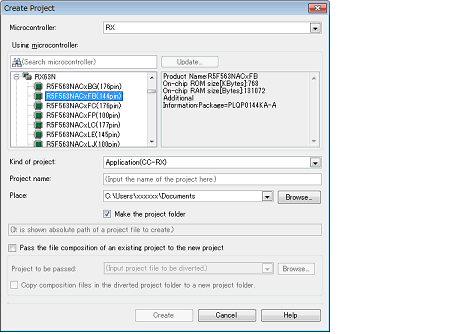
This section describes how to create a new project.
When a project for RH850 multi-core is created, see "2.3.4 Create a project for multi-core [RH850]". |
From the [Project] menu, select [Create New Project...], the Create Project dialog box will open.

Set the items in the order below.
Select the microcontroller type to use in the project on [Microcontroller].
You can select the item below.
Select the microcontroller to use in the project on the [Using microcontroller] area.
If your microcontroller is not in the [Using microcontroller] area, click the [Update...] button.
You can open the CS+ Update Manager window, and check for microcontroller information updates via the network.
The [Update...] button is only enabled when this product is installed using the installer. It is disabled when a packaged item is being used. |
Select the project type to create on [Kind of project].
You can select the item below.
Select this to generate the load module file and hex file from C source files, by using the build tool provided by CS+.
The generated file will be the debug target.
This item is not displayed when microcontrollers for RH850 multi-core are selected in "(2) Select the microcontroller". |
If the build tool is CC-RH, the following start-up source files are generated in the project folder. |
|
For defining the processing from the occurrence of a reset to a branch to the start-up routine and defining the interrupt vector table |
|
If the build tool is CC-RX, the following start-up source files are generated in the project folder. |
If the build tool is CC-RL, the following start-up source files are generated in the project folder. |
Select this to generate the load module file and hex file from a C++ source file (only a file that has a main function) and C source files, by using build tool CC-RX provided by CS+.
The generated file will be the debug target.
The following start-up source files are generated in the project folder. |
Select this to generate the load module file, by using build tool CC-RH/CC-RX/CC-RL or build-tool plugin for GHS CCRH850 provided by CS+.
The generated file will be the debug target.
Sample startup programs are not generated when the project is created.
Select this to create a boot loader project for multi-core, by using build tool CC-RH provided by CS+.
A boot loader project is used to set application projects configuring a project for multi-core.
This item is displayed only when microcontrollers for RH850 multi-core are selected in "(2) Select the microcontroller". |
The following start-up source files are generated in the project folder. |
|
For defining the processing from the occurrence of a reset to a branch to each application project and defining the interrupt vector table |
|
The core number n is sometimes included in the file name of a startup file (bootn.asm) for a core.
Select this to create an application project for multi-core, by using build tool CC-RH provided by CS+.
This item is displayed only when microcontrollers for RH850 multi-core are selected in "(2) Select the microcontroller". |
The following start-up source files are generated in the project folder. |
The core number n is sometimes included in the file name of a startup file (cstartn.asm) for a core.
Select this to debug a load module file built by the GHS compiler.
This makes it easier to build based on existing GHS project files.
Select this to generate a library file for a user library, by using build tool CC-RH/CC-RX/CC-RL or build-tool plugin for GHS CCRH850 provided by CS+.
Select this to debug a load module file or hex file generated with a build tool other than the one provided by CS+ (i.e. creates a debug-dedicated project).
See "E. USING AN EXTERNAL BUILD TOOL" for details on how to create and use the debug-dedicated project.
Specify the name of the project and the location to create the project file in [Project name] and [Place].
If you don’t create a folder with the project name under the specified location, clear the [Make the project folder] check box.
When directly entering the location to create the project file, enter it as an absolute path. |
The name of a network path cannot be used for [Place]. Assign the name of a path on a drive. |
It is recommended to specify the same folder as the diverted project for the location to create the project file. |
When creating a project that reuses the file structure of an existing project, check [Pass the file composition of an existing project to the new project] and specify the location of the project filename to reuse in [Project to be passed].
You cannot specify an e2 studio, CubeSuite, High-performance Embedded Workshop, or PM+ project file. |
When you create a project, only the settings for the default debug tool will be imported. |
When the version of the build tool used in the source project is different from the version of the build tool in the project to be created, it is automatically diverted (the case that "Debug Only" is specified with [Kind of project] is excluded). |
The settings of the properties of the build tool of the existing project are reused, then the properties of the build tool are changed to those for the specified microcontroller. iodefine.h and the start-up source files of the specified microcontroller are copied as sample source files. For the start-up files, create a folder named "<device name after change>.nnn" (nnn = 000, 001, …) and copy them to that folder. |
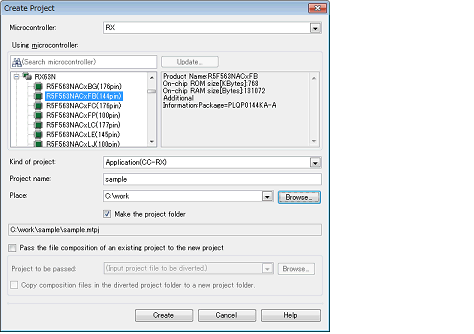
An image of the dialog box after setting the items is shown below.

When you click the [Create] button, the project file is created in the location specified in (4) and the structure of the created project is displayed as a tree in the Project Tree panel.

After creating a project, you must add target files to the project in order to perform building or debugging. |
-> See the "2.6.1 Add a file to a project"
-> See "E.3 Add a File to a Project"