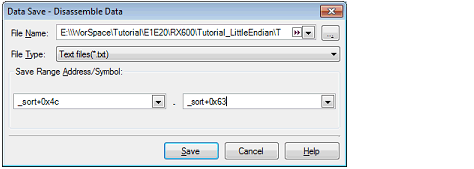
The contents of disassembled results can be saved to a text file (*.txt) or CSV file (*.csv).
When saving to a file, CS+ gets latest information from the debug tool and saves it in the form in which data are displayed on this panel.
Choose [Save Disassemble Data As...] from the [File] menu, and the Data Save dialog box shown below is opened. (At this time, if you perform this operation while a range is selected on panel, it is possible to save only the selected range of disassembled data.)
In this dialog box, follow the procedure described below to save the displayed contents of disassembled results.

Specify a file name in which you want to save.
Enter it directly in the text box (specifiable in up to 259 characters) or select an input history item from the drop-down list (up to 10 history entries).
Also, you can select a file using the Select Data Save File dialog box that is opened by clicking the [...] button.
Select the type of file in which you want to save from the drop-down list below.
The selectable file types are as follows.
Each piece of data are separated with a comma (,) when saved. |
Specify the "start address" and "end address" to set a range of data to be saved in a file.
Directly enter hexadecimal values or address expressions in the respective text boxes or select an input history item from the drop-down list (up to 10 history entries).
Note that if a range is selected on panel, this selected range is specified, by default, in the text boxes. If no range is selected, the currently displayed range on panel is specified.
By holding down [Ctrl]+[Space] keys in this text box, you can complete the symbol name at the present caret position (see "2.21.2 Symbol name completion function"). |
Disassembled data is saved in specified format to a specified file.

If panel contents are saved over an existing file by selecting [Save Disassemble Data] on [File] menu, the respective Disassemble panels (Disassemble1-4) are handled individually. |