This trace operation can be configured in the [Trace] category on the [Debug Tool Settings] tab of the Property panel.
Select whether to use trace function.
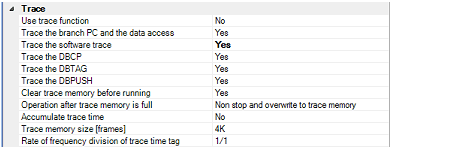
Select [Yes] to use the trace function (default: [No]).
Select the trace target from the following drop-down list.
|
Collects the trace data regarding the currently selected PE (default). After collecting the trace data, if you switch PE, the contents of the Trace panel will be updated to the corresponding trace data. |
|
|
Collects the trace data for all PEs. After collecting the trace data, the contents of the Trace panel is not changed even if you switch PE. |
Select the type of trace data to be collected from the following properties.
Select whether to clear (initialize) the trace memory before tracing starts.
Select [Yes] to clear the memory (default).
You can forcibly clear the trace memory when clicking the |
 button in the toolbar in the
 Select the operation after the trace memory is full with the collected trace data from the following drop-down list.
|
Continues overwriting the older trace data after the trace memory is full (default). When the [Clear trace memory before running] property is set to [Yes], at the time of a resumption, the trace data is collected after clearing the trace memory. |
|
|
When the trace memory is full, CS+ stops writing trace data (the program does not stop execution). |
|
|
When the trace memory is full, CS+ stops writing trace data and the program stops execution. |
Select whether to display the trace time with accumulated time.
Select [Yes] to display trace time with accumulated time. Select [No] to display the trace time with differential time (default).
Select the trace memory size (trace frame number).
The trace frame is a unit of trace data. One trace frame is used for each operation in fetch/write/read.
Drop down list includes the following trace frame numbers.
4K (default), 8K, 12K, 16K, 20K, 24K, 28K, 32K, 36K, 40K, 44K, 48K, 52K, 56K, 60K, 64K, 128K 192K, 256K, 320K, 384K, 448K, 512K, 576K, 640K, 704K, 768K, 832K, 896K, 960K, 1M, 2M, 3M
Select the frequency division ratio of the counter to be used for time tag display (the [Time] item in the Trace panel) (default: [1/1]).
When the division ratio is set, the number of clocks required for the incrementation of the counter displayed on the time tag of the branch PC and the data access is changed.