This panel is used to display trace data recording the execution history of the program (see "2.14 Collect Execution History of Programs").
The trace data displays by mixing the disassembled text and source text by default, but it is also possible to display either one of these by selecting the Display mode.
After the execution of the program is stopped, the display position is automatically updated such that the latest trace data is displayed.
This panel appears only when connected to the debug tool.
Software trace data can be acquired by using the Python console. See debugger.SoftwareTrace functions in "CS+ Python Console" for detail. |
[Full-spec emulator][E1][E20] |
When the separator line of each area in this panel is double-clicked, the width of the area changes to the shortest possible size that can display the contents of the area. |
This panel can be zoomed in and out by |
 in the tool bar, or by moving the mouse wheel forward or backward while holding down the [Ctrl] key.
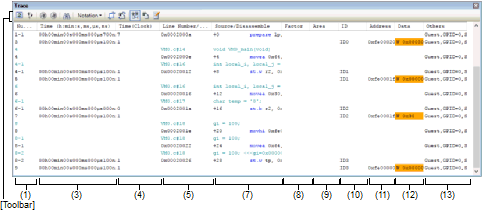
This section describes the following.
On the Editor panel/Disassemble panel, select [Trace Settings] >> [Show Trace Result] from the context menu. |
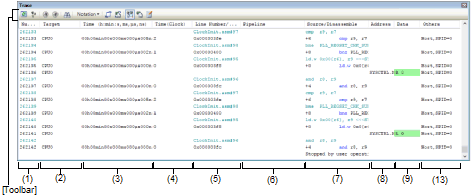
The trace number corresponding to the trace frame is displayed.
The name of the target core is displayed.
This area displays the time required from the execution start of the program to the execution start of an instruction of each frame or generation of memory access cause.
The time is displayed in units of "hours, minutes, seconds, milliseconds, microseconds and nanoseconds".
[Full-spec emulator][E1][E20] |
[Simulator] |
This area displays the time required from the execution start of the program to the execution start of an instruction of each frame or generation of memory access cause. The time is displayed in CPU clock cycles.
[Simulator] |
The line number of a source file or the address of the assemble code is displayed.
The notation of a data value can be selected by the button on the toolbar or the context menu item.
The display formats are as follows:
Since the following execution histories are not displayed, the line numbers displayed are not consecutive numbers. |
This area displays the pipeline execution status.
A 20-character string is displayed in this field, and each character represents the stage of the pipeline in one clock cycle. Residues of 20 from the number of clock cycles are used as indices in display of the string representing the corresponding stages of execution.
The meanings of the letters used to represent the stages are as follows.
F: 10th clock cycle, D: 11th clock cycle, E: 13th clock cycle |
F: 18th clock cycle, D: 19th clock cycle, E: 20th clock cycle |
The collected trace data is displayed as follows:
Note that the items displayed in this area differ depending on the selection of the display mode (see "(a) Display mode").
|
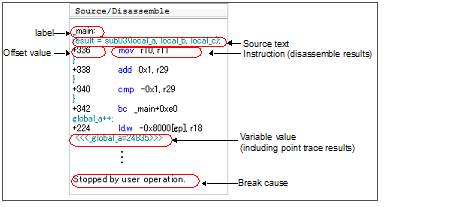
The label is displayed when a label is defined for the address. |
||
|
The offset value from the nearest label is displayed when a label is defined for the address. |
||
|
The corresponding source text is displayed when the Mixed display mode or Source display mode is selected. In addition, when the value of a variableNote 1 or an I/O register that is accessed during execution of a source line can be analyzed, that value is displayed in the following format at the end of the source line. The results of the Point Trace are displayed as same as format above. |
||
|
The corresponding instructions are displayed as the result of disassembling when the Mixed display mode or Disassemble display mode is selectedNote 2. |
||
When there is a memory access, a symbol will be interpreted as a variable and displayed only if a symbol is assigned to the accessed address. Note, however, that only variables of up to 4 bytes are supported. If multiplication or other code is processed by the standard libraries, the label of the SADDR area used by the standard library may be shown. |
At a frame for which not all the trace data was fetched, "(LOST)" is displayed. In this case, the corresponding line is shown in error color (the error color depends on the configuration in the [General - Font and Color] category of the Option dialog box). |
This area is provided with the following functions.
It is possible to select the following three display modes by selection of a button on the toolbar or the context menu.
By selecting [Jump to Source] from the context menu, the Editor panel opens with moving the caret to the source line corresponding to the line at the current caret position (if the Editor panel is already open, the screen will jump to the panel).
In addition, similarly by selecting [Jump to Disassemble], the Disassemble panel (Disasemmble1) is opened with moving the caret to the address corresponding to the fetch address of the line at the current caret position (if the Disassemble panel is already open, the screen will jump to the panel (Disassemble1)).
By clicking the  /
/ button on the toolbar, or selecting [Window Connecting] >> [Connect Source Window]/[Connect Disassemble Window] from the context menu, it is possible to link and display the corresponding places on the Editor panel/Disassemble panel, with the address of the caret position on this panel used as the pointer (no movement of the focus is done).
By hovering the mouse cursor over a line, all the area (item) data corresponding to that line is pop-up displayed in tandem shape.
The Data Save dialog box can be opened by selecting the [File] menu >> [Save Trace Data As...], and the contents of this panel can be saved in a text file (*.txt) or CSV file (*.csv).
See "2.14.9 Save the contents of execution history" for details on the method for saving trace data.
This area displays information on the memory access cause.
The display formats are as follows:
This area displays information on the target area of memory access.
The display formats are as follows:
This area displays the ID of memory access.
The display formats are as follows:
The target address of memory access is displayed.
However, in the event of access to I/O register, the I/O register name is displayed instead of the address (when a plurality is accessed these are displayed in the following lines).
The radix of a data value can be selected by the button on the toolbar or the context menu item.
The accessed data value and the access type at that time are displayed.
However, CPU register access is not displayed.
The notation of a data value can be selected by the button on the toolbar or the context menu item.
The display format of the data value and the access type are as follows (character colors and background colors depend on the configuration in the [General - Font and Color] category of the Option dialog box):


Other sets of information on the virtualization facility, software tracing, and so on are displayed in this area.
Sets of information are delimited by ‘,’.
Information is given in the format <item name> or <item name> = <value>.
|
Acquires the latest data from the debug tool, and updates the contents of this panel. |
||
|
Clears the trace memory and the display of this panel (initialized). |
||
|
The content currently being displayed in this panel is cleared. |
||
|
Opens the Trace Search dialog box. |
||
|
The following buttons to change the notation of a data value are displayed. |
||
|
Displays values on this panel in hexadecimal number (default). |
||
|
Links with the Disassemble panel. |
||
|
Sets to the Mixed display mode as the display mode (default). |
||
|
Sets to the Disassemble display mode as the display mode. |
||
|
Sets to the Source display mode as the display mode. |
||


[[File] menu (Trace panel-dedicated items)]
The following items are exclusive for the [File] menu in the Trace panel (other items are common to all the panels).
Note that all these items are disabled during execution of a program.
|
Overwrites the contents of this panel to the previously saved text file (*.txt)/CSV file (*.csv) (see "(e) Saving trace data"). Note that when the file has never been saved or the file is write disabled, the same operation is applied as the selection in [Save Trace Data As...]. |
|
|
Opens the Data Save dialog box to newly save the contents of this panel to the specified text file (*.txt)/CSV file (*.csv) (see "(e) Saving trace data"). |
[[Edit] menu (Trace panel-dedicated items)]
The following items are exclusive for [Edit] menu in the Trace panel (all other items are disabled).
|
Copies the contents of the selected line to the clipboard (multiple line selections impossible). |
|
|
Opens the Trace Search dialog box. |
|
Clears the trace memory and the display of this panel (initialized). |
||
|
Starts the tracer operation (see "2.14.5.2 Restart collection of execution history"). The content currently being displayed in this panel is cleared. |
||
|
Stops the tracer operation (see "2.14.5.1 Stop collection of execution history temporarily"). |
||
|
Opens the Trace Search dialog box. |
||
|
Copies the contents of the selected line to the clipboard (multiple line selections impossible). |
||
|
Sets to the Mixed display mode as the display mode. |
||
|
Sets to the Disassemble display mode as the display mode. |
||
|
Sets to the Source display mode as the display mode. |
||
|
The following cascade menus are displayed to specify the notation. |
||
|
Displays values on this panel in hexadecimal number (default). |
||
|
The following cascade menus are displayed to link with other panels (see "(c) Linking with other panels"). |
||
|
Links with the Disassemble panel. |
||
|
Opens the Disassemble panel (Disassemble1) and jumps to the fetch address corresponding to the line at the caret position in this panel. |
||
|
Opens the Editor panel and jumps to the source line corresponding to the line at the caret position in this panel. |
||
|
Opens the Memory panel and jumps to the memory value corresponding to the line at the caret position in this panel. |
||