Contents of the disassembled text can be saved in text files (*.txt)/CSV files (*.csv).
When saving to the file, the latest information is acquired from the debug tool, and it is saved in accordance with the display format on this panel.
The Data Save dialog box can be opened by selecting the [File] menu >> [Save Disassemble Data As...] (when this operation takes place with the range selected on the panel, the disassembled data can be saved only for the selected range).
In this dialog box, follow the steps below.
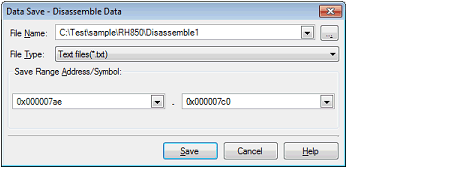
Specify the name of the file to save.
You can either type a filename directly into the text box (up to 259 characters), or select one from the input history via the drop-down list (up to 10 items).
You can also specify the file by clicking the [...] button, and selecting a file via the Select Data Save File dialog box.
Select the format in which to save the file from the following drop-down list.
The following file formats can be selected.
The data is saved with entries separated by commas (,). |
Specify the range of addresses to save via "start address" and "end addresses".
Directly enter hexadecimal number/address expression in each text box or select from the input history displayed in the drop-down list (up to 10 items).
If a range is selected in the panel, that range is specified as the default. If there is no selection, then the range currently visible in the panel is specified.
A symbol name at the current caret position can be complemented by pressing the [Ctrl] + [Space] key in each text box (see "2.21.2 Symbol name completion function"). |
Disassembling data is saved in the specified file with the specified format.

When the contents of the panel are overwritten and saved by selecting the [File] menu >>[Save Disassemble Data], the Disassemble panels (Disassemble1-4) are handled individually for these respectively. In addition, saving range is same as the previously specified address range. |