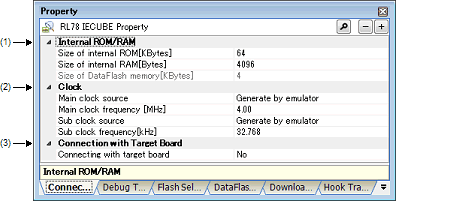
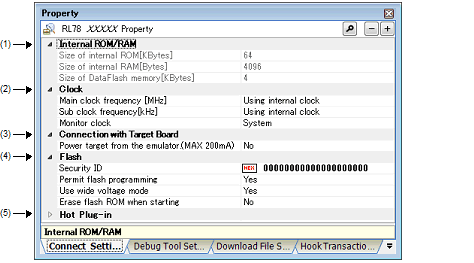
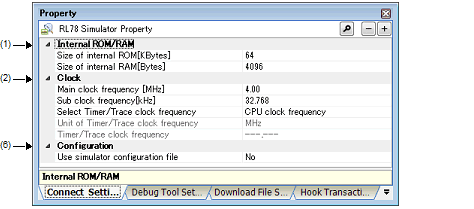
This tab is used to display the detailed information categorized by the following and the configuration can be changed.
(3) [Connection with Target Board] [IECUBE][E1][EZ Emulator]
(4) [Flash] [E1][E20][EZ Emulator]
(6) [Configuration] [Simulator]


[Description of each category]
The detailed information on internal ROM/RAM is displayed and its configuration can be changed.
The detailed information on clocks is displayed and its configuration can be changed.
|
Select from the drop-down list. Note that changes can be made only when disconnected from the debug tool. |
|||
|
Specify the main clock frequency in MHz unit. This property appears only when the [Main clock source] property is set to [Generate by emulator]. |
|||
|
Select from the drop-down list or directly enter from the keyboard. |
|||
|
1.00, 2.00, 3.00, 3.57, 4.00, 4.19, 4.91, 5.00, 6.00, 8.00, 8.38, 10.00, 12.00, 16.00, 20.00 (unit: MHz) Using internal clock, 2.00, 3.00, 3.57, 4.00, 4.19, 4.91, 5.00, 6.00, 8.00, 8.38, 10.00, 12.00, 16.00, 20.00 (unit: MHz) 2.00, 3.00, 3.57, 4.00, 4.19, 4.91, 5.00, 6.00, 8.00, 8.38, 10.00, 12.00, 16.00, 20.00 (unit: MHz) |
|||
|
Select the sub clock source to input to the CPU and peripheral microcontrollers. |
|||
|
Select from the drop-down list. Note that changes can be made only when disconnected from the debug tool. |
|||
|
Specify the sub clock frequency in kHz unit. This property appears only when the [Sub clock source] property is set to [Generate by emulator]. |
|||
|
Select from the drop-down list or directly enter from the keyboard. |
|||
|
Select a clock for monitor programs to operate while the program is stopped. |
|||
|
Specifies an arbitrary frequency (property items to specify become valid in the lower area). |
|||
|
Select the unit of the clock frequency for timer/trace. This property appears only when the [Select Timer/Trace clock frequency] property is set to [Specify clock frequency]. |
|||
|
The operation of this property differs depending on the specification with the [Select Timer/Trace clock frequency] property. |
|||
|
Unit is depending on the specification with the [Unit of Timer/Trace clock frequency] property. |
|||
You can also select the frequency greater than 20.00 MHz, depending on the selected microcontroller. |
When using X1/X2 oscillation, specify the clock frequency. |
The detailed information on the connection to the target board is displayed and its configuration can be changed.
Note that this category does not appear if no property displayed exists according to the type of the selected microcontroller.
|
Select from the drop-down list. Note that changes can be made only when disconnected from the debug tool. |
||||
|
Select whether to use a low voltage OCD board. This property appears only when the selected microcontroller supports a low voltage OCD board. |
||||
|
Select whether to supply power to the target board from E1. This property appears only when the [Low voltage OCD board] property is set to [No] if it is displayed. |
||||
|
Select from the drop-down list. Note that changes can be made only when disconnected from the debug tool. |
||||
|
Select the power voltage supplied to the target board. This property appears only when the [Power target from the emulator (MAX 200mA)] property is set to [Yes]. |
||||
|
Select from the drop-down list. Note that changes can be made only when disconnected from the debug tool. |
||||
The detailed information on the flash memory writing is displayed and its configuration can be changed.
|
Specify a security ID for reading codes in the internal ROM or internal flash memoryNote. This property appears only when the selected microcontroller supports the ROM security function (security ID) for flash memory. |
||||
|
Directly enter from the keyboard. Note that changes can be made only when disconnected from the debug tool. |
||||
|
The flash memory area cannot be rewritten at all from the debug tool. |
||||
|
Select whether to rewrite the flash memory with the wide voltage mode. This property appears only when the selected microcontroller supports the wide voltage mode for the flash memory rewriting. |
||||
|
Select from the drop-down list. Note that changes can be made only when disconnected from the debug tool. |
||||
|
Select whether to erase flash ROM when connecting to the debug tool. This property appears only when the [Permit flash programming] property is set to [Yes]. When conducting hot plug-in connection, the setting of this property will be ignored and flash ROM will not be erased. |
||||
|
Select from the drop-down list. Note that changes can be made only when disconnected from the debug tool. |
||||
|
Erases the flash ROM when connecting to the debug tool. Note that after connecting to the debug tool, this property automatically selects [No]. |
||||
The detailed information on hot plug-in connection is displayed and its configuration can be changed.
Note that this category appears only when the selected microcontroller incorporates the hot plug-in function.
The detailed information when customizing the simulator is displayed and its configuration can be changed.
|
Select whether to use the simulator configuration file to perform user customization (adding of user models) of the simulator. |
||||
|
Select from the drop-down list. Note that changes can be made only when disconnected from the debug tool. |
||||
|
Specify the simulator configuration file to be use. This property appears only when the [Use simulator configuration file] property is set to [Yes]. |
||||
|
Directly enter from the keyboard, or specify with the Select Simulator Configuration File dialog box that is opened by clicking the [...] button. Note that changes can be made only when disconnected from the debug tool. |
||||