|
Object Properties dialog box
|
This property dialog box is used to set or change the connection information fed to the pins of figure object (including text and bitmap) of the I/O Panel window.
Show/hide can be switched for each pin-connected object by the output status of the connected pins in the Simulation mode.
The default status of each signal is active HIGH. Display styles can be changed on the [[Style] tab].
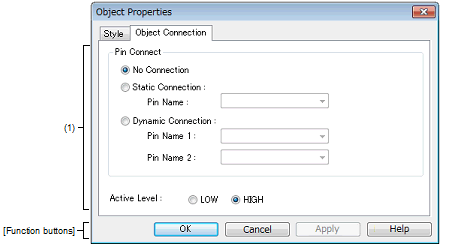
Figure A.89 | Object Properties Dialog Box: [Object Connection] Tab |
Figure A.90 | Object Properties Dialog Box: [Style] Tab |
This section describes the following.
[How to open]
On the I/O Panel window, any one of the following:
- | Double-click a figure object. |
- | Select [Properties...] form the context menu on a figure object. |
- | Select a figure object, and then select [Properties...] form the [View] menu. |
[[Object Connection] tab]
(1) | Pin connection information setting area |
|
Pin Connect
|
Select the method for connecting objects and output pins by clicking the corresponding option buttons, and specify the output pin name.
As a result of the connection, figure display is switched by the ON/OFF status of the connected output pin.
|
|
No Connection
|
The object and pin are not connected (default).
Objects not connected to pins are always in the displayed status.
|
|
Static Connection
|
Connects the figure to 1 output pin.
The connection pin can be specified in [Pin Name] either via direct input or through selection from the drop-down list. During simulation, the object is displayed when the specified output signal data is active.
|
|
Dynamic Connection
|
Connects the figure to 2 output pins.
The connection pin can be specified in [Pin Name1] and [Pin Name2] either via direct input or through selection from the drop-down list. During simulation, the object is displayed when the specified output signal 1 data and the specified output signal 2 data are both active.
|
|
Active Level
|
The common active status of each output signal can be selected from the option buttons.
|
|
LOW
|
Sets the active level to LOW.
|
|
HIGH
|
Sets the active level to HIGH (default).
|
Remark | For the pin names that can be specified, see the user's manual of the microcontroller that is used. |
[[Style] tab]
(1) | Style information setting area |
|
Fill up
|
Specifies and changes settings related to each object fillingNote, as follows:
The area to be filled differs according to the object.
- | Rectangle, Ellipse, Rounded Rectangle
Inside area enclosed by contour lines |
- | Polygon
Inside area enclosed by lines linking apexes |
- | Bitmap
Inside figure drawing area |
|
|
Color
|
Specifies and changes settings of color
You can change the color by clicking the pull-down button.
|
|
Line
|
This area is used to perform settings and changes related to the lines of objects.
The definition of line for each type of object is provided below.
- | Line
All areas of the object |
- | Rectangle, Ellipse, Rounded Rectangle
Contour line of the figure |
- | Polygon
Lines that link the apexes of the polygon |
- | Text
Contour lines of the text box |
- | Bitmap
Contour lines of figure drawing area |
|
|
Color
|
Specifies and changes the line color.
You can change the color by clicking the pull-down button.
|
|
Dotted/Solid
|
Specifies and changes line shapes (dotted line/solid line).
The desired line shape can be selected from the drop-down list.
Note that this item can be changed only when [Thickness] is set to "1".
|
|
Thickness
|
Specifies and changes the line thickness.
The desired line thickness can be specified either via direct input or through selection from the spin button.
A value in the range of 1 to 100 (decimal) can be specified.
|
Note | At this time, if the object that have been pasted from a bitmap file, it becomes invisible. |
[Function buttons]
|
|
|
|
OK
|
Validates the settings and closes this dialog box.
|
|
Cancel
|
Cancels the settings and closes this dialog box.
|
|
Apply
|
Cannot be selected.
|
|
Help
|
Displays the help for this dialog box.
|