2.14.3.1
Setting the timer start event and timer end event
On the Editor panel, Disassemble panel or Watch panel, set the events at which you want a timer measurement to start and end.
(1) | How to set a timer start event |
- | To set from the Editor panel/Disassemble panel
Move the caret to the line or address Note 1 at which you want a timer measurement to start and then select [Timer Settings] from the context menu and from it, choose [Start Timer] and then [Set Timer * Note 2].
A timer start event is set for the instruction at the beginning address corresponding to the line or address at the caret position.
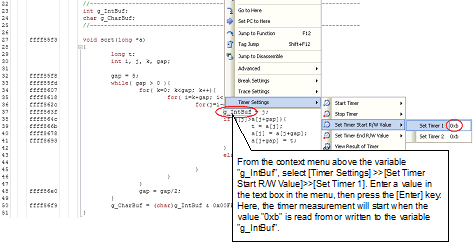
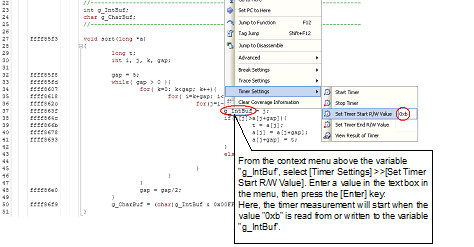
Move the caret to the variable at which you want a timer measurement to start and then select [Timer Settings] from the context menu and from it, choose [Set Timer Start R/W Value] and then [Set Timer * Note 2].
A timer start event is set for the variable at the caret position. |
- | To set from the Watch panel
Move the caret to the watch-expression Note 3 at which you want a timer measurement to start and then select [Timer Settings] from the context menu and from it, choose [Set Timer Start R/W Value] and then [Set Timer * Note 2].
A timer start event is set for the watch-expression on the Watch panel. |
- | To set from the Editor panel/Disassemble panel
Move the caret to the line or address Note 1 at which you want a timer measurement to finish and then select [Timer Settings] from the context menu and from it, choose [Stop Timer] and then [Set Timer * Note 2]
A timer end event is set for the instruction at the beginning address corresponding to the line or address at the caret position.
Move the caret to the variable at which you want a timer measurement to finish and then select [Timer Settings] from the context menu and from it, choose [Set Timer End R/W Value] and then [Set Timer * Note 2].
A timer end event is set for the variable at the caret position. |
- | To set from the Watch panel
Move the caret to the watch-expression Note 3 at which you want a timer measurement to finish and then select [Timer Settings] from the context menu and from it, choose [Set Timer End R/W Value] and then [Set Timer * Note 2].
A timer end event is set for the watch-expression on the Watch panel. |
Note 1. | Timer start event/timer end event cannot be set to lines with no address indication. |
Note 2. | [E1] [E20] [EZ Emulator]
The asterisk (*) in the menu [Set Timer *] denotes a channel number as a number for a timer measurement section. To set timer start and end events in one section, be sure to select the same channel number.
Note that the selectable channel numbers vary with each microcontroller used and depend on how the [Timer] [E1] [E20] [EZ Emulator] category on the Property panel’s [Debug Tool Settings] tab is set, as shown below. |
|
|
|
|
|
RX600 Series
|
No
|
Specifiable from 2 sections (32-bit), [Set Timer 1] and [Set Timer 2]
|
|
Yes
|
Only 1 section (64-bit), [Set Timer 1], is specifiable
|
|
RX200 Series
|
-
|
Only 1 section (24-bit), [Set Timer 1], is specifiable
|
[Simulator]
Only one section is available and desired timer channels cannot be specified; the [Set Timer *] menu is not displayed.
Note 3. | This watch-expression can only be a global variable, static variable inside a function, static variable inside a file, and an IO register. |
Caution 1. | [E1] [E20] [EZ Emulator]
Timer measurement is possible even if either a timer start or timer end event is set. When only a timer start event is set, measurement ends as soon as the program stops running. When only a timer end event is set, measurement starts as soon as the program starts running.
[Simulator]
Timer measurement works only when both timer start and end events are specified. If only one of the start and end events is specified, execution time cannot be measured. |
Caution 2. | [Simulator]
Only a single event can be specified for each of timer start and end events. Multiple events cannot be specified in combination. |
Figure 2.155 | Example of Setting a Timer Start Event (Access-related) on a Variable in the Source Text [E1] [E20] [EZ Emulator] |
Figure 2.156 | Example of Setting a Timer Start Event (Access-related) on a Variable in the Source Text [Simulator] |
Figure 2.157 | Example of Setting a Timer Start Event (Access-related) on a Watch-expression [E1] [E20] [EZ Emulator] |
Figure 2.158 | Example of Setting a Timer Start Event (Access-related) on a Watch-expression [Simulator] |
When timer start and end events are set, the following event marks are displayed in the event area of the relevant line, address, or watch-expression.
Also, on the Events panel, they are managed collectively as one instance of a timer measurement event. (By clicking the "+" mark at a timer measurement event item, it is possible to check information on the timer start and end events you've set.
Table 2.15 | Event Marks of the Timer Start and End Events |
|
|
|
|
Timer start
|

|
|
Timer end
|

|
Figure 2.159 | Example of Timer Start and End Events Set (Disassemble panel) |
Caution | [Simulator]
If the timer start and end events occur at the same instruction execution, the operation depends on the measurement state as follows. |
- | When timer measurement has started:
Timer measurement stops and the measured time is reflected in the result. |
- | When timer measurement has not started:
Timer measurement is not done. |
Remark | Event marks differ depending on the event state (see "2.17.1 Changing states of setting (Enabled/Disabled)").
Also, if a new event is set at a place where an event has already been set, the event mark ( ) is displayed, indicating that multiple events have been set.
 |


 ) is displayed, indicating that multiple events have been set.