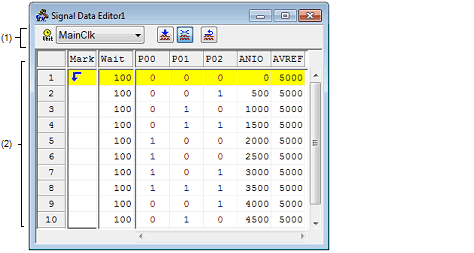
This window is used to create and edit the signal data that is input to input pins.
The created signal data can be input to the input pin during simulation by selecting the [Edit] menu >> [Signal Input]. This data can also be saved to the signal data file (*.wvi) by selecting the [File] menu >> [Save]/[Save As...] or by saving the project file.
The saved file contents can be restored by selecting the [File] menu >> [Open...] or by loading the project file.
If the saved signal data file is opened or the project file is opened while Simulator GUI is running with a microcontroller different from the one used when the signal data file was created, the settings of pins that are not provided in the microcontroller will not be restored. |
The main clock and sub clock cannot be input from this window. Set the main clock/sub clock oscillation frequency on the [Connect Settings] tab in the Property panel. |
If inputting of signals is started during program break, the signals will actually be input when the program is resumed from the break. |
File of signal data previously obtained by performing simulation and saving the results as output signal data |
On the titlebar of this window, "Project file name + Serial number (from 0).wvi" is displayed when the project file has been loaded. However, after having loaded a project file of PM+, then if you save a file as the project file of CS+, "Project file name + CS+ Serial number (from 0).wvi" is displayed on the titlebar. |

This section describes the following.
It can be specified whether this area is displayed or not, by selecting the [View] menu >> [Information Bar].

|
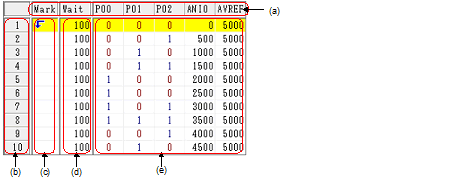
The input pin to be used is selected via the Select Pin dialog box that is opened by clicking the Data input to pins can be enabled/disabled by selecting the [Edit] menu >> [Pin Status]. |
||||
|
This area is used when performing editing in line units. Note that up to 1,048,576 (= 1M) lines can be specified as the signal data. |
||||
|
Displays the loop information for the specified input value. The loop information is specified by selecting from the context menu or the [Edit] menu >> [Mark] in the relevant field. The following marks are displayed after the loop information has been specified. |
||||
|
Displays as "wait time" the timing at which the specified input value is input to the pins. The wait time is specified by directly writing numeric values in the relevant field. Note that numeric values (decimal code) from 0 to 4,294,967,295 can be specified (values that exceed 4,294,967,295 can be set by using one more line). The wait time unit can be changed by selecting the [Edit] menu >> [Time unit]. |
||||
|
Displays the input value input to the pins. The input value is specified by directly writing numeric value in the relevant field. Note that the input rules differ as follows according to the pin type. |
||||
[Dedicated menu (Signal Data Editor window)]
|
Pastes the contents of the clipboard to the selected location. |
||
|
Opens the Select Pin dialog box. The pin(s) for which input signal data is to be created or edited is (are) selected in this dialog box. |
||
|
Sets a mark to the selected Mark area. |
||
|
Opens the Loop dialog box. Sets the details of loop information. |
||
|
Opens the Customize dialog box. |
|
Opens the Select Pin dialog box. The pin(s) for which input signal data is to be created or edited is (are) selected in this dialog box. |
|
|
If this button is clicked while the program is running, signal input starts. If this button is clicked while the program is stopped, signal input starts automatically the next time the program execution is started. |
|
|
If this button is clicked while the program is running, signal input is stopped. If this button is clicked while the program is stopped, signal input does not start automatically even if the program execution is started. |
|
|
The current signal input line (line highlighted with yellow) is returned to the beginning. |
The following context menus are available at each area in the Client area.
|
Opens the Select Pin dialog box. The pin(s) for which input signal data is to be created or edited is (are) selected in this dialog box. |
|
Pastes the contents of the clipboard to the selected location. |
|
|
Opens the Loop dialog box. Sets the details of loop information. |
To create the signal data, it is first necessary to select the pin to be used.
Open the Select Pin dialog box by clicking the  button on the toolbar or selecting the [Edit] menu >> [Select Pin...], and select the pin to be used. Once a pin is selected, its name is displayed in Pin area.
Create the signal data input to each pin.
In the Data area, specify the value that is input to each pin (see "Data area").
In the Wait area, specify the timing at which the input value is input to each pin as "wait time" (see "Wait area").
When loop processing for the signal data specified in step (a) and (b) is needed, specify the loop information.
To specify the loop information, select [Loop Start] from the context menu on the loop start position in the Mark area, and select [Loop End] on the loop stop position.
At this time, the loop count can be specified. In this case, specify the loop count via the Loop dialog box that is opened by selecting [Loop Dialog...] from the context menu.
The corresponding loop information marks are displayed if the setting of the loop information is completed (see "Mark area").
The set values in Mark area/Wait area/Data area can be copied and pasted.
However, copied data can be pasted only in the same area.
Single lines can be edited by selecting Line number area.
The method is the same as that described in "(3) Data copy and paste".
Data pasted during line paste (insertion) is inserted immediately before the selected line.
Input the created signal data to the input pins of the simulator while simulation is executed.
At this time, the line whose signal is currently being input (current line) is highlighted in yellow during program breaks (this can be changed via [Inputted current line] item in the Customize dialog box), in order to display signal input progress.
There are the following types of signal data input operations:
The signal data input to the selected pin can be controlled by selecting the [Edit] menu >> [Pin Status] >> [Valid]/[Invalid]. |
When CPU reset occurs, the current signal input line returns to the beginning.
If a CPU reset occurs during signal input, input continues from the beginning (same operation as the  button).
 button


 button on the toolbar or selecting the [Edit] menu >> [Select Pin...].


 button, or select the [Edit] menu >> [Signal Input] >> [Start].
  button, or select the [Edit] menu >> [Signal Input] >> [Stop].
  button, or select the [Edit] menu >> [Signal Input] >> [Reset].