This panel is used to display and edit files.
Furthermore, the source level debugging, instruction level debugging and the code coverage measurement result displayNote can be performed when connected to the debug tool and the downloaded source file is opened in this panel.
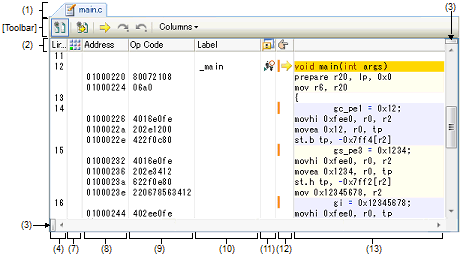
The code data, label and disassembled text can be displayed combined with the source text by selecting the Mixed display mode (see "2.9 Change Display Mode").
When opened the file encoding and newline code is automatically detected and retained when it is saved. You can open a file with a specific encoding selected in the Encoding dialog box. If the encoding and newline code is specified in the Save Settings dialog box then the file is saved with those settings.
This panel can be opened multiple times (up to 100 panels).
The code coverage measurement result is displayed only when the selected debug tool supports the coverage function. |
When a project is closed, all of the Editor panels displaying a file being registered in the project are closed. |


This panel can be zoomed in and out by |
 in the tool bar, or by moving the mouse wheel forward or backward while holding down the [Ctrl] key.
 When a file whose size is greater than 24MB is opened, a message dialog box is shown for confirmation of whether or not to disable all of the functions listed below (if you select [No] in this message dialog box, the operation speed may become sluggish). |
This section describes the following.
On the Project Tree panel, select a file, and then select [Open with Internal Editor...] from the context menu. |
On the Project Tree panel, select [Add] >> [Add New File...] from the context menu, and then create a text file or source file. |
On the Disassemble panel, Call Stack panel, Trace panel, or Events panel, select [Jump to Source] from the context menu. |
Automatically opens if there is a source text line corresponding to the current PC value when the current PC value is forcibly changed or the program stops executing. |
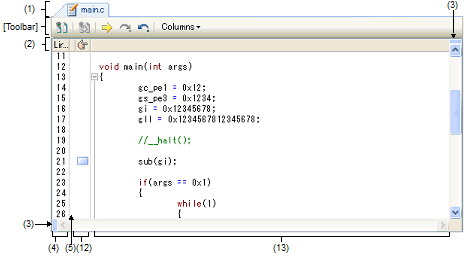
The name of the opened file is displayed.
Marks displayed at the end of the file name indicate the following:
|
Update time and date of the source file opened are later than the one of the downloaded load module file. Note that this mark is valid only when connected to the debug tool and the downloaded source file is opened. |
|
|
The recycle mode (see "2.11 Display Multiple Source Files Sequentially in a Single Panel") is valid. Note that this mark is valid only when connected to the debug tool and the downloaded source file is opened. |
|
The title of each column on the Editor panel is displayed.
Hovering the mouse cursor over this area displays the title name.
|
Displays line numbers (see "(4) Line number area"). |
||
|
The display is colored to reflect the state in terms of saving of the state of editing (see "(5) Selection area"). However, this column is not displayed in the Mixed display mode. |
||
|
The display is colored to reflect cases where a source file has been updated more recently than the corresponding load module file (see "(6) Out of date module Indicator area"). However, this column is not displayed when disconnected from the debug tool or in the Mixed display mode. |
||
|
Displays the coverage information (see "(7) Coverage area"). However, this column is not displayed when disconnected from the debug tool. |
||
|
Displays addresses (see "(8) Address area"). However, this column is not displayed when disconnected from the debug tool. |
||
|
Displays instruction codes (see "(9) Op code area"). However, this column is displayed only in the Mixed display mode. |
||
|
Displays labels (see "(10) Label area"). However, this column is displayed only in the Mixed display mode. |
||
|
Sets events (see "(11) Event area"). However, this column is not displayed when disconnected from the debug tool. |
||
|
Displays bookmarks, address marks and the current PC mark. Furthermore, sets breakpoints (see "(12) Main area"). |


For details on how to do it, see "2.3 Split the Panel".
The split is enabled only when this panel is in the normal display mode (setting to the Mixed display mode removes the split). |
This area displays the line number of the opened file.
This area displays the following indicators that shows the line modification status (except in the Mixed display mode).
|
This means new or modified line and saved. To erase this mark, close the panel, and then open this source file again. |


This area is valid only when connected to the debug tool and the downloaded source file is opened (except in the Mixed display mode).
If the update time and date of the source file opened are later than the one of the downloaded load module file, the following indicator is displayed (the color of the indicator depends on the "Warning" color of the [General - Font and Color] category of the Option dialog box).
To erase this mark, run a build and then download the load module file again.

This area is valid only when connected to the debug tool and the downloaded source file is opened.
When the coverage function is valid, lines corresponding to the specified coverage measurement area are shown highlighted based on the code coverage measurement result that is acquired by executing the program (the color depends on the coverage color in the [General - Font and Color] category of the Option dialog box).
For details on the coverage function, see "CS+ Debug Tool".
This area is valid only when connected to the debug tool and the downloaded source file is opened.
This area shows the address corresponding to where the instruction is located in the memory space of the selected microcontroller.
The format of this area is fixed as hexadecimal number notation.
The address width corresponds to the one in memory space of the selected microcontroller in the project.
This area is valid only when connected to the debug tool and the downloaded source file is opened in the Mixed display mode.
This area shows the instruction code corresponding to the source text.
This area is valid only when connected to the debug tool and the downloaded source file is opened in the Mixed display mode.
This area shows the label name when a label is defined for the address.
This area is valid only when connected to the debug tool and the downloaded source file is opened.
This area displays event marks that indicate various events currently being set and sets/deletes various events.
By selecting a item from the context menu on the line that has the address mark (  ), a Timer Result event, Performance Measurement event, Trace event or action event (Printf event) can be set/deleted (see "2.12 Set/delete Various Events").
This area is provided with the following functions.
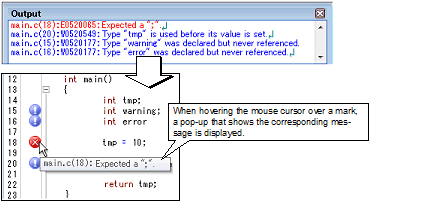
When an error or warning has been output via the last build commandNote, an error mark (  ) or warning mark (
  ) is displayed at the corresponding line.
To erase these marks, run a clean.
Compiling or assembling of source files and running a build, rebuild, or rapid build of the project |
Even when the line number of the source text is changed by modifying, the position of a mark currently being displayed is not moved. |
Bookmarks (  ) that have been registered are displayed (see "2.8 Register Bookmarks").
This function is disabled when the Mixed display mode is selected. |
The following functions are also available when the debug tool is connected and a downloaded source file is open.
Address marks (  ) are displayed at lines that have valid addresses.
Breakpoints or various events can be set at lines with the address mark.
The current PC mark (  ) that corresponds to the current PC position (PC register value) is displayed.
Note that the current PC mark is only displayed if the current PC value corresponds to the source text line, when the state of the debug tool is changed from execution to stop.
When the Mixed display mode is selected, if the unit of step execution is set to instruction level by selecting the |
 button on the toolbar, then the current PC mark will be moved to a disassembled text line.
This area displays event marks that indicate breakpoints currently being set and sets/deletes breakpoints.
By clicking the line that has the address mark (  ) with the mouse, the breakpoints can be set easily (see "2.12 Set/delete Various Events").
Setting a breakpoint and changing the state of a breakpoint can also be done from the context menu in this area. |
This area displays character strings of files and you can edit it.
This area is provided with the following functions.
Characters can be entered from the keyboard.
Various shortcut keys can be used to enhance the edit function (see "2.4 Edit Characters").
This function is disabled when the Mixed display mode is selected. |
The following items can be customized by setting the Option dialog box (the Option dialog's category name to customize the item is shown in "()". For details on the Option dialog box, see "CS+ Project Operation").
Highlighting the current line ([General - Text Editor] category) (see "2.4.1 Highlight the current line") |
About reserved words: |
The bracket that corresponds to a bracket at the caret position is shown emphasized (see "2.4.2 Emphasize brackets").
You can select multiple lines or a block that consists of multiple lines (see "2.4.3 Select characters").
When a C/C++ source file or a header file is opened, you can expand and collapse source code blocks so that you can concentrate on the areas of code which you are currently modifying or debugging (see "2.4.5 Use code outlining").
This function is disabled when the Mixed display mode is selected. |
The smart edit function is used to complement the names of functions, variables and the arguments of functions during input and offer them as candidates (see "2.4.6 Use the smart edit function").
The smart edit function operates with the items listed below.
It automatically recognizes the currently selected characters or the word at the caret position as the function name and jumps to the target function (see "2.6 Jump to Functions").
If the information of a file name, a line number and a column number exists in the line at the caret position, selecting [Tag Jump] from the context menu opens the file in a new Editor panel and jumps to the corresponding line and the corresponding column (see "2.7 Jump to a Desired Line (Tag Jump)").
By clicking the  button on the bookmark toolbar or selecting [Bookmark] >> [Toggle Bookmark] from the context menu on this area, a bookmark can be registered to the line at the caret position (see "2.8 Register Bookmarks").
This function is disabled when the Mixed display mode is selected. |
If the contents of the currently displayed file is changed (including renaming or deleting) without using CS+, a message will appear asking you whether you wish to update the file or not.
The following functions are also available when the debug tool is connected and a downloaded source file is open.
When the current PC position (PC register value) corresponds to the source text lines, those lines are shown highlighted (the highlighting color depends on the current PC color in the [General - Font and Color] category of the Option dialog box).
Lines where the breakpoints are set are shown highlighted (the highlighting color depends on the breakpoint color in the [General - Font and Color] category of the Option dialog box).
When the debug tool to be used supports the coverage function and its function is enabled, then lines corresponding to the specified coverage measurement area are shown highlighted based on the code coverage measurement result that is acquired by executing the program (the highlighting color depends on the coverage color in the [General - Font and Color] category of the Option dialog box).
For details on the coverage function, see "CS+ Debug Tool".
When hovering the mouse cursor over a variable in the source text, a pop-up that shows the name and value of the variable is displayed (see "2.10 Display Variables").
When hovering the mouse cursor over a constant, a pop-up that shows the value the same as the constant value is displayed because a constant is interpreted as a numeric value. |
By selecting a item from the context menu on the line that has the address mark (  ), various events can be set (see "2.12 Set/delete Various Events").
C+C++ language variable, CPU registers, I/O registers [RH850][RX]/SFRs [RL78], and assembler symbols can be registered in the Watch panel as watch expressions.
For details on how to register watch expressions, see "CS+ Debug Tool".
|
Toggles between the normal display mode (default) and the mixed display mode, as the display mode of this panel (see "2.9 Change Display Mode"). Note that this item is enabled only when connected to the debug tool and the downloaded source file is opened in this panel. |
||
|
Toggles between source (default) and instruction level, as the unit in which the program is step-executed. When the unit of a step execution is set to instruction level, then the current PC mark will be moved to a disassembled text line Note that this item is enabled only when connected to the debug tool and the downloaded source file is opened in this panel. |
||
|
Displays the current PC position. Note that this item is enabled only when connected to the debug tool. |
||
|
Forwards to the position before operating [Back To Last Cursor Position]. Note that this item is disabled when this panel is in the mixed display mode. |
||
|
Goes back to the position before operating [Jump to Function]/[Find...]/[Go To...]/[Next Bookmark]/[Previous Bookmark] or moving the caret by clicking the mouse. The jump history is cleared when all of the Editor panel currently being opened are closed. Note that this item is disabled when this panel is in the mixed display mode. |
||
|
The following items are displayed to show or hide the columns or marks on all of the Editor panels. Remove the check to hide the items (all the items are checked by default). |
||
|
Shows the mark that indicates the line modification status, in the line number area. |
||
|
Shows the mark that indicates the update status of the downloaded load module file, in the line number area. Note that this item is enabled only when connected to the debug tool. |
||
|
Note that this item is enabled only when connected to the debug tool. |
||
|
Note that this item is enabled only when connected to the debug tool. |
||
|
Note that this item is enabled only when connected to the debug tool and the mixed display mode is selected. |
||
|
Note that this item is enabled only when connected to the debug tool and the mixed display mode is selected. |
||
|
Note that this item is enabled only when connected to the debug tool. |
||


[[File] menu (Editor panel-dedicated items)]
The following items are exclusive for the [File] menu in the Editor panel (other items are common to all the panels).
|
Closes the currently editing Editor panel. When the contents of the panel have not been saved, a confirmation message is shown. |
||
|
Overwrites the contents of the currently editing Editor panel. When the file has never been saved or the file is read only, the same operation is applied as the selection in [Save file name As...]. Note that this item is disabled when this panel is in the mixed display mode. |
||
|
Opens the Save As dialog box to newly save the contents of the currently editing Editor panel. Note that if this panel is in the mixed display mode, then "file name" will be changed to "Source Mixed Data". |
||
|
Opens the Save Settings dialog box to change the encoding and newline code of the file being opened in the currently editing Editor panel. |
||
|
Opens the Windows dialog box for printing the contents of the currently editing Editor panel. |
||
|
Opens the Print Preview window to preview the file contents to be printed. |
||
[[Edit] menu (Editor panel-dedicated items)]
The following items are exclusive for [Edit] menu in the Editor panel (all other items are disabled).
|
Cancels the previous operation and restores the characters and the caret position (up to 100 times). Note that this item is disabled when this panel is in the mixed display mode. |
||
|
Cancels the previous [Undo] operation and restores the characters and the caret position. Note that this item is disabled when this panel is in the mixed display mode. |
||
|
Cuts the selected character string and copies it to the clipboard. If there is no selection, the entire line is cut. Note that this item is disabled when this panel is in the mixed display mode. |
||
|
Copies the contents of the selected range to the clipboard as character string(s). |
||
|
Inserts (insert mode) or overwrites (overwrite mode) the characters that are copied on the clip board into the caret position. Note that this item is disabled when the contents of the clipboard are not recognized as characters or this panel is in the mixed display mode. |
||
|
Deletes one character at the caret position. When there is a selection area, all the characters in the area are deleted. Note that this item is disabled when this panel is in the mixed display mode. |
||
|
Selects all the characters from beginning to the end in the currently editing text file. Note that this item is disabled when this panel is in the mixed display mode. |
||
|
Opens the Find and Replace dialog box with selecting [Quick Find] tab. |
||
|
Opens the Find and Replace dialog box with selecting [Quick Replace] tab. Note that this item is disabled when this panel is in the mixed display mode. |
||
|
Opens the Go to Line dialog box to move the caret to the specified line. |
||
|
Displays a cascading menu for bookmarks (see "2.8 Register Bookmarks"). |
||
|
Inserts/deletes a bookmark on the line at the current caret position. Note that this item is disabled when this panel is in the mixed display mode. |
||
|
Moves a caret to the position of the next bookmark, in the active Editor panel. Note that this item is disabled in the following cases: |
||
|
Moves a caret to the position of the previous bookmark, in the active Editor panel. Note that this item is disabled in the following cases: |
||
|
Clears all the registered bookmarks, in the active Editor panel. |
||
|
Opens the Bookmarks dialog box for displaying the list of bookmarks. |
||
|
Displays a cascading menu for controlling expand and collapse states of source file outlining (see "2.4.5 Use code outlining"). Note that these items are disabled when this panel is in the mixed display mode. |
||
|
Collapses all nodes that are marked as implementation blocks (e.g. function definitions). |
||
|
Toggles the current state of the innermost outlining section in which the cursor lies when you are in a nested collapsed section. |
||
|
Toggles the collapsed state of all outlining nodes, setting them all to the same expanded or collapsed state. If there is a mixture of collapsed and expanded nodes, all nodes will be expanded. |
||
|
Stops code outlining and remove all outlining information from source files. |
||
|
Starts automatic code outlining and automatically displayed in supported source files. |
||
|
Displays a cascading menu for performing an advanced operation for the Editor panel. Note that these items are disabled when this panel is in the mixed display mode. |
||
|
Increases the indentation of the current cursor line by one tab. |
||
|
Decreases the indentation of the current cursor line by one tab. |
||
|
Removes the first set of line-comment delimiters from the start of the current cursor line, appropriate to the current language. This operation will only be available when the language of the current source file has line-comment delimiters specified. |
||
|
Places line-comment delimiters at the start of the current cursor line, appropriate to the current language. This operation will only be available when the language of the current source file has line-comment delimiters specified. |
||
|
Converts each set of consecutive space characters on the current line to tab characters, but only for those sets of spaces that are at least equal to one tab size. |
||
|
Tabifies the current line, causing all spaces at the start of the line (prior to any text) to be converted to tabs where possible. |
||
|
Untabifies the current line, causing all tabs at the start of the line (prior to any text) to be converted to spaces. |
||
|
Toggles the character cases (uppercase / lowercase) of all letters within the selection. |
||
|
Capitalizes the first character of every word within the selection. |
||
|
Deletes any excess white space either side of the cursor position, leaving only one whitespace character remaining. If there the cursor is within a word or not surrounded by whitespace, this operation will have no effect. |
||
|
Deletes any trailing whitespace that appears after the last non-whitespace character on the cursor line. |
||
|
Duplicates the cursor line, inserting a copy of the line immediately after the cursor line. |
||
|
Deletes the line at the cursor if it is empty or contains only whitespace. |
||
[[Window] menu (Editor panel-dedicated items)]
The following items are exclusive for the [Window] menu in the Editor panel (other items are common to all the panels).
|
Splits the active Editor panel horizontally. Only the active Editor panel can be split. Other panels will not be split. A panel can be split up to four times. |
||
(4) Main area (when connected to the debug tool)
(5) Characters area (when disconnected from the debug tool)
(6) Characters area (when connected to the debug tool)
For details on how to set various events when connected to the debug tool, see "CS+ Debug Tool". |
The Editor panel displayed in a floating window is not displayed in the list of windows in the [Window] menu. Switching by the [Ctrl] + [Tab] key, [Shift] + [Ctrl] + [Tab] key, [Ctrl] + [F6] key, or [Shift] + [Ctrl] + [F6] key is also not supported. |
During floating, except for [Close Panel] and [Docking], items in the above table are not displayed. |
|
Clears all the coverage measurement results currently being stored in the debug tool. Note that this item is enabled only when the selected debug tool supports the coverage function. |
 ) which indicates that multiple events have been set is selected, all of the events that have been set are enabled.
 ) which indicates that multiple events have been set is selected, all of the events that have been set are disabled.
 ) which indicates that multiple events have been set is selected, all of the events that have been set are deleted.
[RH850 [E1][E20]][RX/RL78 [E1][E20][EZ Emulator]] |
 ) which indicates that multiple events have been set is selected, all of the breakpoints that have been set are enabled.
  ) which indicates that multiple events have been set is selected, all of the breakpoints that have been set are disabled.
  ) which indicates that multiple events have been set is selected, all of the breakpoints that have been set are deleted.
Except for [Simulator] |
|
Cuts the selected character string and copies it to the clipboard. |
||
|
Copies the contents of the selected range to the clipboard as character string(s). |
||
|
Inserts (insert mode) or overwrites (overwrite mode) the characters that are copied on the clip board into the caret position. When the contents of the clipboard are not recognized as characters, the operation is invalid. |
||
|
Opens the Find and Replace dialog box with selecting [Quick Find] tab. |
||
|
Opens the Go to Line dialog box to move the caret to the specified line. |
||
|
Forwards to the position before operating [Back To Last Cursor Position]. |
||
|
Goes back to the position before operating [Jump to Function]/[Find...]/[Go To...]/[Next Bookmark]/[Previous Bookmark] or moving the caret by clicking the mouse. The jump history is cleared when all of the Editor panel currently being opened are closed. |
||
|
Jumps to the function that is selected or at the caret position regarding the selected characters and the words at the caret position as functions (see "2.6 Jump to Functions"). |
||
|
Jumps to the corresponding line and column in the corresponding file if the information of a file name, a line number and a column number exists in the line at the caret position (see "2.7 Jump to a Desired Line (Tag Jump)"). |
||
|
Displays a cascading menu for bookmarks (see "2.8 Register Bookmarks"). |
||
|
Inserts/deletes a bookmark on the line at the current caret position. |
||
|
Moves a caret to the position of the next bookmark, in the active Editor panel. |
||
|
Moves a caret to the position of the previous bookmark, in the active Editor panel. |
||
|
Clears all the registered bookmarks, in the active Editor panel. Note that this item is disabled when no bookmark is registered. |
||
|
Opens the Bookmarks dialog box for displaying the list of bookmarks. |
||
|
Displays a cascading menu for performing an advanced operation for the Editor panel. |
||
|
Increases the indentation of the current cursor line by one tab. |
||
|
Decreases the indentation of the current cursor line by one tab. |
||
|
Removes the first set of line-comment delimiters from the start of the current cursor line, appropriate to the current language. This operation will only be available when the language of the current source file has line-comment delimiters specified. |
||
|
Places line-comment delimiters at the start of the current cursor line, appropriate to the current language. This operation will only be available when the language of the current source file has line-comment delimiters specified. |
||
|
Converts each set of consecutive space characters on the current line to tab characters, but only for those sets of spaces that are at least equal to one tab size. |
||
|
Tabifies the current line, causing all spaces at the start of the line (prior to any text) to be converted to tabs where possible. |
||
|
Untabifies the current line, causing all tabs at the start of the line (prior to any text) to be converted to spaces. |
||
|
Toggles the character cases (uppercase / lowercase) of all letters within the selection. |
||
|
Capitalizes the first character of every word within the selection. |
||
|
Deletes any excess white space either side of the cursor position, leaving only one whitespace character remaining. If there the cursor is within a word or not surrounded by whitespace, this operation will have no effect. |
||
|
Deletes any trailing whitespace that appears after the last non-whitespace character on the cursor line. |
||
|
Duplicates the cursor line, inserting a copy of the line immediately after the cursor line. |
||
|
Deletes the line at the cursor if it is empty or contains only whitespace. |
||
|
Registers a selected character string or a word at the caret position to the Watch panel (Watch1) as a watch-expression (the judgment of the word depends on current build tool). Note that this item is disabled when no corresponding address exists in the line at caret. |
|||
|
Registers a selected character string or a word at the caret position to the Analysis Chart panel of the analyze tool (Program Analyzer) as a variable. If variables have been already registered to all channels, a message is displayed and this operation will have no effect. Note that this item is disabled when the active project does not support a plug-in of the analyze tool. |
|||
|
Opens the Action Events dialog box to set an action event to the corresponding address of the line at the caret position. Note that this item is disabled when no corresponding address exists in the line at caret. |
|||
|
Deletes the selected character string(s) and copies them to the clipboard. If there is no selection, the entire line is cut. Note that this item is disabled when this panel is in the mixed display mode. |
|||
|
Copies the contents of the selected range to the clipboard as character string(s). |
|||
|
Inserts (insert mode) or overwrites (overwrite mode) the characters that are copied on the clip board into the caret position. Note that this item is disabled when the contents of the clipboard are not recognized as characters or this panel is in the mixed display mode. |
|||
|
Opens the Find and Replace dialog box with selecting [Quick Find] tab. |
|||
|
Opens the Go to Line dialog box to move the caret to the specified line. |
|||
|
Forwards to the position before operating [Back To Last Cursor Position]. Note that this item is disabled when this panel is in the mixed display mode. |
|||
|
Goes back to the position before operating [Jump to Function]/[Find...]/[Go To...]/[Next Bookmark]/[Previous Bookmark] or moving the caret by clicking the mouse. The jump history is cleared when all of the Editor panel currently being opened are closed. Note that this item is disabled when this panel is in the mixed display mode. |
|||
|
Executes the program from the address indicated by the current PC value to the address corresponding to the line at the caret position. Note that this item is disabled during program execution/build (not including rapid build) execution. |
|||
|
Sets the address of the line at the current caret position to the current PC value. Note that this item is disabled when no corresponding address exists in the line at caret, or during program execution/build (not including rapid build) execution |
|||
|
Jumps to the function that is selected or at the caret position regarding the selected characters and the words at the caret position as functions (see "2.6 Jump to Functions"). |
|||
|
Jumps to the corresponding line and column in the corresponding file if the information of a file name, a line number and a column number exists in the line at the caret position (see "2.7 Jump to a Desired Line (Tag Jump)"). |
|||
|
Opens the Disassemble panel and jumps to the address corresponding to the line at the caret. Note that this item is disabled when no corresponding address exists in the line at caret. |
|||
|
Displays a cascading menu for bookmarks (see "2.8 Register Bookmarks"). |
|||
|
Inserts/deletes a bookmark on the line at the current caret position. Note that this item is disabled when this panel is in the mixed display mode. |
|||
|
Moves a caret to the position of the next bookmark, in the active Editor panel. |
|||
|
Moves a caret to the position of the previous bookmark, in the active Editor panel. |
|||
|
Clears all the registered bookmarks, in the active Editor panel. |
|||
|
Opens the Bookmarks dialog box for displaying the list of bookmarks. |
|||
|
Displays a cascading menu for performing an advanced operation for the Editor panel. Note that these items are disabled when this panel is in the mixed display mode. |
|||
|
Increases the indentation of the current cursor line by one tab. |
|||
|
Decreases the indentation of the current cursor line by one tab. |
|||
|
Removes the first set of line-comment delimiters from the start of the current cursor line, appropriate to the current language. This operation will only be available when the language of the current source file has line-comment delimiters specified. |
|||
|
Places line-comment delimiters at the start of the current cursor line, appropriate to the current language. This operation will only be available when the language of the current source file has line-comment delimiters specified. |
|||
|
Converts each set of consecutive space characters on the current line to tab characters, but only for those sets of spaces that are at least equal to one tab size. |
|||
|
Tabifies the current line, causing all spaces at the start of the line (prior to any text) to be converted to tabs where possible. |
|||
|
Untabifies the current line, causing all tabs at the start of the line (prior to any text) to be converted to spaces. |
|||
|
Toggles the character cases (uppercase / lowercase) of all letters within the selection. |
|||
|
Capitalizes the first character of every word within the selection. |
|||
|
Deletes any excess white space either side of the cursor position, leaving only one whitespace character remaining. If there the cursor is within a word or not surrounded by whitespace, this operation will have no effect. |
|||
|
Deletes any trailing whitespace that appears after the last non-whitespace character on the cursor line. |
|||
|
Duplicates the cursor line, inserting a copy of the line immediately after the cursor line. |
|||
|
Deletes the line at the cursor if it is empty or contains only whitespace. |
|||
|
The following cascade menus are displayed to set the break-related event. |
|||
|
Sets a breakpoint (Hardware Break event) to the line at the caret position. |
|||
|
Sets a breakpoint (Software Break event) to the line at the caret position. |
|||
|
Sets a break event (execution type) to the line at the caret position as one of the condition for a Combination Break eventNote 1. |
|||
|
Sets a break event with read access condition to the line at the caret or the selected variable (global variable, static variable inside functions, or file-internal static variable)/I/O register [RH850][RX]/SFR [RL78]Note 2. |
|||
|
Sets a break event with write access condition to the line at the caret or the selected variable (global variable, static variable inside functions, or file-internal static variable)/I/O register [RH850][RX]/SFR [RL78]Note 2. |
|||
|
Sets a break event with read/write access condition to the line at the caret or the selected variable (global variable, static variable inside functions, file-internal static variable)/I/O register [RH850][RX]/SFR [RL78]Note 2. |
|||
|
Sets a break event with read access condition to the line at the caret or the selected variable (global variable, static variable inside functions, or file-internal static variable)/SFR as one of the condition for a Combination Break eventNote 1. |
|||
|
Sets a break event with write access condition to the line at the caret or the selected variable (global variable, static variable inside functions, or file-internal static variable)/SFR as one of the condition for a Combination Break eventNote 1. |
|||
|
Sets a break event with read/write access condition to the line at the caret or the selected variable (global variable, static variable inside functions, file-internal static variable)/SFR as one of the condition for a Combination Break eventNote 1. |
|||
|
The following cascade menus are displayed to set the trace-related eventNote 3. Note that this item is enabled only when both the selected microcontroller and debug tool support the trace function. |
|||
|
Sets a trace start event to start collecting the trace data when the line at the caret is executed. |
|||
|
Sets a trace end event to stop collecting the trace data when the line at the caret is executed. |
|||
|
Sets a Point Trace event to record the access value as the trace data when a variable at the caret or the selected variable (global variable, static variable inside functions, file-internal static variable) /I/O register [RH850][RX]/SFR [RL78] is read accessed. |
|||
|
Sets a Point Trace event to record the access value as the trace data when a variable at the caret or the selected variable (global variable, static variable inside functions, file-internal static variable) /I/O register [RH850][RX]/SFR [RL78] is write accessed. |
|||
|
Sets a Point Trace event to record the access value as the trace data when a variable at the caret or the selected variable (global variable, static variable inside functions, file-internal static variable) /I/O register [RH850][RX]/SFR [RL78] is read/ write accessed. |
|||
|
Sets a trace start event to start collecting the trace data when a variable at the caret or the selected variable (global variable, static variable inside functions, file-internal static variable) /I/O register [RH850][RX]/SFR [RL78] is read/ write accessed. Note that this item is enabled only when both the selected microcontroller and debug tool support this function. |
|||
|
Sets a trace end event to stop collecting the trace data when a variable at the caret or the selected variable (global variable, static variable inside functions, file-internal static variable) /I/O register [RH850][RX]/SFR [RL78] is read/ write accessed. Note that this item is enabled only when both the selected microcontroller and debug tool support this function. |
|||
|
Opens the Property panel to set the trace function. Note that this item is disabled the trace function is in operation. |
|||
|
The following cascade menus are displayed to set the timer-related eventNote 4. Note that this item is enabled only when both the selected microcontroller and debug tool support the timer function. |
|||
|
Sets a timer start event to start measuring the execution time of the program when an instruction of an address at the caret position is executed. |
|||
|
Specify a channel nNote 5 in which a timer start event is set. Note that this item is enabled only when both the selected microcontroller and debug tool support this function. |
|||
|
Sets a timer end event to stop measuring the execution time of the program when an instruction of an address at the caret position is executed. |
|||
|
Specify a channel nNote 5 in which a timer end event is set. Note that this item is enabled only when both the selected microcontroller and debug tool support this function. |
|||
|
Sets a timer start event that causes a measurement of the program's execution time to start upon read/write access to the caret position or a selected variable (global variable, static variable inside a function, static variable inside a file) or I/O register [RH850][RX]/SFR [RL78]. Note that this item is enabled only when both the selected microcontroller and debug tool support this function. |
|||
|
Specify a channel nNote 5 in which a timer start event is set. |
|||
|
Sets a timer end event that causes a measurement of the program's execution time to finish upon read/write access to the caret position or a selected variable (global variable, static variable inside a function, static variable inside a file) or I/O register [RH850][RX]/SFR [RL78]. Note that this item is enabled only when both the selected microcontroller and debug tool support this function. |
|||
|
Specify a channel nNote 5 in which a timer end event is set. |
|||
|
Opens the Events panel and displays only timer-related events. |
|||
|
Performance Measurement Settings [Full-spec emulator] [E1/E20[RH850]] |
The following cascade menus are displayed to set the event related to performance measurement. |
||
|
Sets a performance measurement start event to start measuring performance measurement when the instruction of the address at the caret position is executed. |
|||
|
Specify a channel nNote 6 (n: 1 to 3) in which a performance measurement start event is set. |
|||
|
Sets a performance measurement end event to stop measuring performance measurement when the instruction of the address at the caret position is executed. |
|||
|
Specify a channel nNote 6 (n: 1 to 3) in which a performance measurement end event is set. |
|||
|
Sets a performance measurement start event that causes performance measurement to start upon read access to the caret position or a selected variable (global variable, static variable inside a function, static variable inside a file) or I/O register. |
|||
|
Specify a channel nNote 6 (n: 1 to 3) in which a performance measurement start event is set. |
|||
|
Sets a performance measurement end event that causes performance measurement to end upon read access to the caret position or a selected variable (global variable, static variable inside a function, static variable inside a file) or I/O register. |
|||
|
Specify a channel nNote 6 (n: 1 to 3) in which a performance measurement end event is set. |
|||
|
Sets a performance measurement start event that causes performance measurement to start upon write access to the caret position or a selected variable (global variable, static variable inside a function, static variable inside a file) or I/O register. |
|||
|
Specify a channel nNote 6 (n: 1 to 3) in which a performance measurement start event is set. |
|||
|
Sets a performance measurement end event that causes performance measurement to end upon write access to the caret position or a selected variable (global variable, static variable inside a function, static variable inside a file) or I/O register. |
|||
|
Specify a channel nNote 6 (n: 1 to 3) in which a performance measurement end event is set. |
|||
|
Sets a performance measurement start event that causes performance measurement to start upon read/write access to the caret position or a selected variable (global variable, static variable inside a function, static variable inside a file) or I/O register. |
|||
|
Specify a channel nNote 6 (n: 1 to 3) in which a performance measurement start event is set. |
|||
|
Sets a performance measurement end event that causes performance measurement to end upon read/write access to the caret position or a selected variable (global variable, static variable inside a function, static variable inside a file) or I/O register. |
|||
|
Specify a channel nNote 6 (n: 1 to 3) in which a performance measurement end event is set. |
|||
|
Opens the Events panel and displays events related to performance measurement. |
|||
|
Clears all the coverage measurement results currently being stored in the debug tool. Note that this item is enabled only when the selected debug tool supports the coverage function. |
|||
|
Opens the Save As dialog box to newly save the contents of the currently editing Editor panel. Note that this item is enabled only when the Editor panel is in the mixed display mode. |
|||
This item is enabled only when both the selected microcontroller and debug tool support a Combination Break event. |
This item is disabled when both the selected microcontroller and debug tool support a Combination Break event (i.e. this item is not shown). |
[Simulator] |
[Simulator] |
The specifiable number of channels differs with the selected microcontroller. |