2.6.1
Add a file to a project
Files can be added to a project by the following methods.
(1) | Adding an existing file |
(a) | Add an individual files |
Drag the file from Explorer or the like, and drop it onto the empty space below the project tree.
The file is added below the File node.
Figure 2.50 | Project Tree Panel (File Drop Location) |
Drag the folder from Explorer or the like, and drop it onto the empty space below the project tree. The Add Folder and File dialog box will open.
Remark | You can also add multiple folders to the project at the same time by dragging multiple folders at same time and dropping them onto the project tree. |
Caution | When the folder with the name that is more than 200 characters is dropped, the folder is added to the project tree as a category with the name that 201st character and after are deleted. |
Figure 2.51 | Add Folder and File Dialog Box |
In the dialog box, select the types of the files to be added to the project and specify the number of levels of the subfolder to be added to the project. And then click the [OK] button.
The file types to be displayed are as follows.
|
Project for the CC-RH compiler
|
C source file (*.c)
Header file (*.h; *.inc)
Assembly source file (*.asm; *.s; *.fsy)
Library file (*.lib)
Object file (*.obj)
Relocatable file (*.rel)
Text file (*.txt)
|
|
Project for the CC-RX compiler
|
C source file (*.c)
C++ source file (*.cpp; *.cp; *.cc)
Header file (*.h; *.hpp; *.inc)
Assembler source file (*.src; *.s)
Jump table file (*.jmp)
Symbol address file (*.fsy)
Library file (*.lib)
Object module file (*.obj)
Relocatable file (*.rel)
Text file (*.txt)
|
|
Project for the CC-RL compiler
|
C source file (*.c)
Header file (*.h; *.inc)
Assembly source file (*.asm; *.s; *.fsy)
Library file (*.lib)
Object file (*.obj)
Relocatable file (*.rel)
Text file (*.txt)
|
|
Debug-dedicated project
|
C source file (*.c)
Header file (*.h; *.inc)
Assemble file (*.asm; *.s)
Object module file (*.obj; *.o)
Load module file (*.abs; *.lmf; *.out)
Text file (*.txt)
|
Remark | You can select multiple file types by left clicking while holding down the [Ctrl] or [Shift] key.
If nothing is selected, it is assumed that all types are selected. |
The folder is added below the File node.
Note that on the project tree, the folder is the category.
Remark | When the category node created by the user exists, you can add a file below the node by dropping the file onto the node (see "2.6.4 Classify a file into a category" for a category node). |
(2) | Creating and adding an empty file |
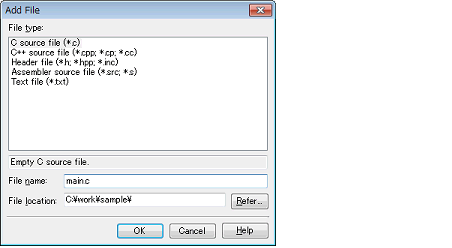
On the project tree, select either one of the Project node, Subproject node, or File node, and then select [Add] >> [Add New File...] from the context menu. The Add File dialog box will open.
Figure 2.52 | Add File Dialog Box |
In the dialog box, specify the file to be created and then click the [OK] button.
The file types to be displayed are as follows.
|
Project for the CC-RH compiler
|
C source file (*.c)
Header file (*.h; *.inc)
Assembly source file (*.asm; *.s; *.fsy)
Text file (*.txt)
|
|
Project for the CC-RX compiler
|
C source file (*.c)
C++ source file (*.cpp; *.cp; *.cc)
Header file (*.h; *.hpp; *.inc)
Assembler source file (*.src; *.s)
Text file (*.txt)
|
|
Project for the CC-RL compiler
|
C source file (*.c)
Header file (*.h; *.inc)
Assembly source file (*.asm; *.s; *.fsy)
Text file (*.txt)
|
|
Debug-dedicated project
|
C source file (*.c)
Header file (*.h; *.inc)
Assemble file (*.asm; *.s)
Text file (*.txt)
All files (*.*)
|
The file is added below the File node.
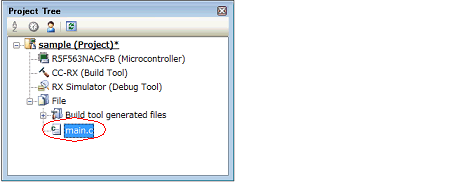
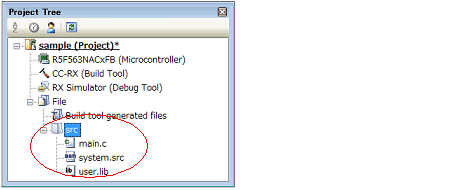
The project tree after adding the file and folder will look like the one below.
Figure 2.53 | Project Tree Panel (After Adding File "main.c") |
Figure 2.54 | Project Tree Panel (After Adding Folder "src") |
Remark | The location of the file added below the File node depends on the current file display order setting.
See "2.6.5 Change the file display order" for the method of changing the file display order. |
Caution 1. | If the paths differ, you can add source files with the same name.
Note, however, that if the setting of the output file name is left as the default, the output files will have the same name, which will prevent the build from running correctly (for example, when adding D:\sample1\func.c and D:\sample2\func.c, the default output file name for these files is both func.obj).
To avoid this problem, set the output file name for each of those files to a different name with the individual build options for the source files.
Changing the name of the C source file is made with the [Object module file name] property in the [Output File] category from the [Individual Compile Options] tab.
The changing the name of the assembly source file is made with the [Object file name] property in the [Output File] category from the [Individual Assemble Options] tab.
See "CS+ Integrated Development Environment User’s Manual: Build Tool Operation" for how to set the individual build options. |
Caution 2. | If source files with the same name are added, the target file cannot be opened during debugging. |
Caution 3. | Up to 5000 files can be added to the main project or subproject. |
Caution 4. | The name of a network path cannot be used for [File location]. Assign the name of a path on a drive. |
When a new file is added, an empty file is created in the location specified in the Add File dialog box.
By double clicking the file name on the project tree, you can open the Editor panel and edit the file.
The files that can be opened with the Editor panel are shown below.
- | Assembly source file (*.asm, *.s) |
- | Symbol address file (*.fsy) |
- | Header file (*.h, *.inc) |
- | List file for assembly program (*.lst, *.lis) |
- | Preprocessor expanded file for assembly program (*.exp) |
- | Assemble list file (*.prn) |
- | Link order specification file (*.mtls) |
- | Library list file (*.lbp) |
- | Motorola S-record file (*.mot) |
Remark 1. | You can use one of the procedures below to open files other than those listed above in the Editor panel. |
- | Drag a file and drop it onto the Editor panel. |
- | Select a file and then select [Open with Internal Editor...] from the context menu. |
Remark 2. | When the environment is set to use an external text editor on the Option dialog box, the file is opened with the external text editor that has been set.
Other files are opened with the applications associated by the host OS. |


