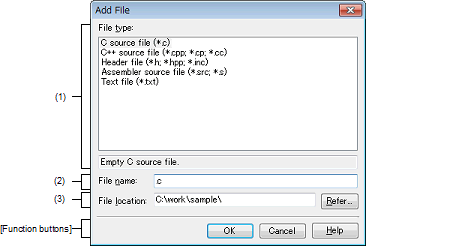
This dialog box is used to create a new file and add it to the project.

The following items are explained here.
On the Project Tree panel, select the Project node, Subproject node, File node, Category node, or Download files node, and then select [Add] >> [Add New File...] from the context menu. |
Select the type of the file to be created.
When the file type is selected, the description is displayed at the lower box.
Directly enter the name of the file to be created.
If any extension is not designated, the one selected in the [File type] area will be added. |
The name of a network path cannot be used for [File location]. Assign the name of a path on a drive. |
Designate the location to be created the file by directly entering its path or selecting from the [Refer...] button.
The path of the project folder is displayed by default.
However, when this dialog box is opened from the context menu in the Category node (only when a shortcut to the folder has been made and the folder exists), the path to the folder specified in the category is displayed.
|
Opens the Browse For Folder dialog box. If a folder is selected, the path will be added in the text box. |
Up to 259 characters (path and file name combined) can be specified in the [File name] area and [File location] area. When the input violates any restriction, the following messages will be shown on the [File name] area in the tooltip. |