20. Advanced Guidelines
20.1. Setup environment and debug multicore CA55 with CR52 using renesas-amalgamator
20.1.1. Overview
Support debug multicore with CA55 and CR52 for R-Car S4 device on VS code.
This item describes how to connect the S4 board to the PC host, install an extension, import the project, configure file launch.json, run and debug.
20.1.2. Connecting S4 board to PC host
We need to connect between board and PC to debug multicore ARM on VSCode as shown in the picture below:
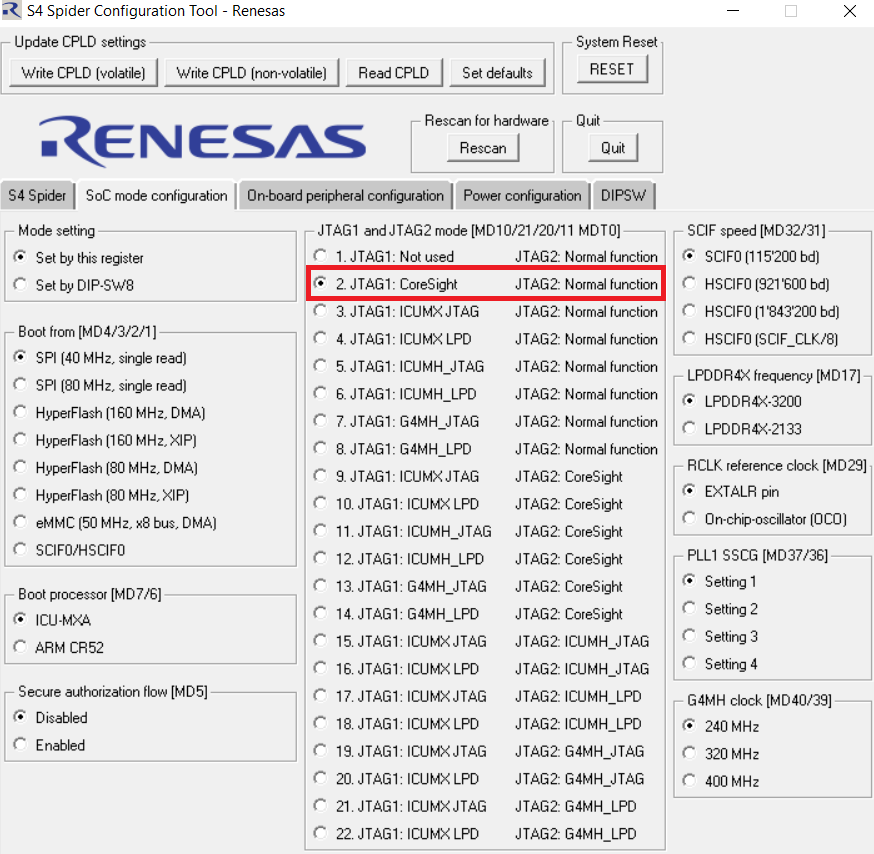
Select the mode for S4 Spider Configuration tool -Renesas as shown below:
20.1.3. Setup debugger options
Install the Renesas Debug extension to VSCode (please refer to Section 1: Installation).
Import the built CA55 and CR52 projects into VS Code.
In order to debug a project using VS Code and the Renesas Debug extension, a configuration file called launch.json needs to be created.
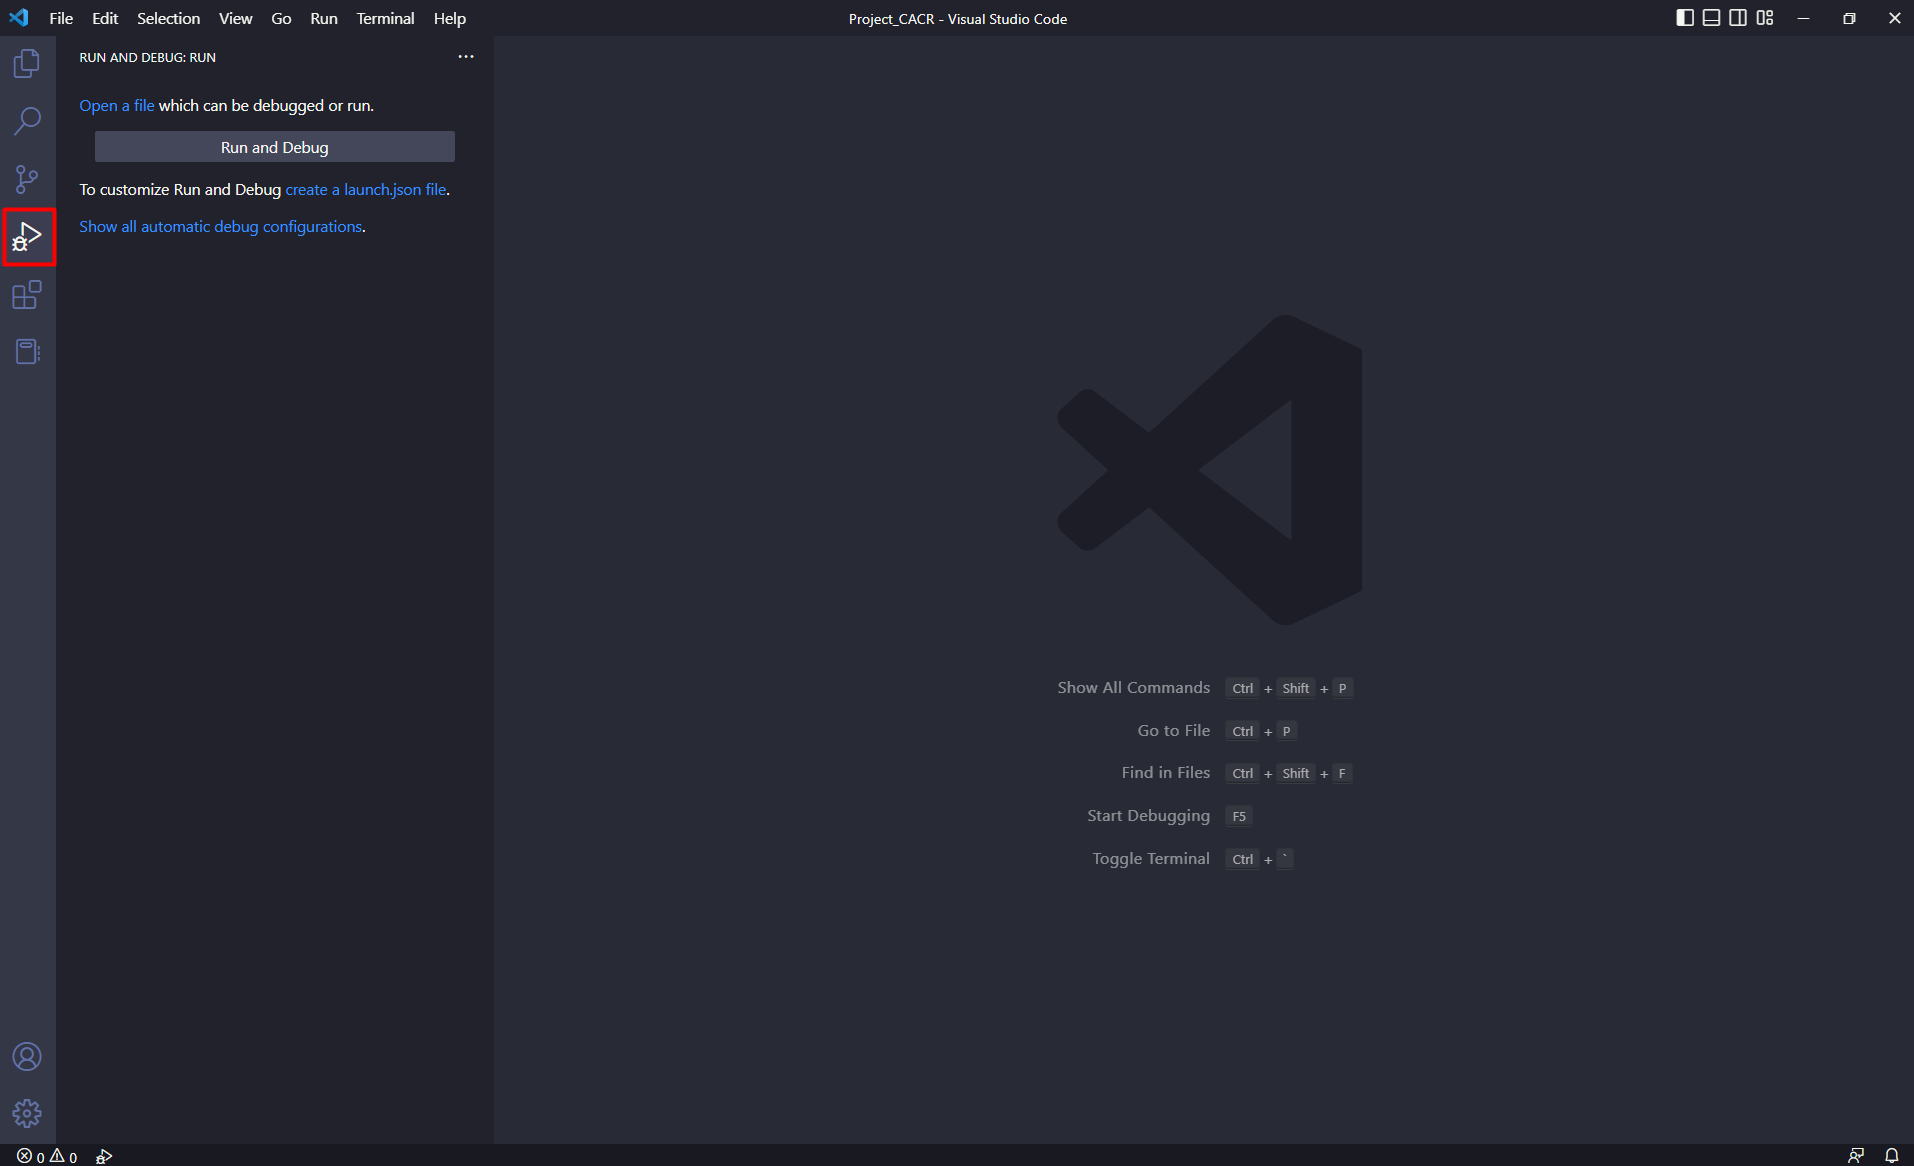
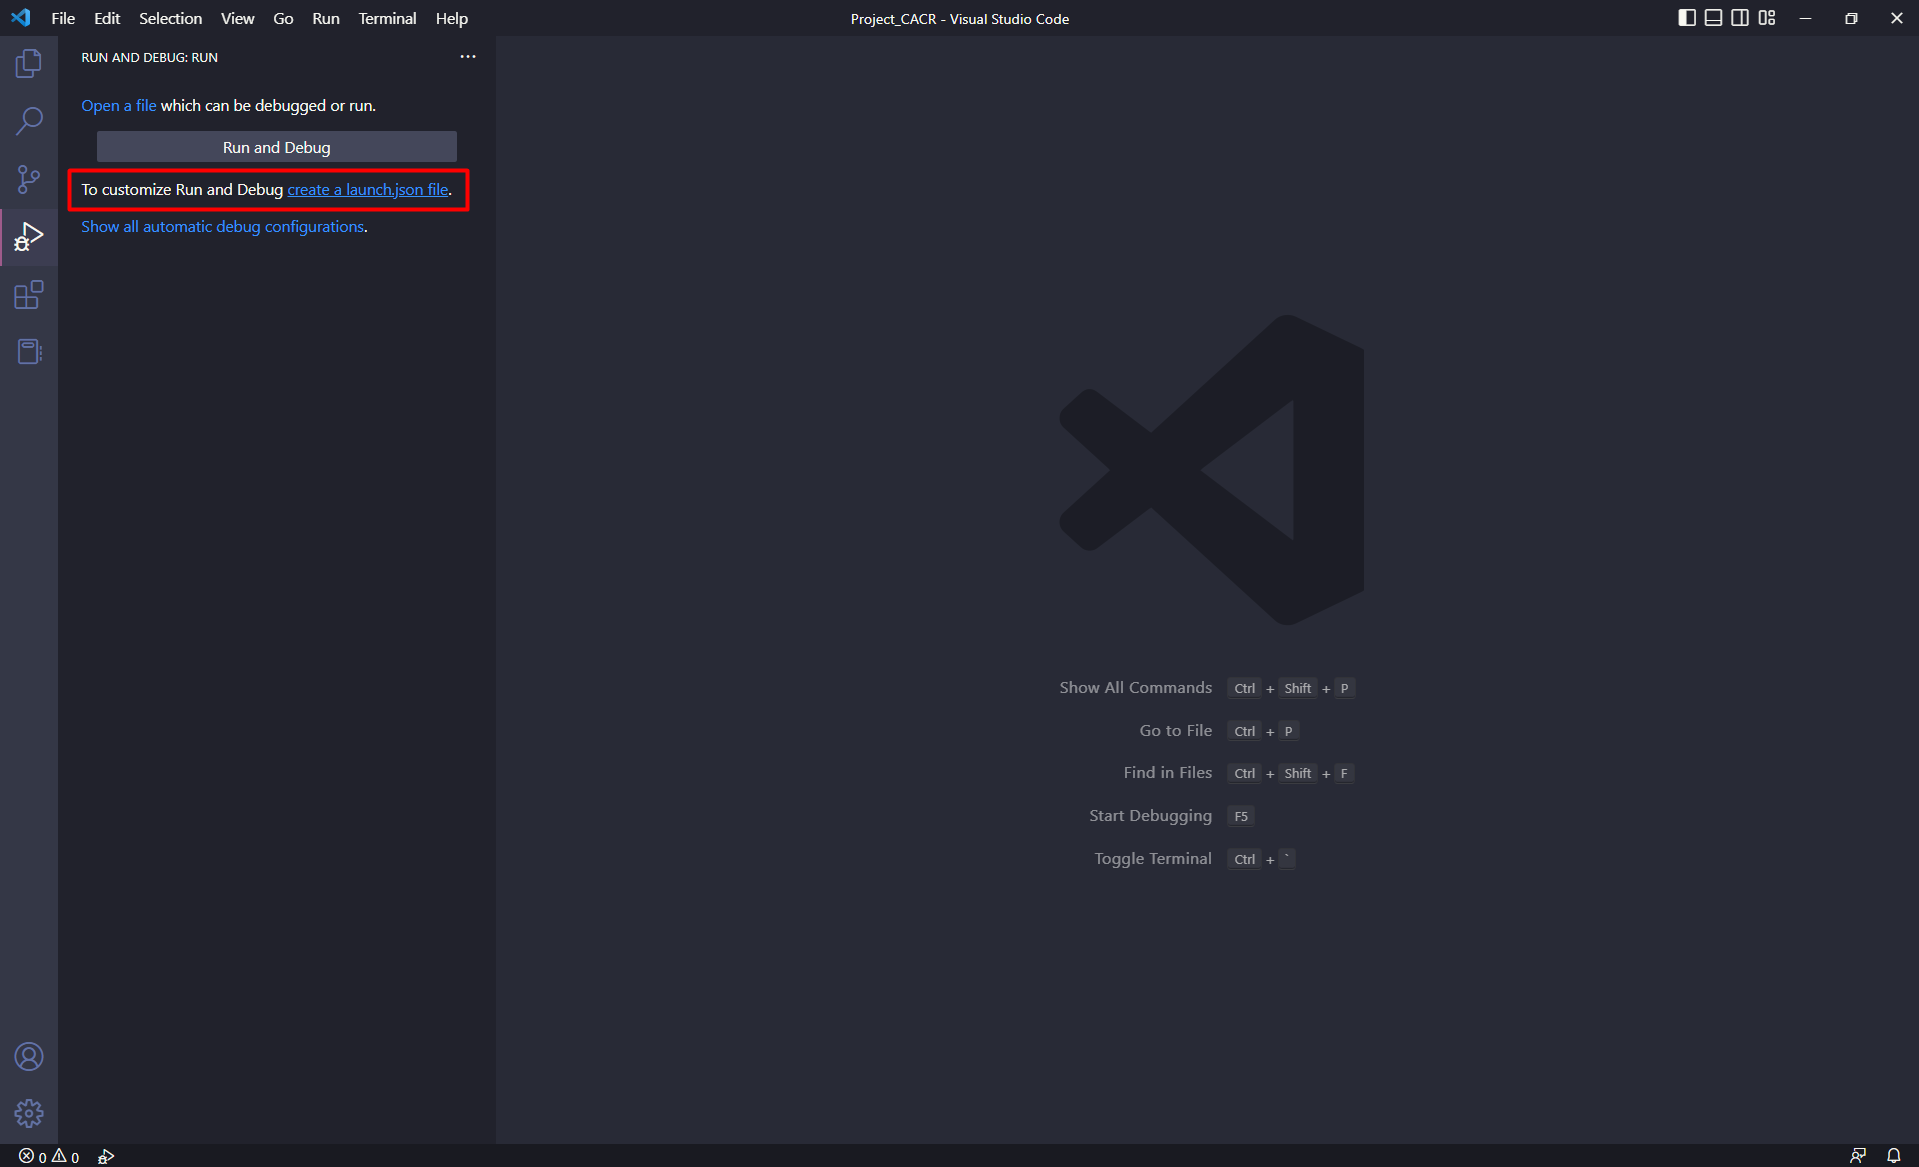
Select [Run and Debug] view.
Select [Create a launch.json file] link.
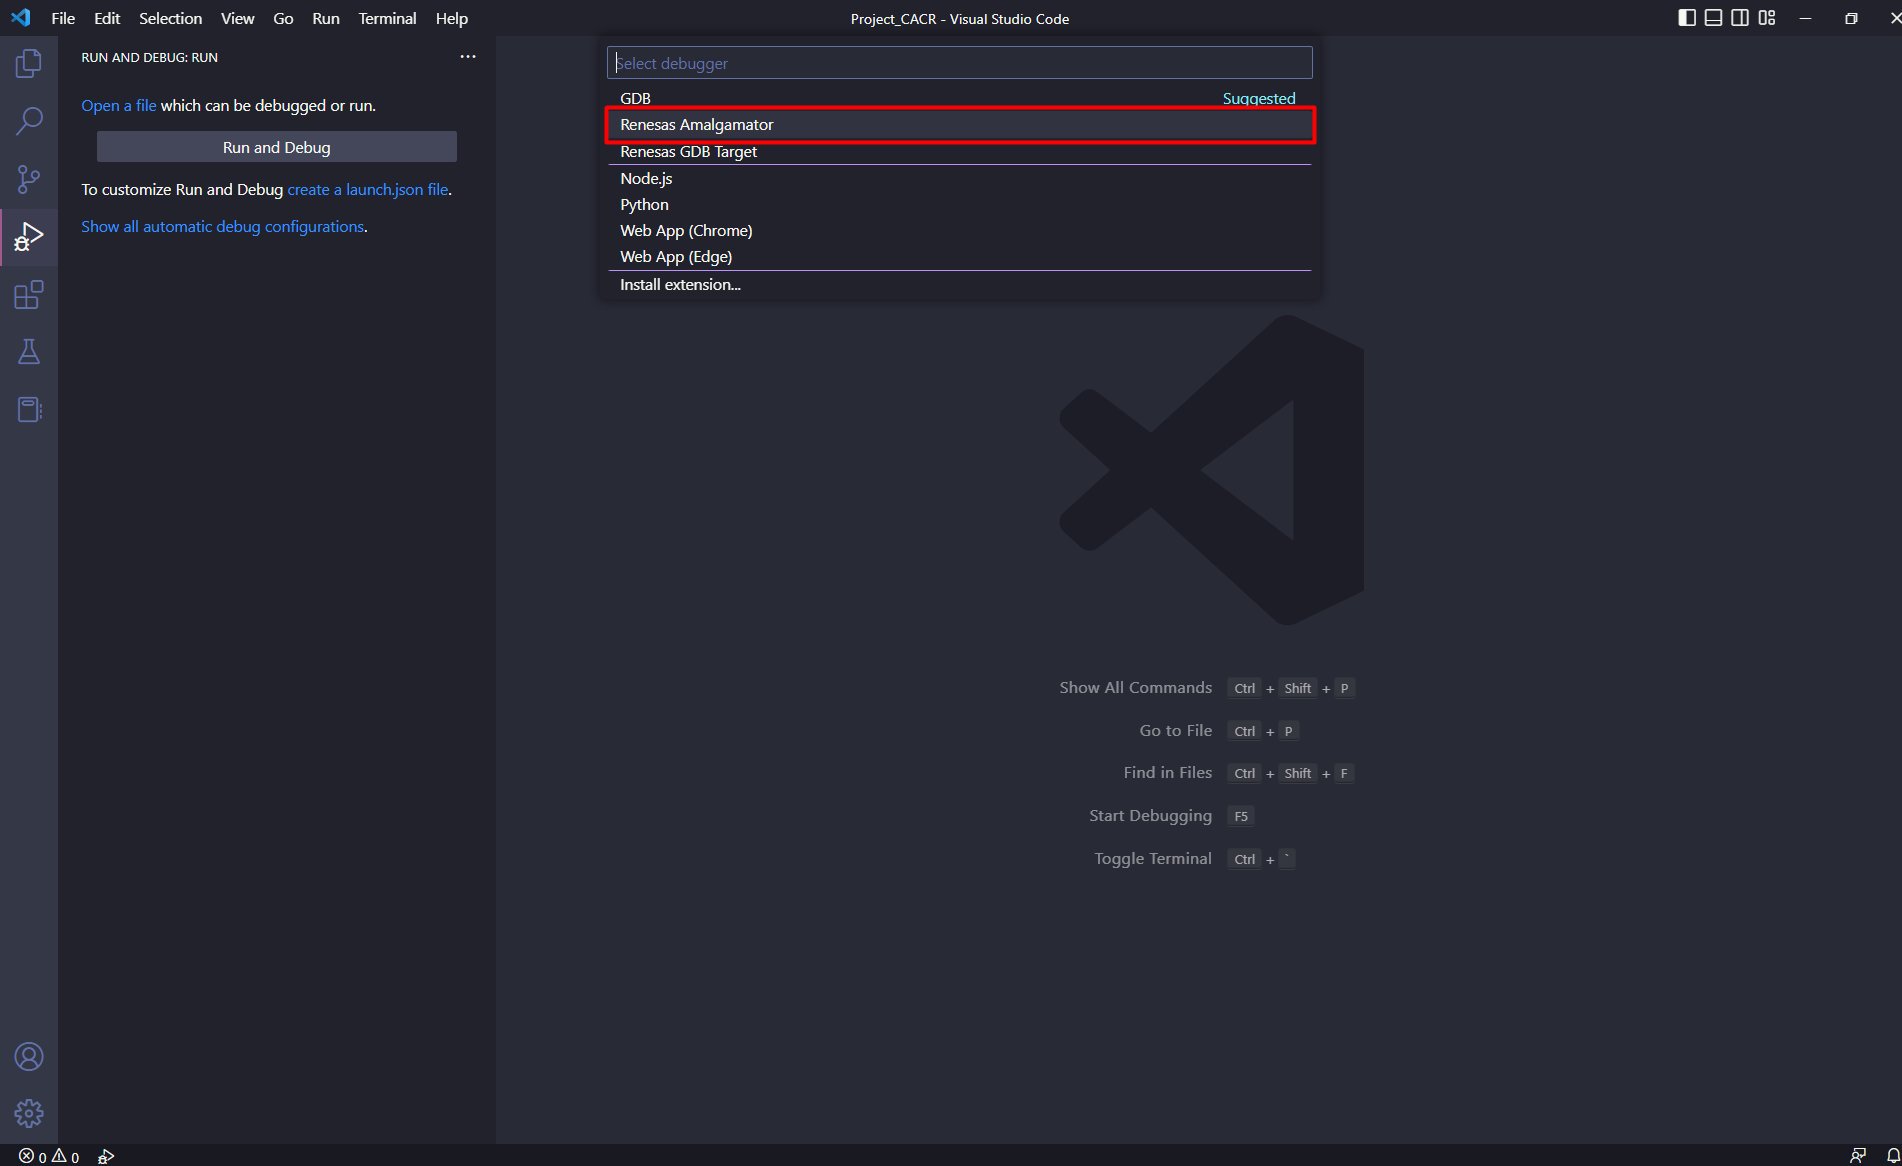
Select [Renesas Amalgamator].
A launch.json file will be created inside .vscode folder with some default settings.
For debugging multicore with multiple architectures on a single device, the configuration can be combined into a single launch entry.
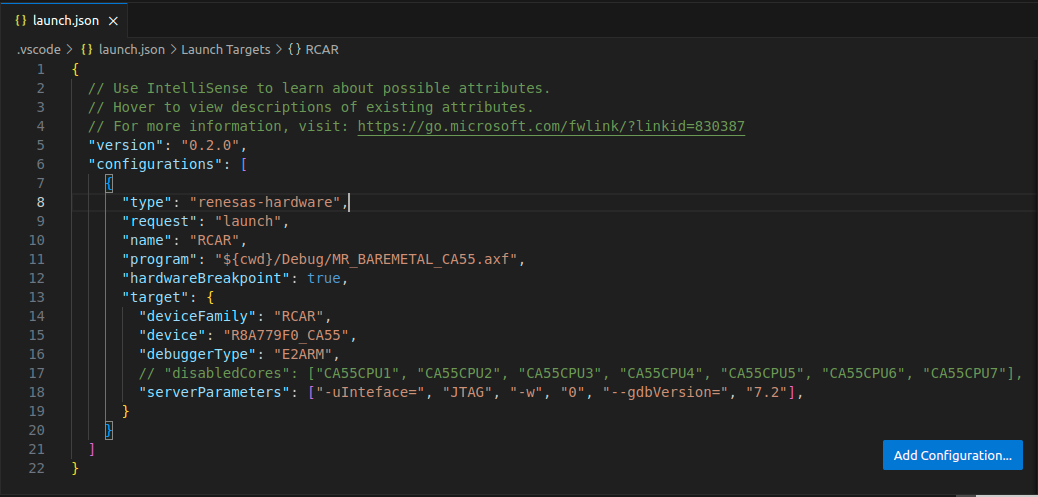
In the launch.json file, fill in the following fields.
launch.json
 1{
 2  // Use IntelliSense to learn about possible attributes.
 3  // Hover to view descriptions of existing attributes.
 4  // For more information, visit: https://go.microsoft.com/fwlink/?linkid=830387
 5  "version": "0.2.0",
 6  "configurations": [
 7    {
 8      "type": "renesas-amalgamator",
 9      "request": "launch",
10      "name": "<display name of the configuration>",
11      "children": [
12        {
13          "name": "<display name of core>",
14          "debugAdapterRuntime": "node",
15          "interfaceType": "GDB",
16          "cortexArmList": [
17            "CortexA55", //The first Cortex is launched as the primary session
18            "CortexR52"  //All remaining Cortex-s are attached as secondary sessions
19          ],
20          "arguments": {
21            "type": "renesas-hardware",
22            "request": "launch",
23            "hardwareBreakpoint": true,
24            "isHeterogeneous": true, //Enables multi-architecture debugging
25            "program": "<absolute path to project's executable file (.x, .elf,...)>",
26            "target": {
27              "deviceFamily": "RCAR",
28              "device": "<CPU of the device>",
29              "debuggerType": "<type of the debugger>"
30            }
31          }
32        }
33      ]
34    }
35  ]
36}
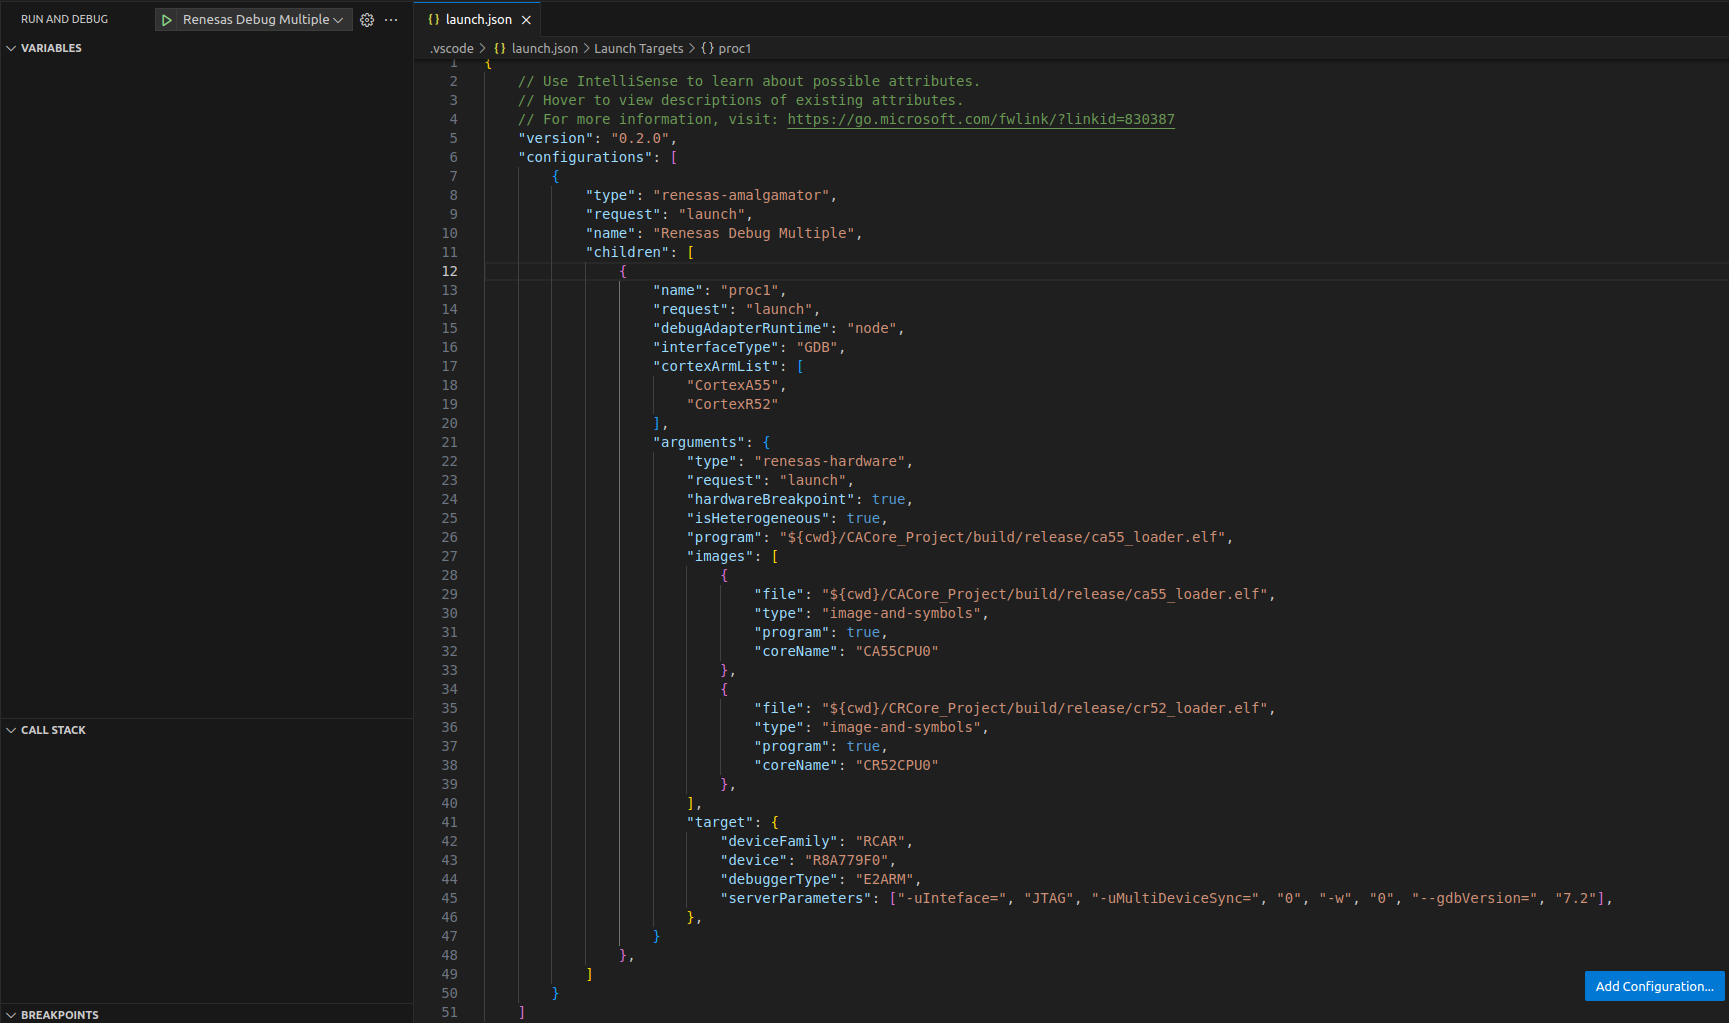
Example configuration file launch.json:
Example: launch.json
 1{
 2  // Use IntelliSense to learn about possible attributes.
 3  // Hover to view descriptions of existing attributes.
 4  // For more information, visit: https://go.microsoft.com/fwlink/?linkid=830387
 5  "version": "0.2.0",
 6  "configurations": [
 7    {
 8      "type": "renesas-amalgamator",
 9      "request": "launch",
10      "name": "Debug Multiple",
11      "children": [
12        {
13          "name": "proc1",
14          "debugAdapterRuntime": "node",
15          "interfaceType": "GDB",
16          "cortexArmList": [
17            "CortexA55",
18            "CortexR52"
19          ],
20          "arguments": {
21            "type": "renesas-hardware",
22            "request": "launch",
23            "hardwareBreakpoint": true,
24            "isHeterogeneous": true,
25            "program": "${cwd}/CACore_Project/build/release/ca55_loader.elf",
26            "images": [
27                {
28                    "file": "${cwd}/CACore_Project/build/release/ca55_loader.elf",
29                    "type": "image-and-symbols",
30                    "program": true, //Specify the program for the first Cortex
31                    "coreName": "CA55CPU0"
32                },
33                {
34                    "file": "${cwd}/CRCore_Project/build/release/cr52_loader.elf",
35                    "type": "image-and-symbols",
36                    "program": true, //Specify the program for the second Cortex
37                    "coreName": "CR52CPU0"
38                },
39            ],
40            "target": {
41              "deviceFamily": "RCAR",
42              "device": "R8A779F0",
43              "debuggerType": "E2ARM",
44              "serverParameters": ["-uInteface=", "JTAG", "-w", "0", "-uConnectMode=", "RESET", "-uWorkRamAddress=", "0x0", "-uSyncMode=", "async", "--gdbVersion=", "7.2"]
45            },
46          }
47        }
48      ]
49    }
50  ]
51}
20.1.4. Start debugging
After setting up debugger options, a debug session can be started by selecting the created configuration and click [Start Debugging] button in [Run and Debug] view, or press [F5].
Waiting for the program to launch and debug successfully.
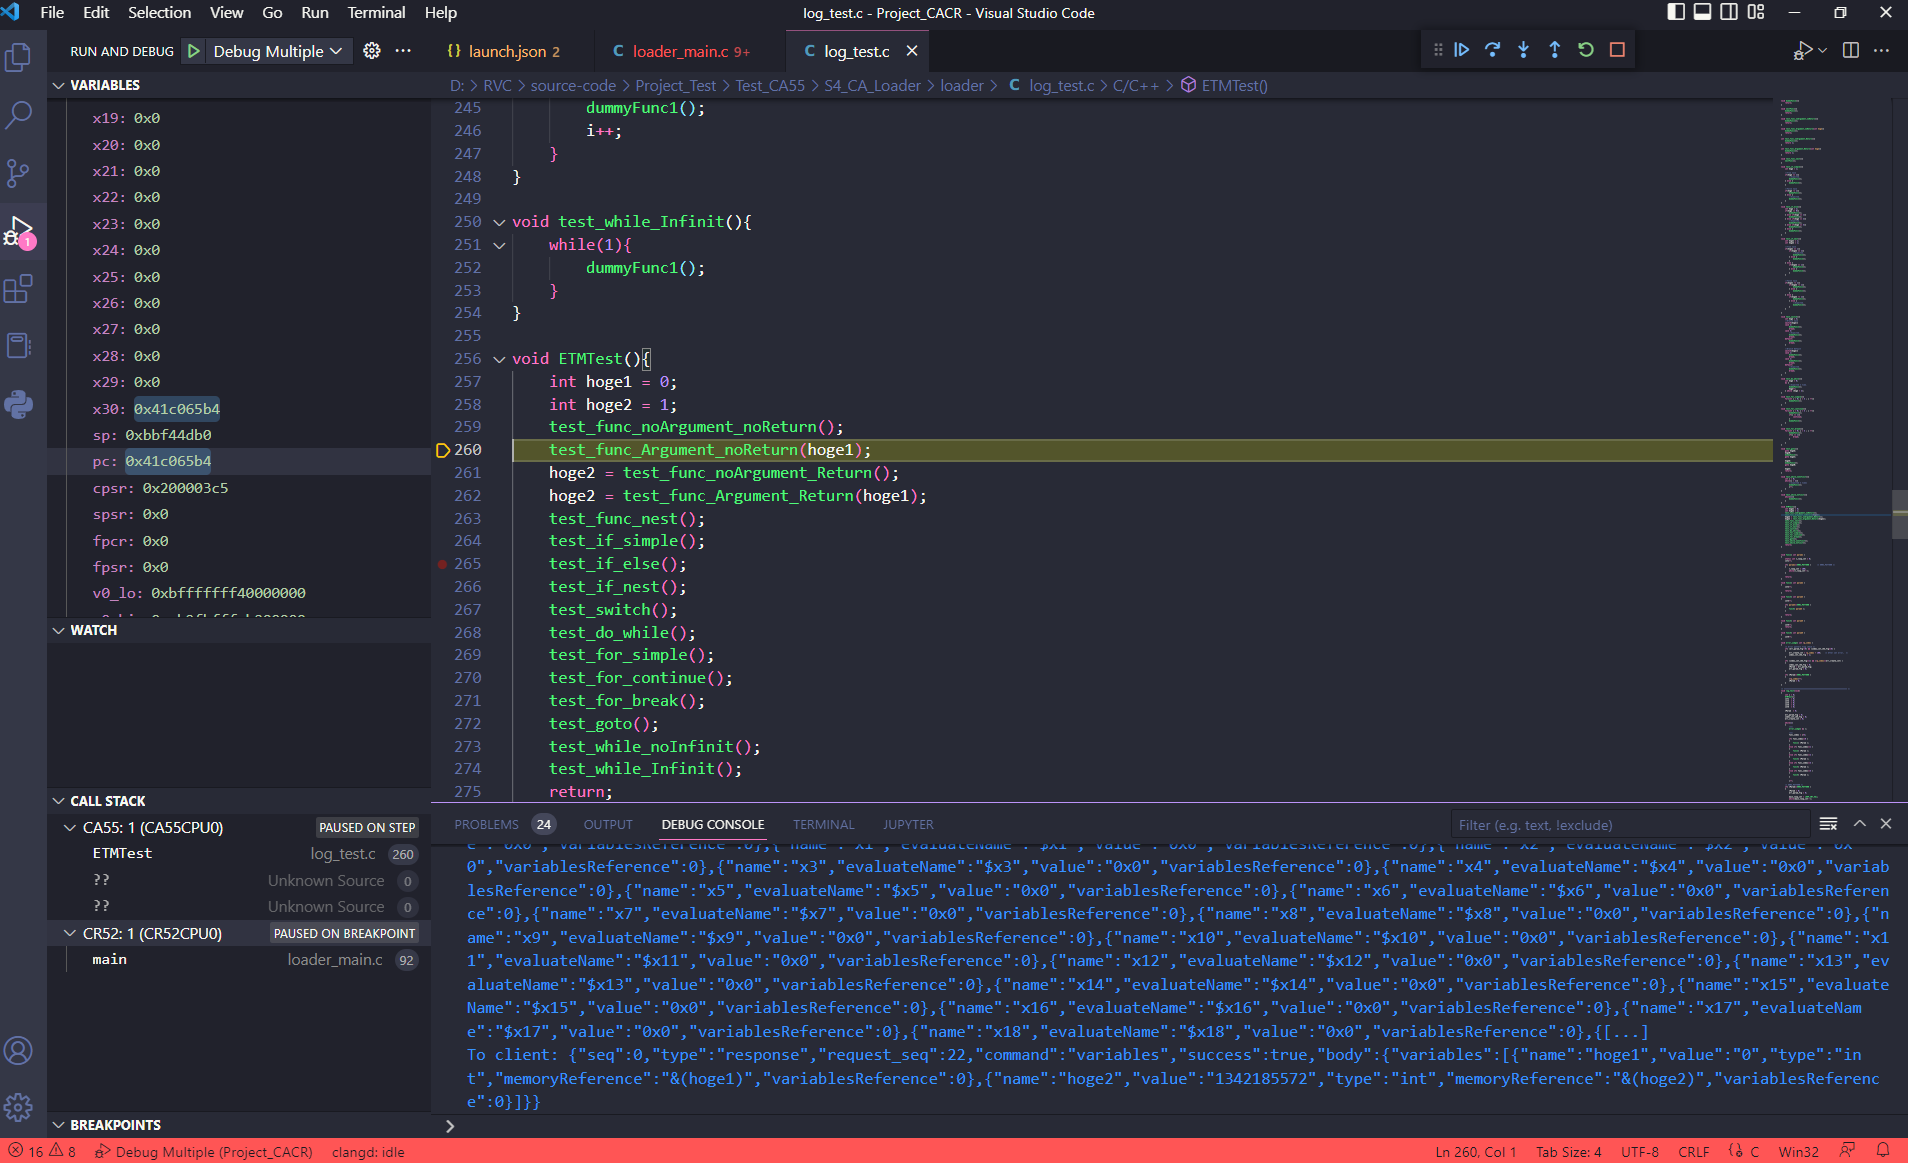
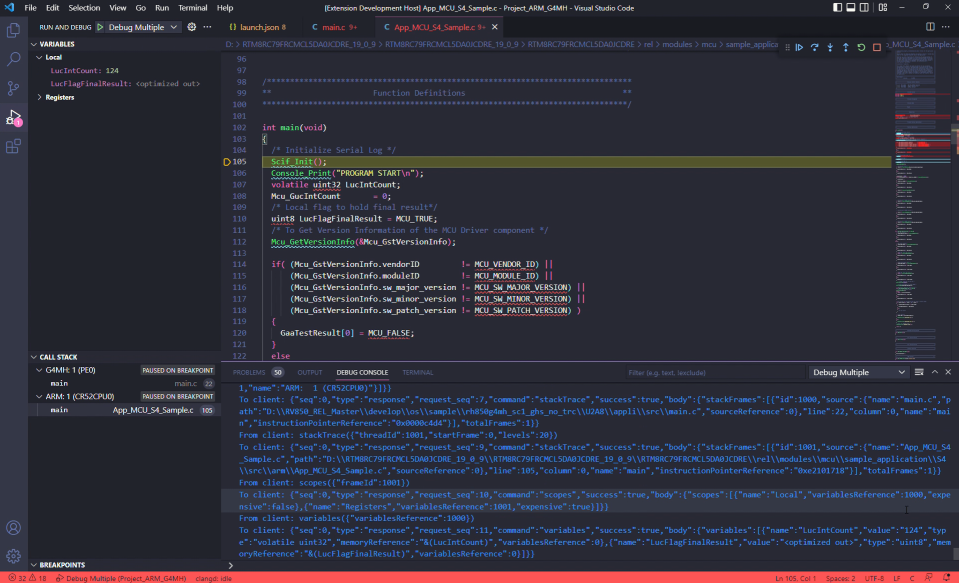
Displaying variables, watch expression, call stack… are supported in VS Code:
Select [View] -> [Open View…]
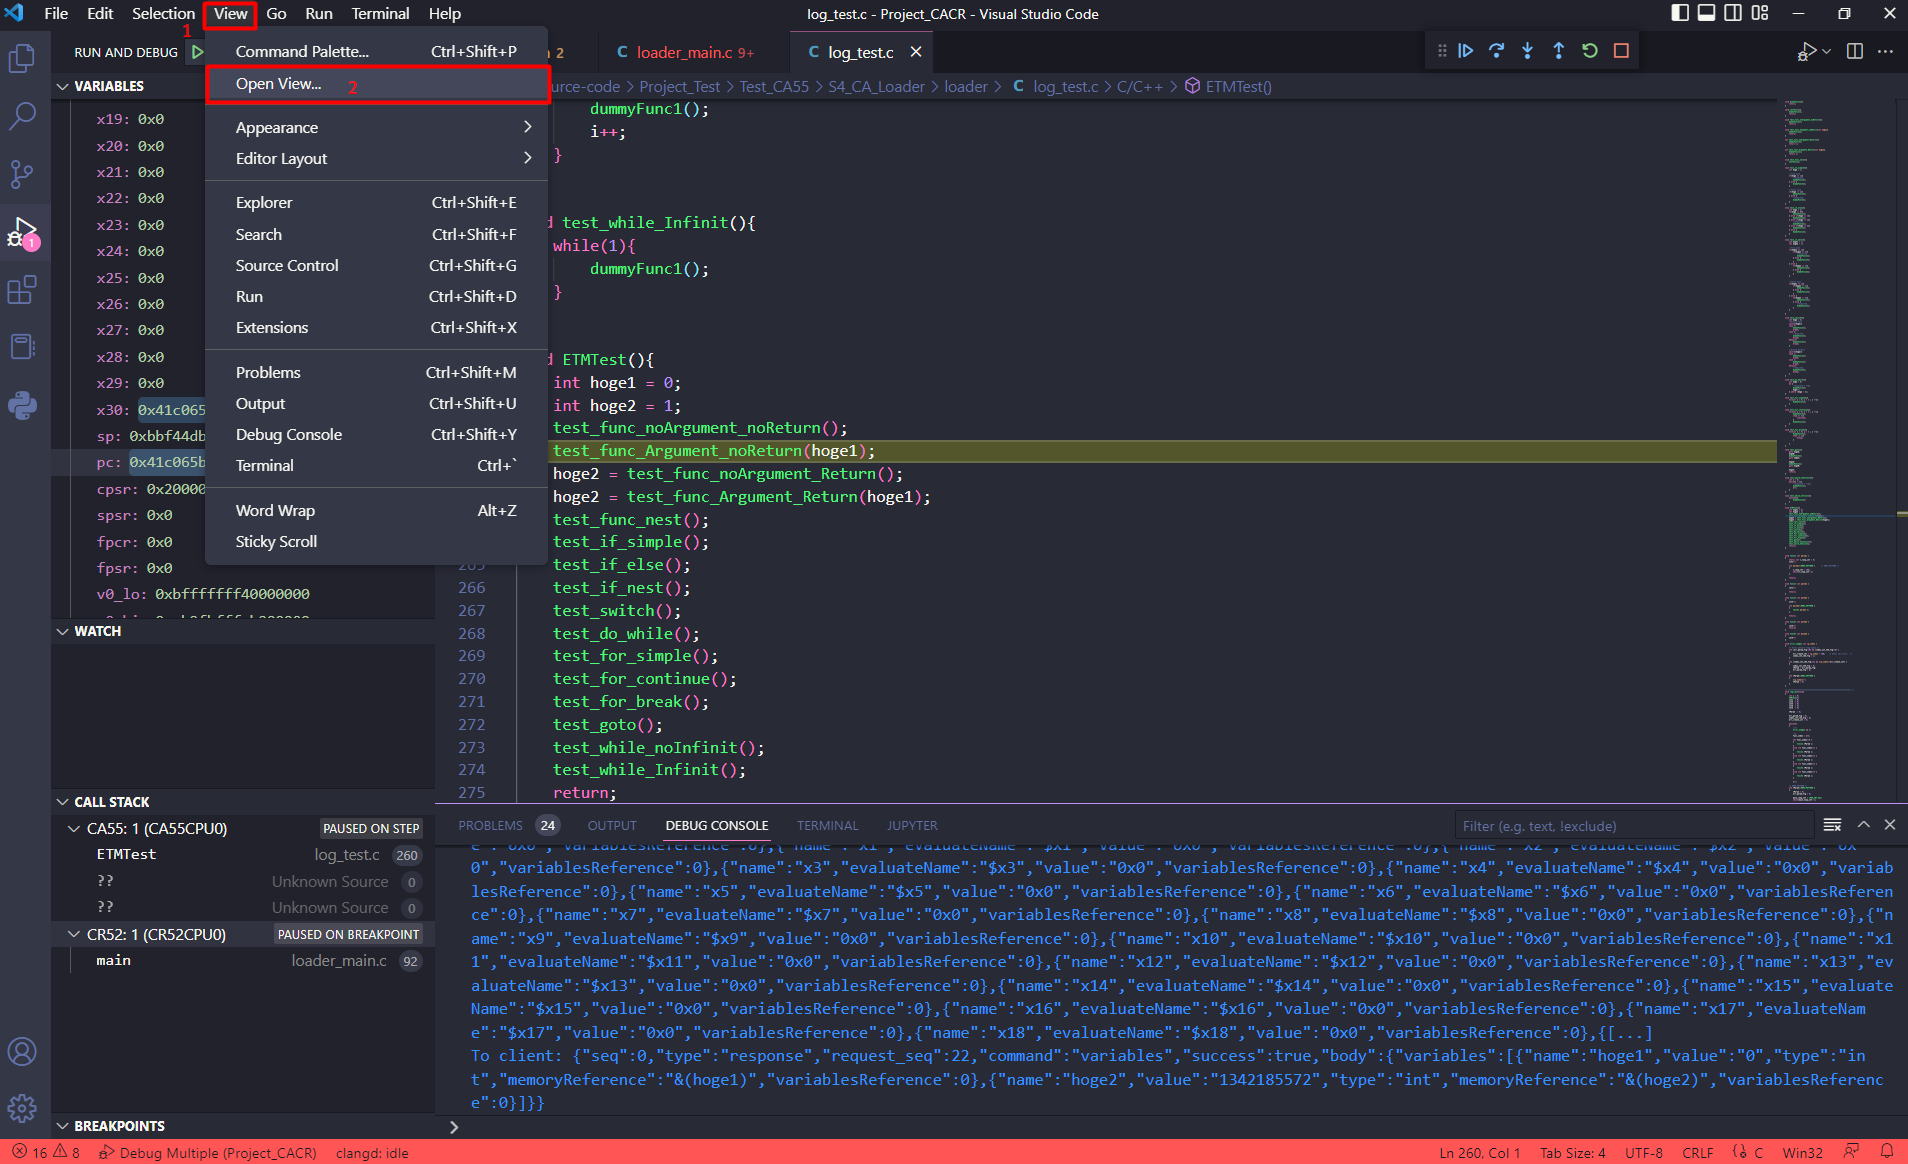
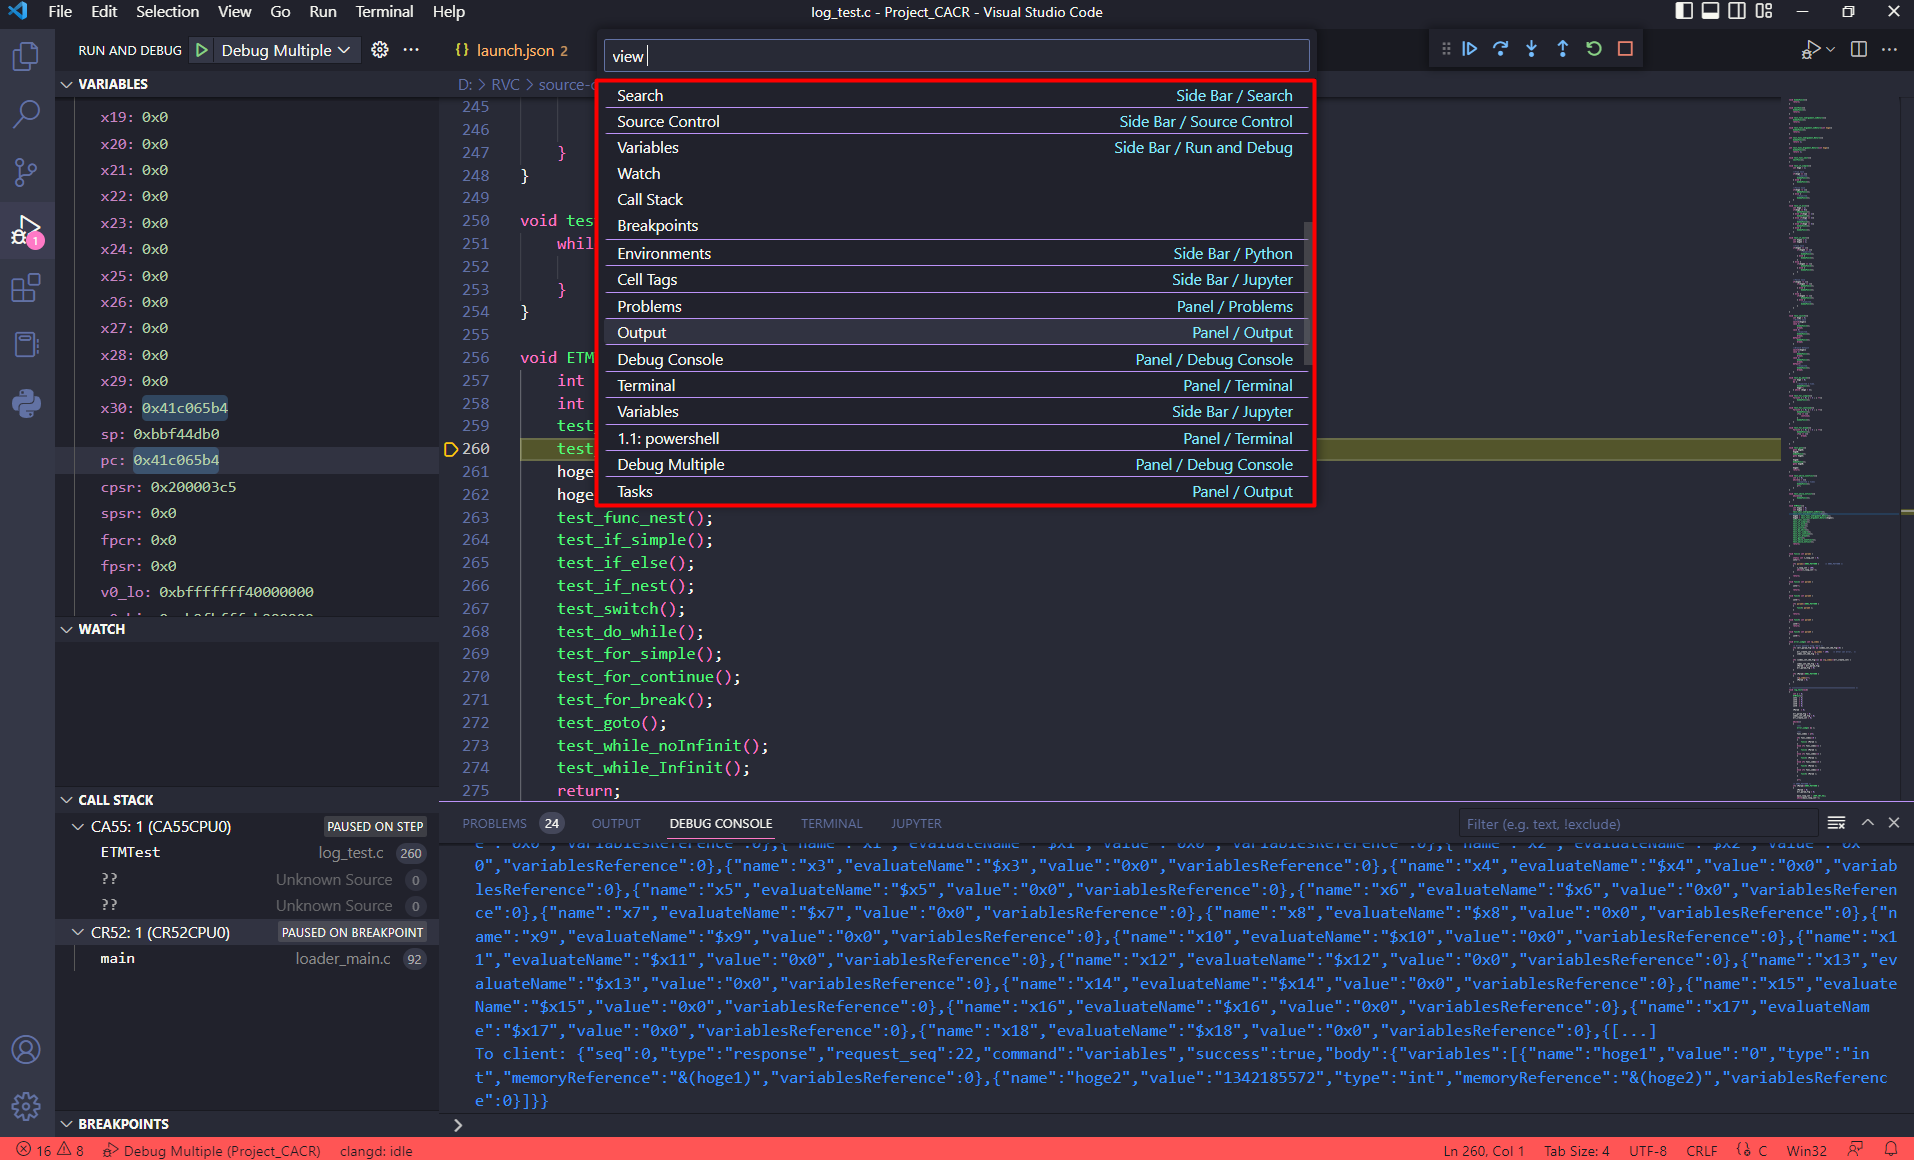
Select the Views to be displayed on the window.
20.2. Setup environment and debug project ARM & G4MH using renesas-amalgamator
20.2.1. Overview
Support multiple different (ARM/G4MH) cores for R-Car S4 device on VS code.
This item describes how to debug (Project ARM+G4MH).
20.2.2. Connecting S4 board to PC host
We need to connect between board and PC to debug ARM and G4MH on VSCode as shown in the picture below:

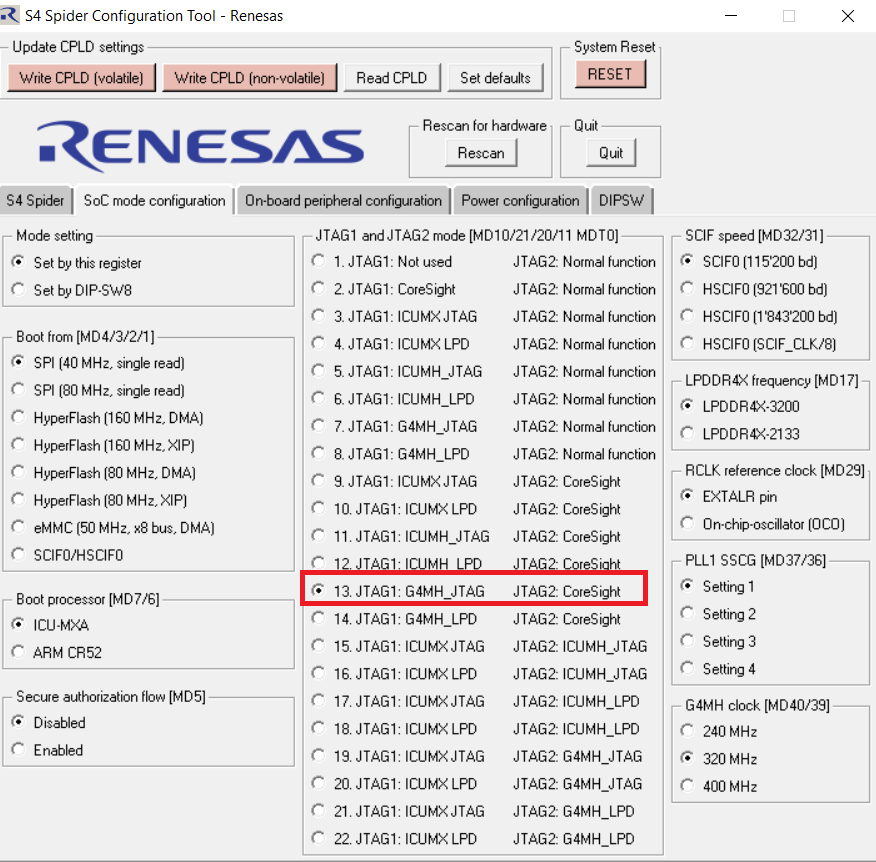
Select the mode for S4 Spider Configuration tool -Renesas as shown below:
20.2.3. Setup debugger options
Install the Renesas Debug extension to VSCode (please refer to Section 1: Installation).
Import the built G4MH and CR52 projects into VS Code.
In order to debug a project using VS Code and the Renesas Debug extension, a configuration file called launch.json needs to be created.
Select [Run and Debug] view.
Select [Create a launch.json file] link.
Select [Renesas Amalgamator].
A launch.json file will be created inside .vscode folder with some default settings.
In the launch.json file, fill in the following fields
launch.json
 1{
 2  // Use IntelliSense to learn about possible attributes.
 3  // Hover to view descriptions of existing attributes.
 4  // For more information, visit: https://go.microsoft.com/fwlink/?linkid=830387
 5  "version": "0.2.0",
 6  "configurations": [
 7    {
 8      "type": "renesas-amalgamator",
 9      "request": "launch",
10      "name": "<display name of the configuration>",
11      "children": [
12        {
13          //RH850 Core G4MH
14          "name": "<display name of core>",
15          "debugAdapterRuntime": "node",
16          "arguments": {
17            "type": "renesas-hardware",
18            "request": "launch",
19            "program": "<absolute path to project's executable file (.x, .elf,...)>",
20            "target": {
21              "deviceFamily": "RCAR",
22              "device": "<CPU of the device>",
23              "debuggerType": "<type of the debugger>"
24            }
25          }
26        },
27        {
28          //Core Arm (CA/CR)
29          "name": "<display name of core>",
30          "debugAdapterRuntime": "node",
31          "arguments": {
32            "type": "renesas-hardware",
33            "request": "launch",
34            "program": "<absolute path to project's executable file (.x, .elf,...)>",
35            "target": {
36              "deviceFamily": "RCAR",
37              "device": "<CPU of the device>",
38              "debuggerType": "<type of the debugger>"
39            }
40          }
41        }
42      ]
43    }
44  ]
45}
Example configuration file launch.json:
Example: launch.json
 1{
 2  // Use IntelliSense to learn about possible attributes.
 3  // Hover to view descriptions of existing attributes.
 4  // For more information, visit: https://go.microsoft.com/fwlink/?linkid=830387
 5  "version": "0.2.0",
 6  "configurations": [
 7    {
 8      "type": "renesas-amalgamator",
 9      "request": "launch",
10      "name": "Debug Multiple",
11      "children": [
12        {
13          //RH850 Core G4MH
14          "name": "G4MH",
15          "debugAdapterRuntime": "node",
16          "arguments": {
17            "type": "renesas-hardware",
18            "request": "launch",
19            "program": "${cwd}/G4MH/HardwareDebug/G4MH_Debug.x",
20            "target": {
21              "deviceFamily": "RCAR",
22              "device": "R8A779F0",
23              "debuggerType": "E2RH850",
24              "serverParameters": ["-ulpdType=","15","-uJTagClockFreq=","Default","-setOptJtagLpd=","-uocdID=","0000000000000000000000000000000000000000000000000000000000000000","-ucustomerID=","0000000000000000000000000000000000000000000000000000000000000000","-uneedAuthentication=","0","-uWorkRamAddress=","0x0","-uTraceEnable=","PE0|PE1","-uTraceClock=","PE0|400|PE1|400","-uUseSyncTrace=","1","-uSyncTraceStandard=","0","-uTraceCore=","PE0","--gdbVersion=","7.2"]
25            },
26          }
27        },
28        {
29          //Core Arm (CA/CR)
30          "name": "ARM",
31          "debugAdapterRuntime": "node",
32          "arguments": {
33            "type": "renesas-hardware",
34            "request": "launch",
35            "program": "${cwd}/BAREMETAL_CR52/Debug/MR_BAREMETAL_CR52.axf",
36            "target": {
37                "deviceFamily": "RCAR",
38                "debuggerType": "E2ARM",
39                "device": "R8A779F0_CR52",
40                "serverParameters": ["-uInteface=", "JTAG", "-w", "0", "-uWorkRamAddress=", "0x0", "--gdbVersion=", "7.2"]
41            },
42          }
43        }
44      ]
45    }
46  ]
47}
20.2.4. Start debugging
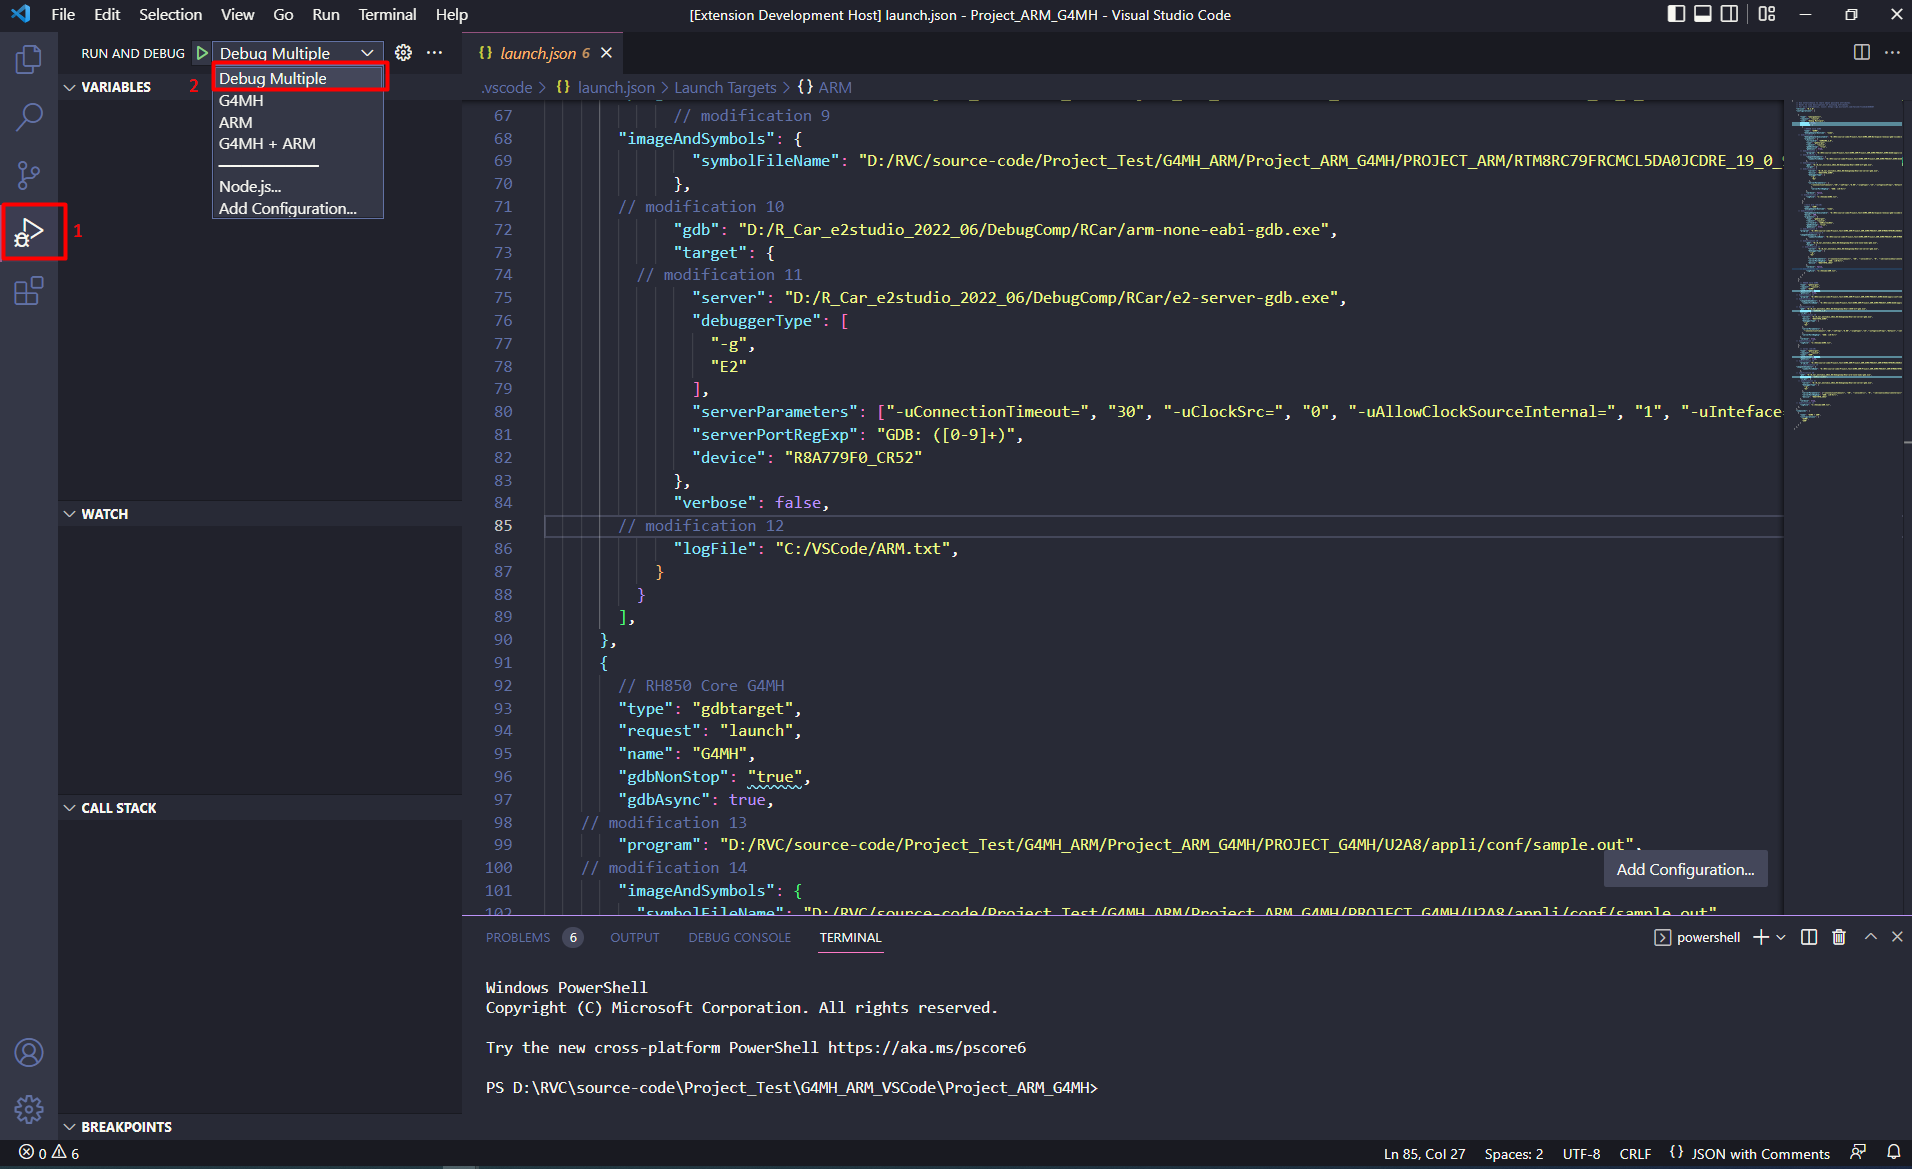
In the select box RUN AND DEBUG (ctrl+shift+D) select “Debug Multiple” option then click [Start Debugging] (F5) button.
Waiting for program to launch and debug successfully.
20.3. Setup environment and debug multi-core ARM device R-Car S4 (CA55: CPU0 to CPU7)
20.3.1. Overview
Support debug multicore with CA55 (CPU0 -> CPU7) for R-Car S4 device on VS code.
This item describes how to connect the S4 board to the PC host, install an extension, import the project, configure file launch.json, run and debug.
20.3.2. Connecting S4 board to PC host
We need to connect between board and PC to debug multicore ARM on VSCode as shown in the picture below:
Select the mode for S4 Spider Configuration tool -Renesas as shown below:
20.3.3. Setup debugger options
Install the Renesas Debug extension to VSCode. (please refer to Section 1: Installation).
Import the built CA55 projects into VS Code.
In order to debug a project using VS Code and the Renesas Debug extension, a configuration file called launch.json needs to be created.
Select [Run and Debug] view.
Select [Create a launch.json file] link.
Select [Renesas GDB Hardware Target].
A launch.json file will be created inside .vscode folder with some default settings.
In the launch.json file, fill in the following fields.
launch.json
 1{
 2  // Use IntelliSense to learn about possible attributes.
 3  // Hover to view descriptions of existing attributes.
 4  // For more information, visit: https://go.microsoft.com/fwlink/?linkid=830387
 5  "version": "0.2.0",
 6  "configurations": [
 7    {
 8      "type": "renesas-hardware",
 9      "request": "launch",
10      "name": "<display name of the configuration>",
11      "program": "<absolute path to project's executable file (.x, .elf,...)>",
12      "target": {
13        "debuggerType": "<type of the debugger>",
14        "device": "<CPU of the device>",
15        "deviceFamily": "RCAR",
16      }
17    }
18  ]
19}
Example configuration file launch.json:
Example: launch.json
 1{
 2    // Use IntelliSense to learn about possible attributes.
 3    // Hover to view descriptions of existing attributes.
 4    // For more information, visit: https://go.microsoft.com/fwlink/?linkid=830387
 5    "version": "0.2.0",
 6    "configurations": [
 7      {
 8        "type": "renesas-hardware",
 9        "request": "launch",
10        "name": "RCAR Multicore CA55",
11        "program": "${cwd}/Debug/MR_BAREMETAL_CA55.axf",
12        "target": {
13          "deviceFamily": "RCAR",
14          "device": "R8A779F0_CA55",
15          "debuggerType": "E2ARM",
16          "serverParameters": ["-uInteface=", "JTAG", "-w", "0", "--gdbVersion=", "7.2"]
17        },
18      },
19    ]
20}
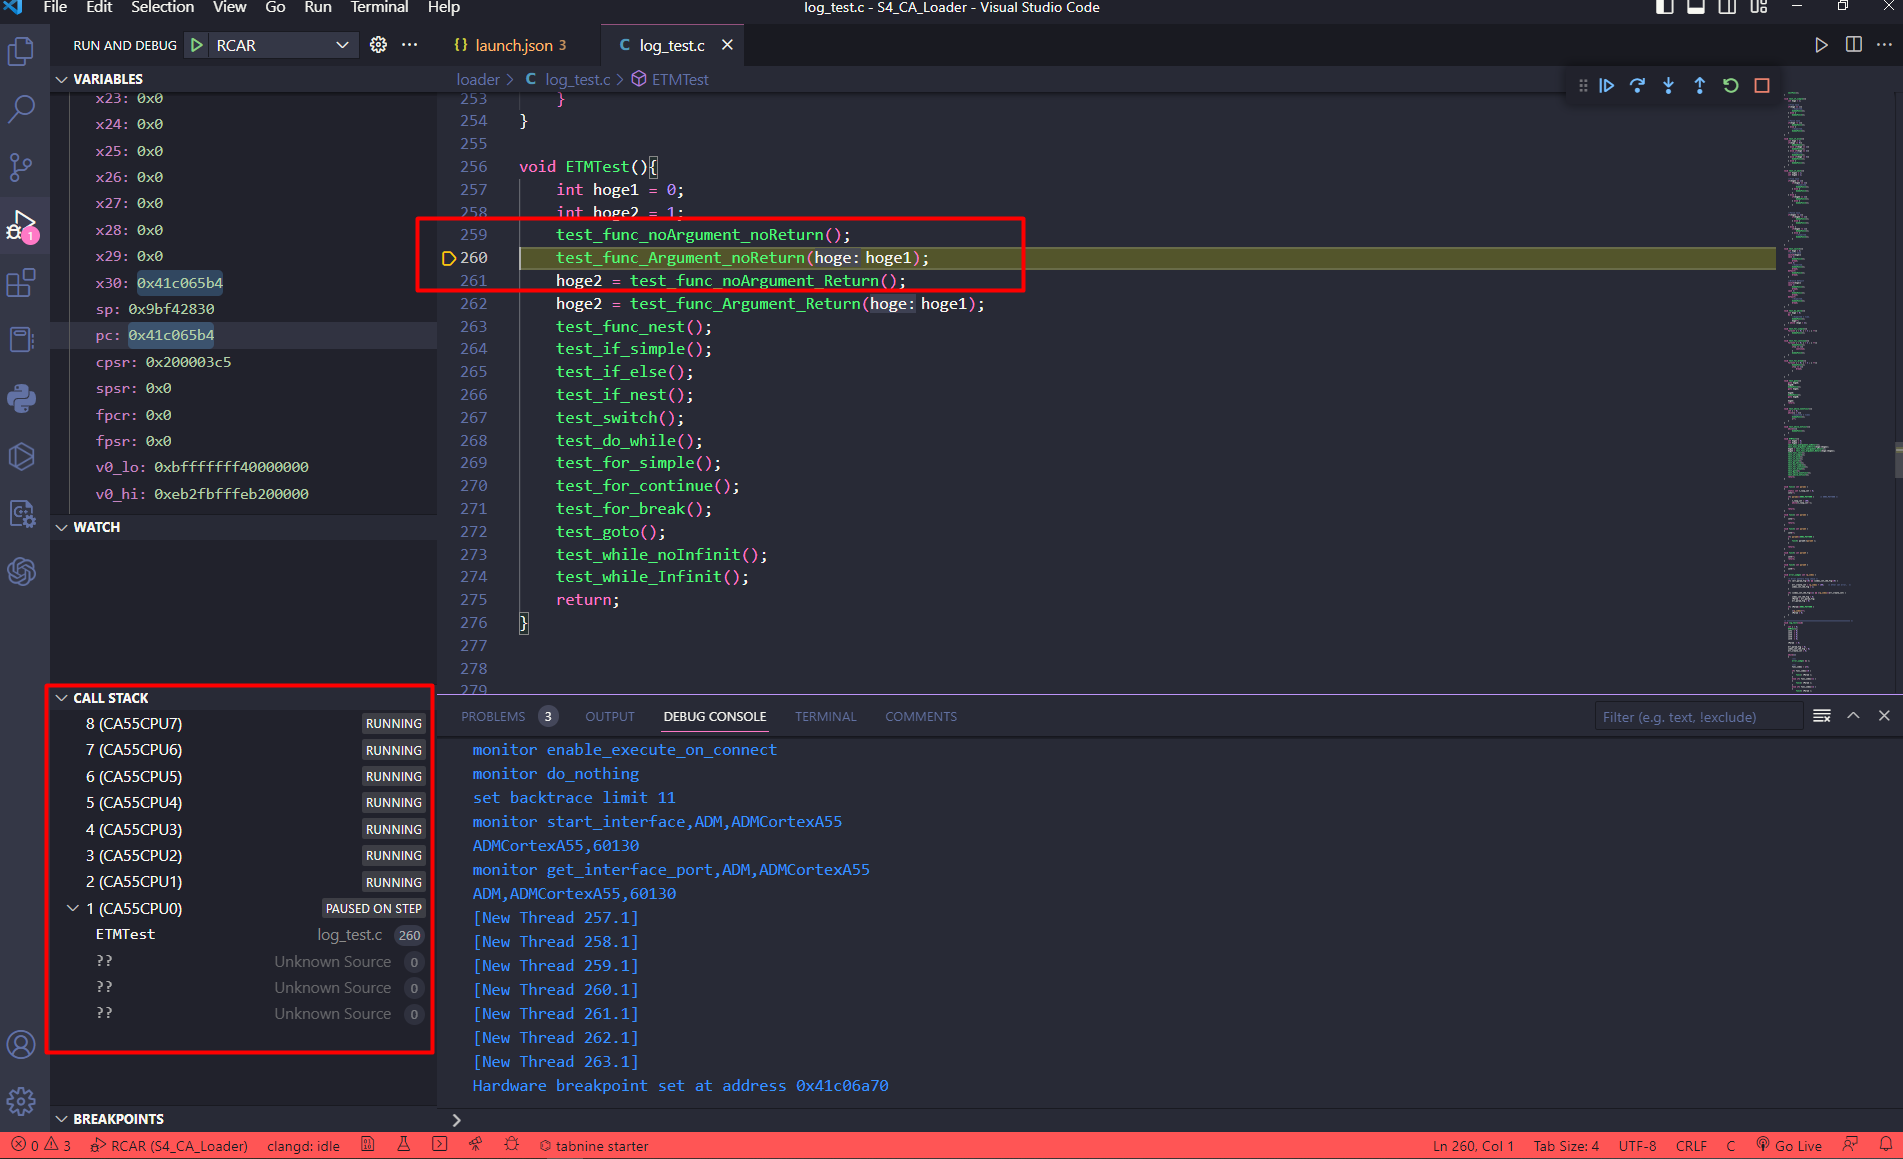
20.3.4. Start debugging
After setting up debugger options, a debug session can be started by selecting the created configuration and click [Start Debugging] button in [Run and Debug] view, or press [F5].
Waiting for the program to launch and debug successfully.
20.4. Setup environment and debug multi-core G4MH device R-Car S4 or device RH850
20.4.1. Overview
Support debug multicore with multi-core G4MH for R-Car S4 device (PE0, PE1) or device RH850 (PE0,PE1,PE2,PE3) on VS code.
This item describes how to connect the S4 board or RH850 board to the PC host, install an extension, import the project, configure file launch.json, run and debug.
20.4.2. Connecting S4 board to PC host
We need to connect between board and PC to debug multicore ARM on VSCode.
Select the mode for S4 Spider Configuration tool -Renesas if debug with R-Car S4 device.
20.4.3. Setup debugger options
Install the Renesas Debug extension to VSCode. (please refer to Section 1: Installation).
Import the built G4MH/RH850 projects into VS Code.
In order to debug a project using VS Code and the Renesas Debug extension, a configuration file called launch.json needs to be created.
Select [Run and Debug] view.
Select [Create a launch.json file] link.
Select [Renesas GDB Hardware Target].
A launch.json file will be created inside .vscode folder with some default settings.
In the launch.json file, fill in the following fields.
Format of launch.json:
 1{
 2  // Use IntelliSense to learn about possible attributes.
 3  // Hover to view descriptions of existing attributes.
 4  // For more information, visit: https://go.microsoft.com/fwlink/?linkid=830387
 5  "version": "0.2.0",
 6  "configurations": [
 7    {
 8      "type": "<type>",
 9      "request": "launch",
10      "name": "<display name of the configuration>",
11      "program": "<absolute path to project's executable file (.x, .elf,...)>",
12      "target": {
13        "deviceFamily": "<the device family name Eg.RCAR>",
14        "device": "<CPU of the device>",
15        "debuggerType": "<debugger type (type of the simulator or emulator)>"
16      }
17    }
18  ]
19}
Sample configurations for launch.json file:
Sample: launch.json for multi-core G4MH for R-Car S4 device (PE0, PE1)
{
  // Use IntelliSense to learn about possible attributes.
  // Hover to view descriptions of existing attributes.
  // For more information, visit: https://go.microsoft.com/fwlink/?linkid=830387
  "configurations": [
    {
      "name": "G4MH",
      "type": "renesas-hardware",
      "request": "launch",
      "hardwareBreakpoint": true,
      "program": "${cwd}/HardwareDebug/G4MH_Debug.x",
      "target": {
        "deviceFamily": "RCAR",
        "device": "R8A779F0",
        "debuggerType": "E2RH850",
        "serverParameters": ["-ulpdType=","15","-uJTagClockFreq=","Default","-setOptJtagLpd=","-uocdID=","0000000000000000000000000000000000000000000000000000000000000000","-ucustomerID=","0000000000000000000000000000000000000000000000000000000000000000","-uneedAuthentication=","0","-uWorkRamAddress=","0x0","-uTraceEnable=","PE0|PE1","-uTraceClock=","PE0|400|PE1|400","-uUseSyncTrace=","1","-uSyncTraceStandard=","0","-uTraceCore=","PE0","--gdbVersion=","7.2"]
      }
    }
  ]
}
Sample: launch.json for multi-core device RH850 (PE0, PE1, PE2, PE3)
{
  // Use IntelliSense to learn about possible attributes.
  // Hover to view descriptions of existing attributes.
  // For more information, visit: https://go.microsoft.com/fwlink/?linkid=830387
  "configurations": [
    {
      "name": "RH850",
      "type": "renesas-hardware",
      "request": "launch",
      "hardwareBreakpoint": true,
      "program": "${cwd}/HardwareDebug/Project_RH850.x",
      "target": {
        "deviceFamily": "RCAR",
        "device": "R7F702Z19A",
        "debuggerType": "E2RH850",
        "serverParameters": ["-ulpdType=", "15","-setOptJtagLpd=", "0", "-w", "1", "-usupplyVoltage=", "0", "-uocdID=", "0000000000000000000000000000000000000000000000000000000000000000"]
      }
    }
  ]
}
20.5. Create and build G4MH project on R-Car SDK
20.5.1. Create G4MH Project
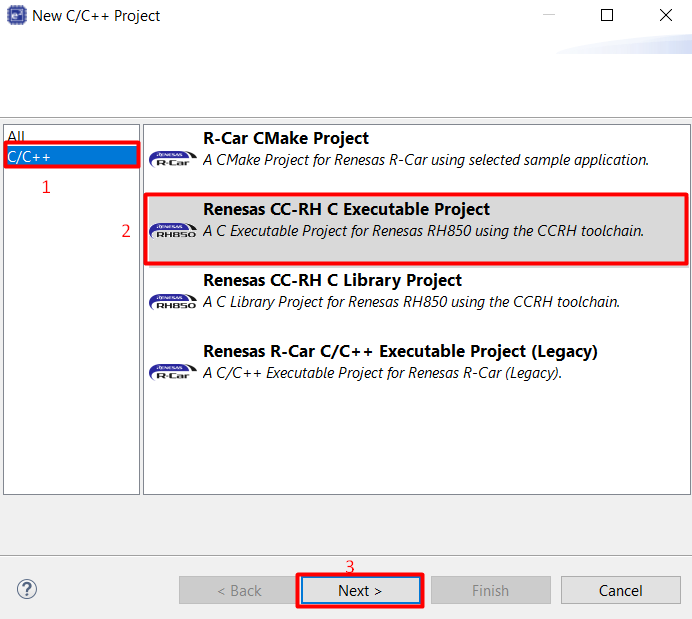
From the menu bar select [File] > [New] > [Renesas C/C++ Project] > [Renesas R-Car]

Select R-Car project template [Renesas CC-RH C Executable Project], then click [Next] button
Input the project name then click [Next] button.
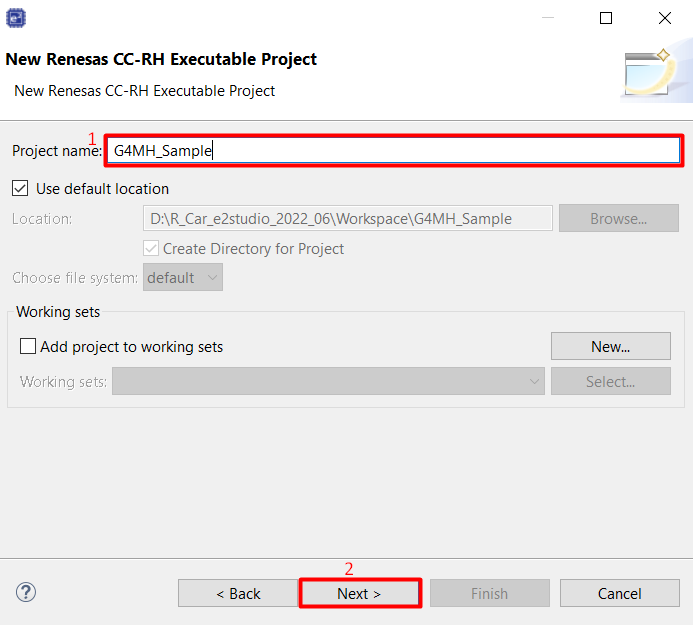
In New Renesas CC-RH Executable Project select Create Hardware Debug Configuration [E2 (RH850)], then click [Finish] button
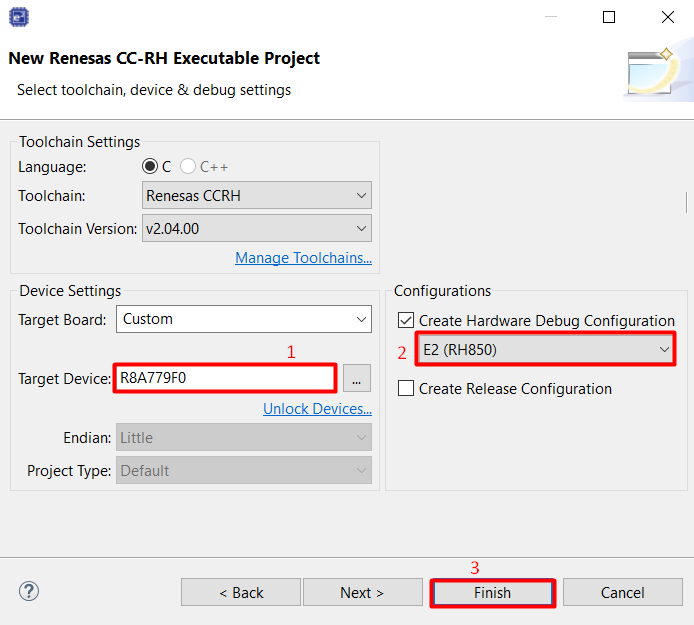
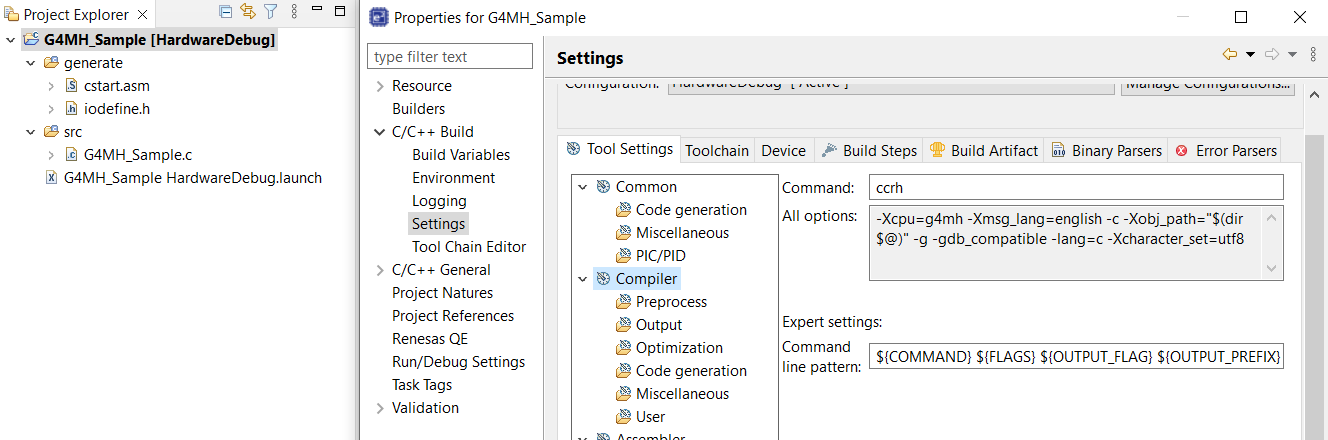
Projects will be created.
20.5.2. Build Project G4MH
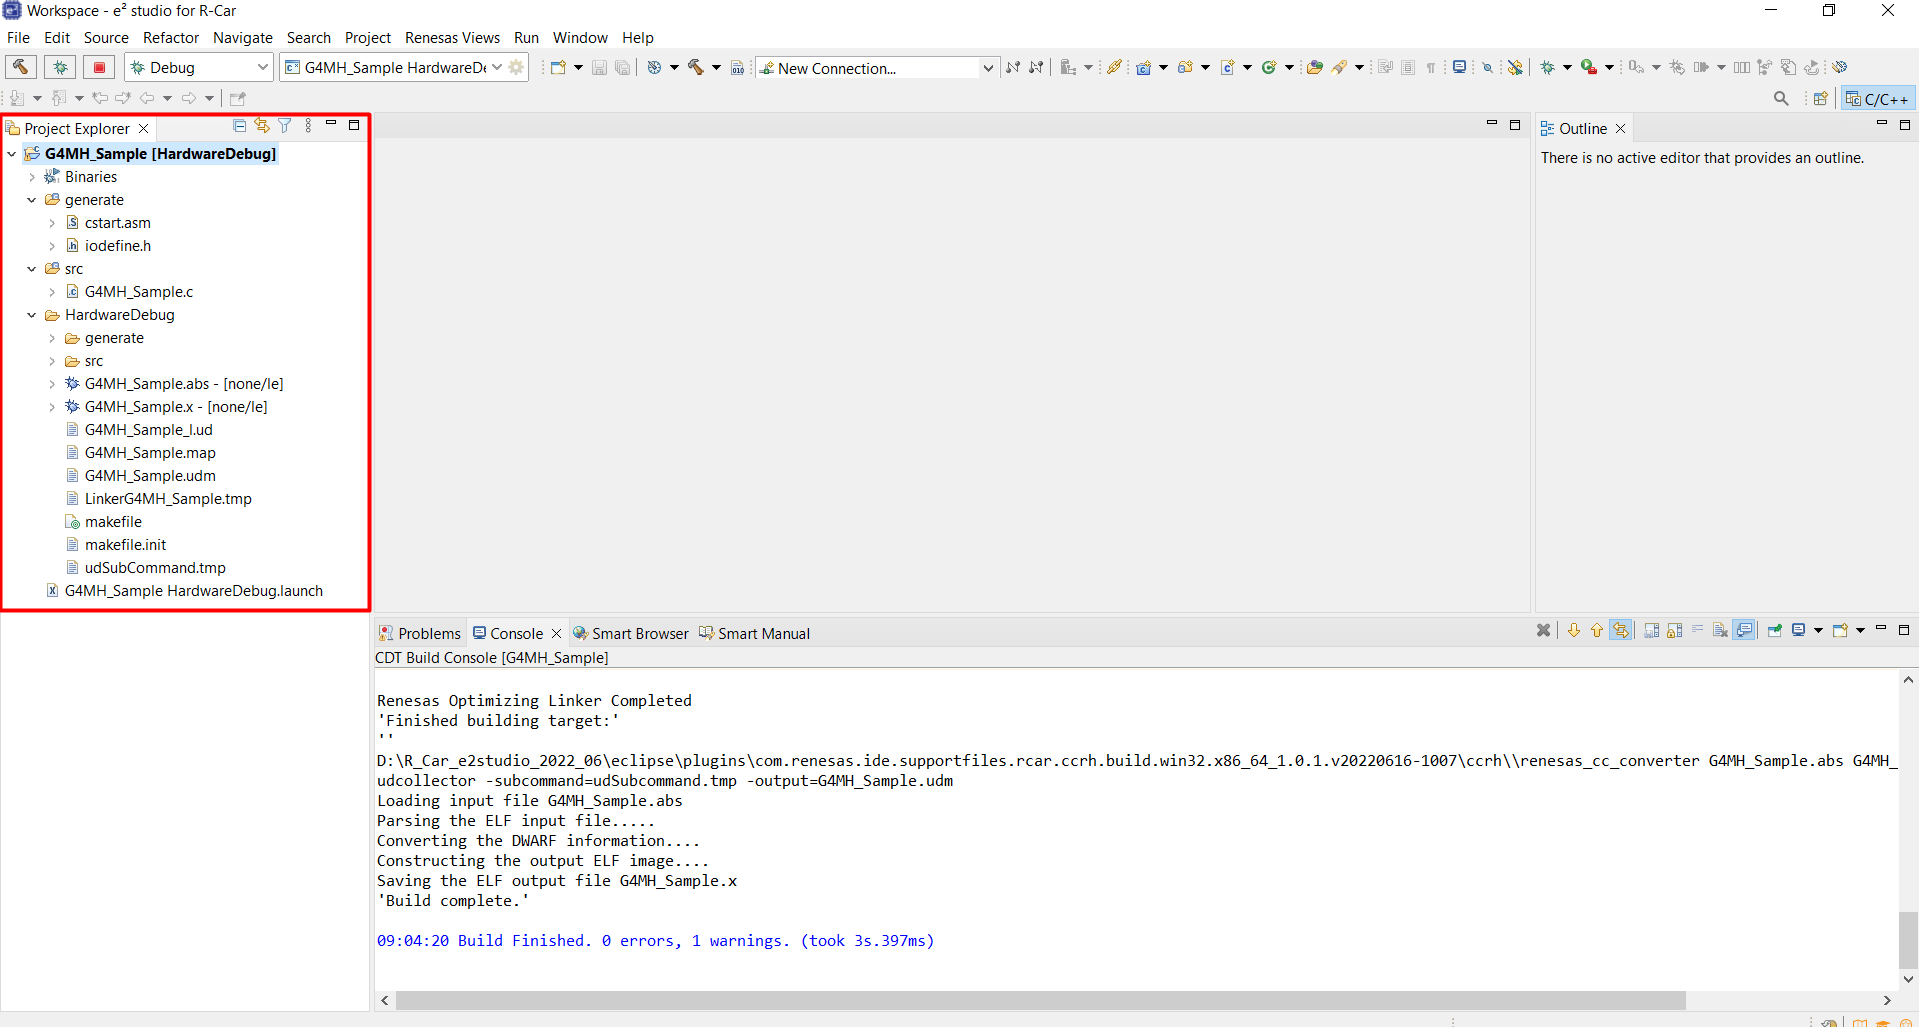
Right-click on the project and select [Build Project]

Or can click on the [Build ]icon on the toolbar.

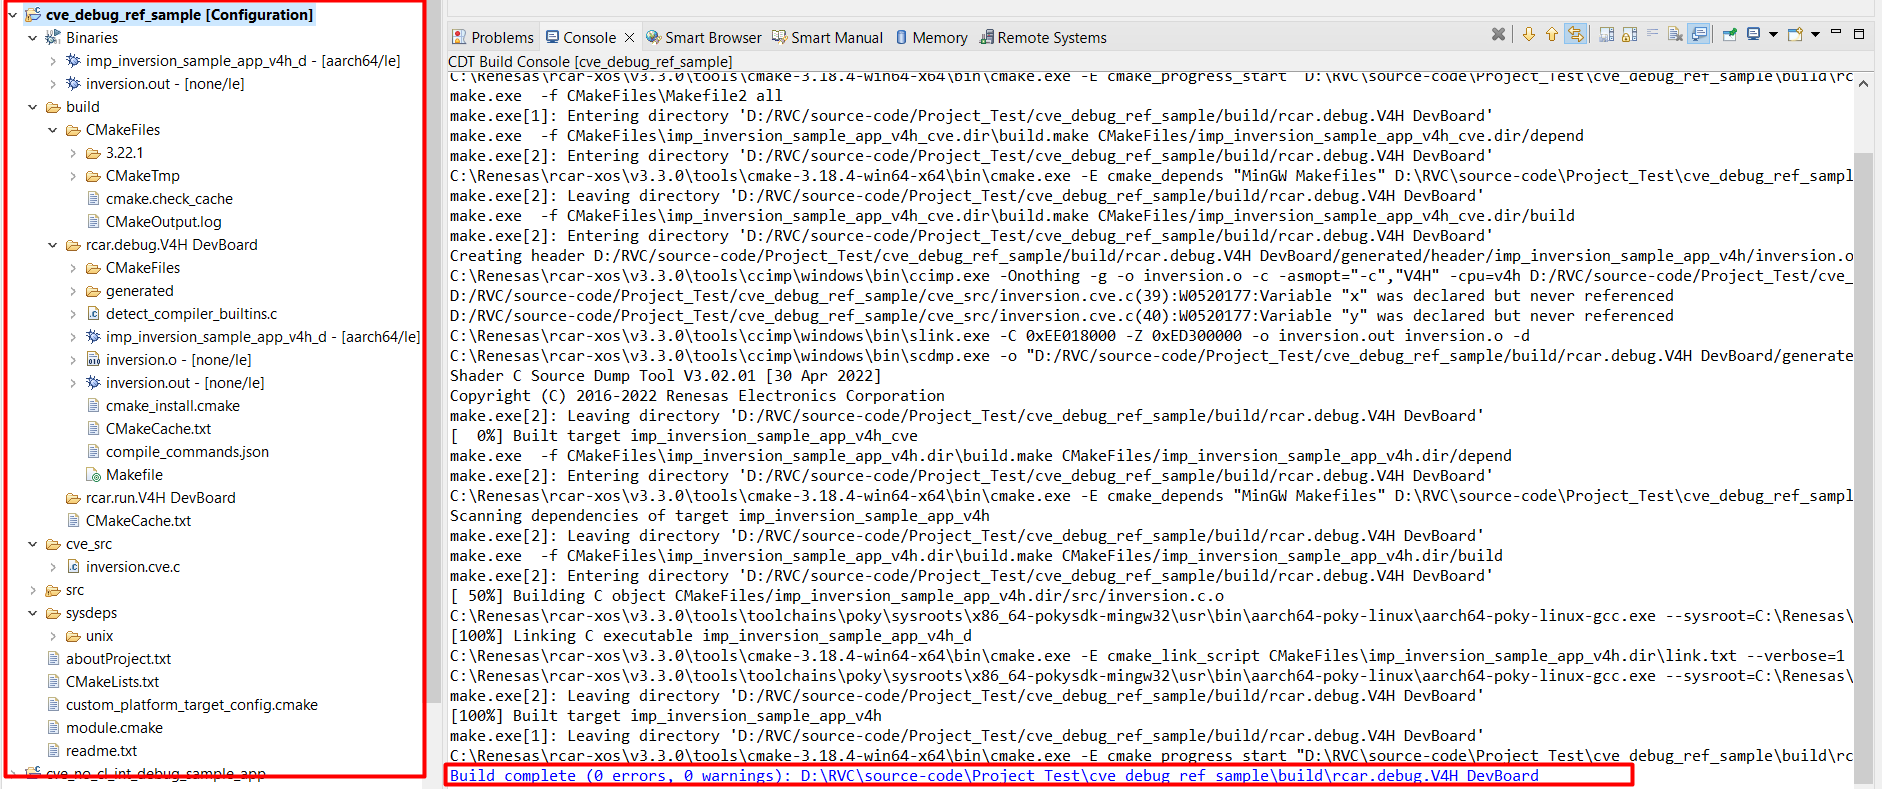
Project after built.
20.6. Build CVEngine project on R-Car SDK
20.6.1. Create Project
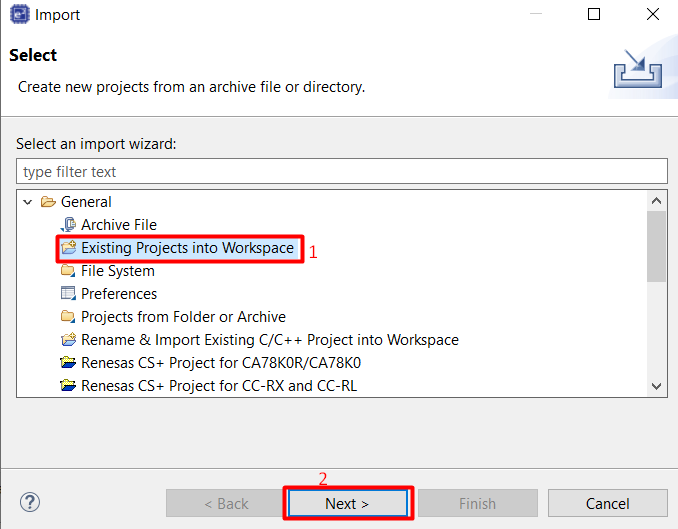
From the menu bar select File > Import…

Select Dialog Import “Existing Projects into Workspace”, then click Next button
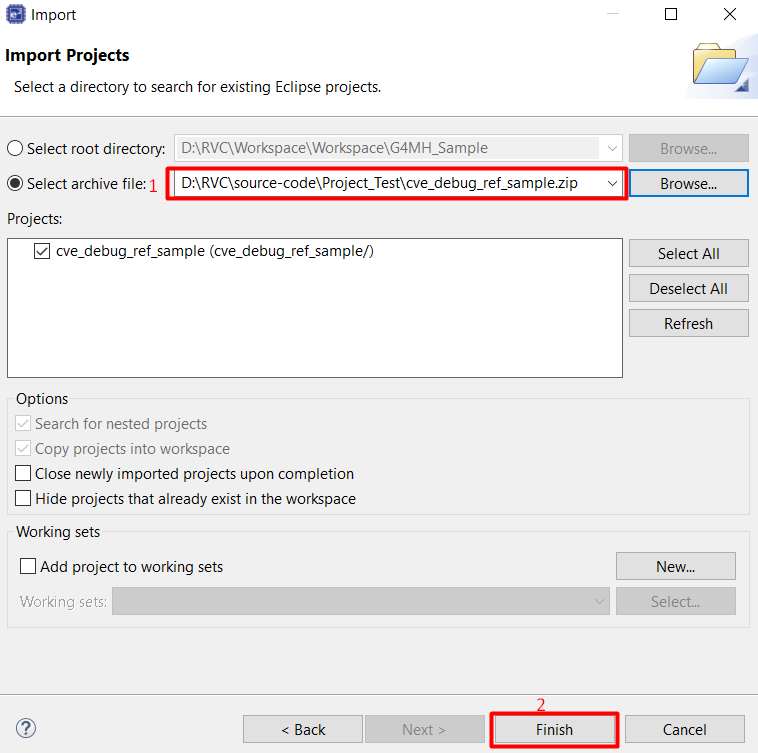
Select Dialog Import “Select archive file” > Select Browse… > Select the project you want to build in your directory, then click Finish button.
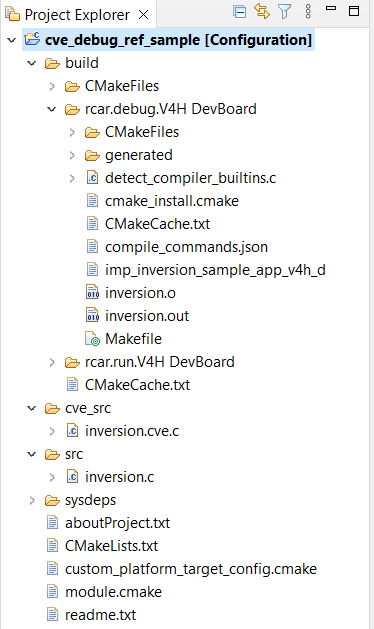
Project after imported
20.6.2. Build Project
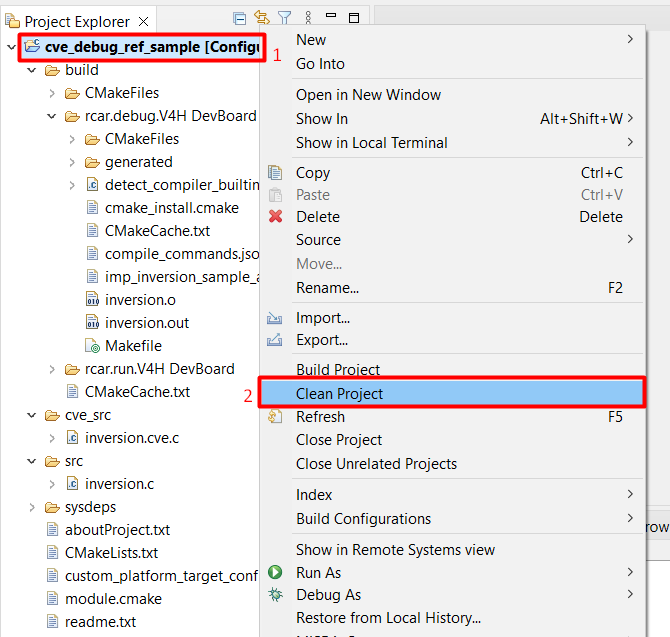
Right-click on the project and select “Clean Project”
Check Toolchain Configuration: From the menu bar select File > Window > Preferences

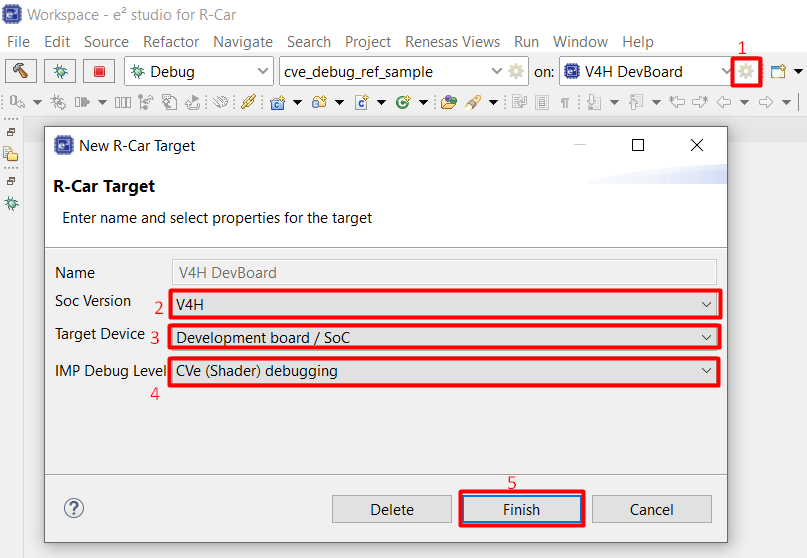
Select Launch Configuration (the name of the project is imported), and Launch Target “V4H DevBoard” on the toolbar.

Select “Edit” icon of Launch Target “V4H DevBoard” on the toolbar, then select Target Device “Development board / SoC” and IMP Debug Level “CVe (Shader debugging)”, then click Finish button.
Right-click on the project and select “Build Project”
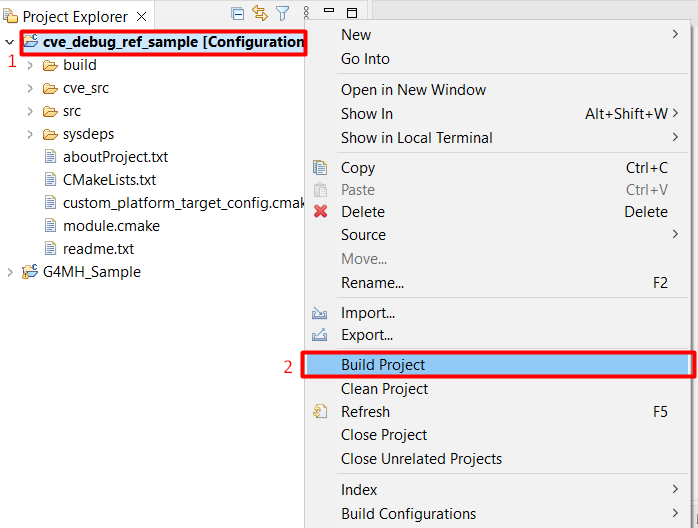
Project after built