21. Troubleshooting and Common Issues
21.1. Setup environment when using renesas-amalgamator
When debugging with renesas-amalgamator users need to install Node.js. You can download and install Node.js from Node v16.20.0 (LTS).
21.2. Debugging failed with message: Don’t know how to attach. Try “help target”.
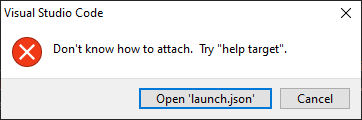
If the debug session failed with the error message [Don’t know how to attach. Try “help target”.], then open the launch.json file and control the serverParameters array. There shouldn’t be any -uCore= parameter in the serverParameters array. Any definition of -uCore= needs to be removed from the serverParameters array.
21.3. Renesas extensions failed in macOS: “Error occurred during *.xz file extraction. Please check the installation requirements of Renesas VS Code Extensions.”
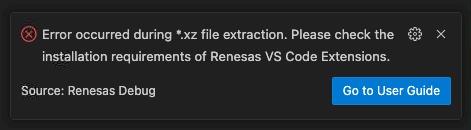
If the error message “Error occurred during *.xz file extraction. Please check the installation requirements of Renesas VS Code Extensions.” appeared while using Renesas extensions in macOS, it is probably because the “XZ Archive Manager”, which is one of the prerequisites for using Renesas extensions in macOS, is not installed in the development environment.
Install the XZ Archive Manager by using brew install xz command.
$ brew install xz
Also, please refer to the installation steps in the section “Dependencies for macOS” to check any other steps missed during the setup.
Note
Installation steps for macOS use Homebrew (brew), which is an open-source software package management system that simplifies the installation of software for macOS. For installation and more information about Homebrew, please refer to https://brew.sh/.
21.4. Renesas Project Build is failing due to incorrect CMake Generator
Renesas build scripts require “Ninja Build” to run correctly. In development environments, where multiple CMake Generators are installed, developers needed to be aware of the selected CMake Generator during the build operation. If the build operation fails due to incorrect CMake Generator. Please check the following steps:
Step 1: Check the Ninja Build installation.
Open a terminal window.
Run the following command to check if “Ninja Build”
ninja --version
If the command fails. Please check the installation guide and control the installation steps for Ninja Build in section “Installation”.
Step 2: Set the Ninja Build as the default Cmake Generator for the project
If Ninja Build is not the default CMake Generator in your environment, you can still define Ninja Build to be selected as the default Cmake Generator for your project. To make this definition, please follow the instructions below:
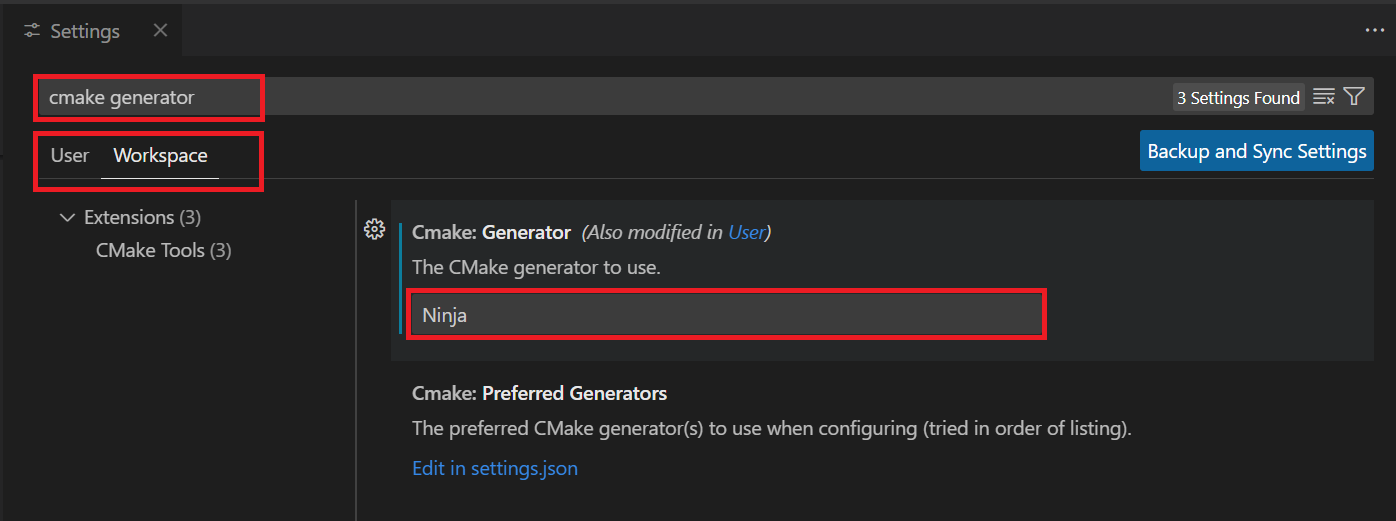
Open VS Code settings using [File] => [Preferences] => [Settings] menu.
Search for “cmake generator”, and switch to the [Workspace] tab.
Then, set the value of the [Cmake: Generator] to “Ninja”
Note
Alternative Method: Changing the settings file directly
Alternatively, you can directly change the settings file of your project to make “Ninja” your CMake Generator for this project.
Open the .vscode/settings.json file in your project folder.
Insert the following definition into the file:
"cmake.generator": "Ninja"
Step 3: Delete the old build cache and rebuild the project
After making these changes, please delete the old build cache and rebuild the project again.
Open VS Code command palette by running [View] => [Command Palette]
Find and click to [CMake: Delete Cache and Reconfigure]
Then, build the project again by opening the Command Palette again ([View] => [Command Palette]) and running the [CMake: Build] command.
21.5. Specific GCC version requirement on Ubuntu 22.04
The build system for R-Car projects using the Renesas CMake toolchain scripts requires GCC version 9.4. On Ubuntu 22.04, the default GCC is 11.4, so you may need to install and select GCC 9 manually.
sudo apt-get install gcc-9=9.4.0-5ubuntu1 g++-9=9.4.0-5ubuntu1 gcc-9-base=9.4.0-5ubuntu1 cpp-9=9.4.0-5ubuntu1 libgcc-9-dev=9.4.0-5ubuntu1 libstdc++-9-dev=9.4.0-5ubuntu1 libasan5=9.4.0-5ubuntu1
sudo update-alternatives --install /usr/bin/gcc gcc /usr/bin/gcc-9 10
sudo update-alternatives --install /usr/bin/gcc gcc /usr/bin/gcc-11 20
sudo update-alternatives --install /usr/bin/g++ g++ /usr/bin/g++-9 10
sudo update-alternatives --install /usr/bin/g++ g++ /usr/bin/g++-11 20
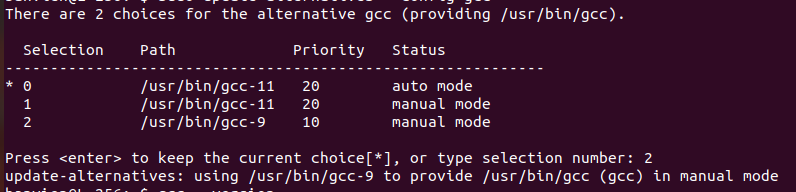
sudo update-alternatives --config gcc
sudo update-alternatives --config g++
A menu is shown like this, enter 2 to select gcc 9: