15. Quick Start for Renesas RL78
15.1. Supported Environments
Operating System |
Windows: Windows 10 / Windows 11 Linux: Ubuntu 22.04 / Ubuntu 24.04 macOS: macOS 14 Sonoma (Apple silicon) / macOS 15 Sequoia (Apple silicon) |
VS Code version |
1.102.0 (minimum) |
VS Code can be downloaded and installed from this page https://code.visualstudio.com/.
15.2. Installation
Please choose your operating system for operating system dependent installation steps.
For the Renesas RL78 Family, Renesas Platform provides a straightforward installation wizard to install the CMake, Ninja, Python and the Support Files for RL78 Family. To set up your environment:
Open VS Code.
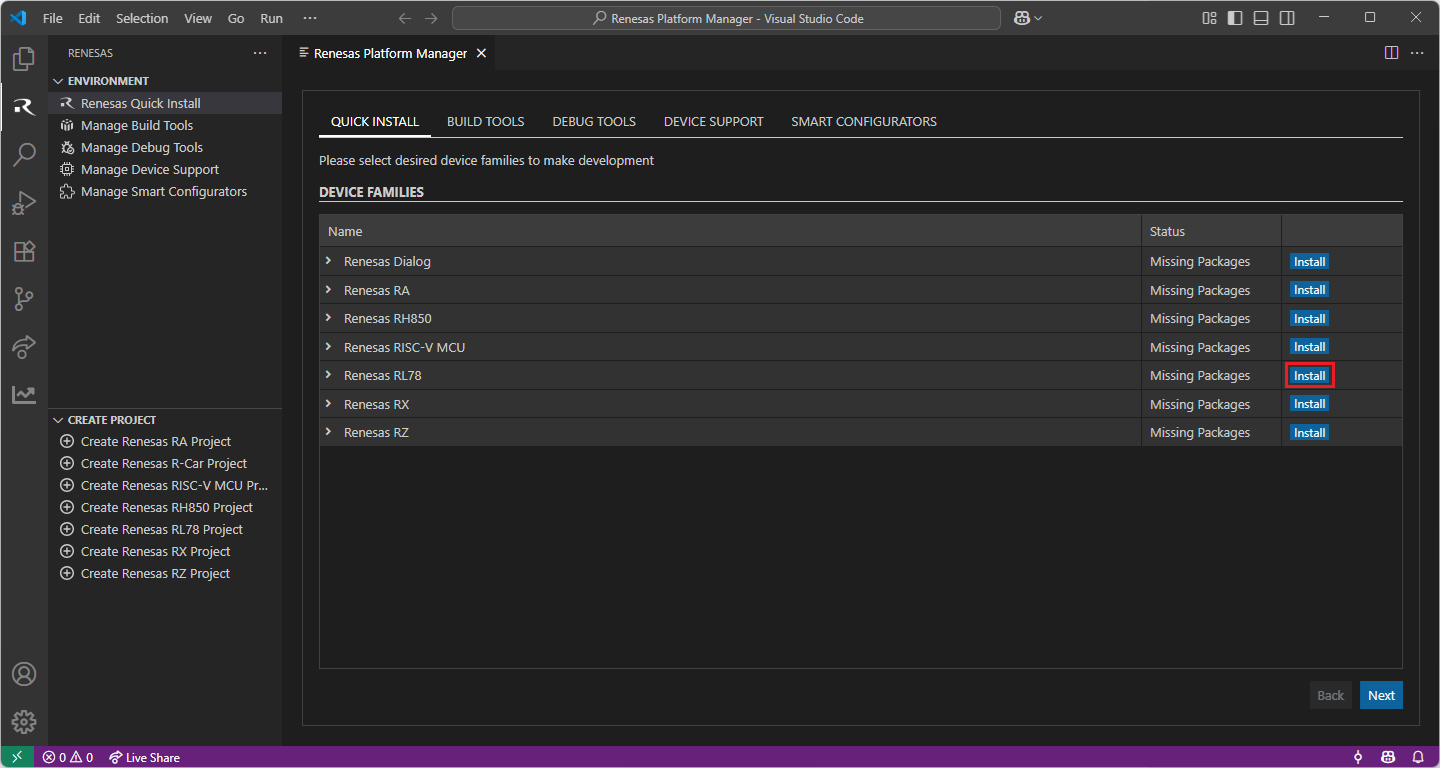
Navigate to the “Renesas” tab in VS Code. Then, click “Renesas Quick Install” in the “Environment” view.

Click the “Install” button for the “Renesas RL78” device family. The Renesas Platform will now check the dependencies required by the Renesas RL78 Device Family. The Renesas Platform extension will check the local environment and CMake, Ninja, Python and the Support Files for RL78 Family, then create an installation plan for them if necessary.
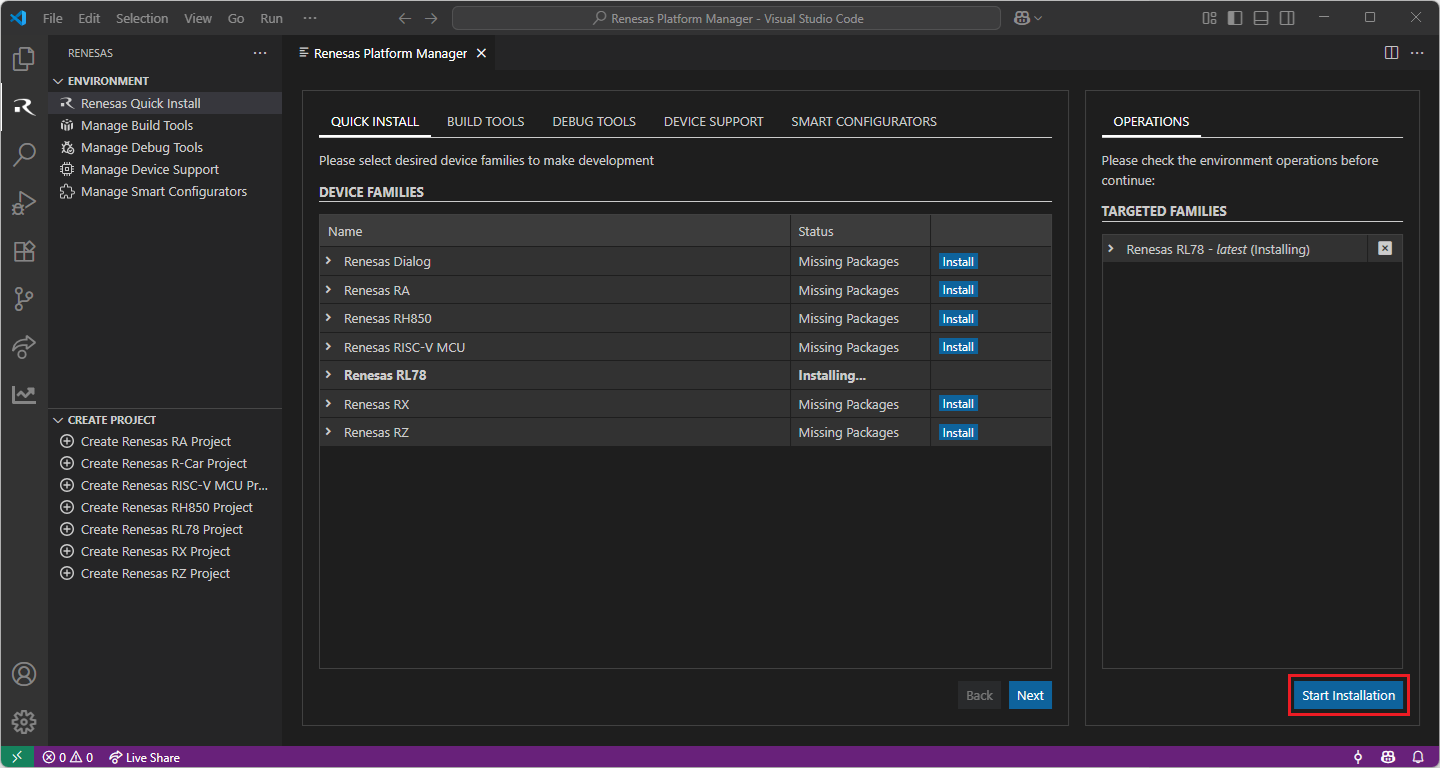
When your selection is ready, click the “Start Installations” button. The download and installation process will start automatically.
Installing the latest RL78 Smart Configurator (RL78 SC):
Download and install the latest version of RL78 Smart Configurator:
Note
Renesas Platform extension scans for changes at start-up, thus, after installing the Renesas RL78 Smart Configurator, please restart VS Code to force Renesas Platform to detect the recent RL78 Smart Configurator installation.
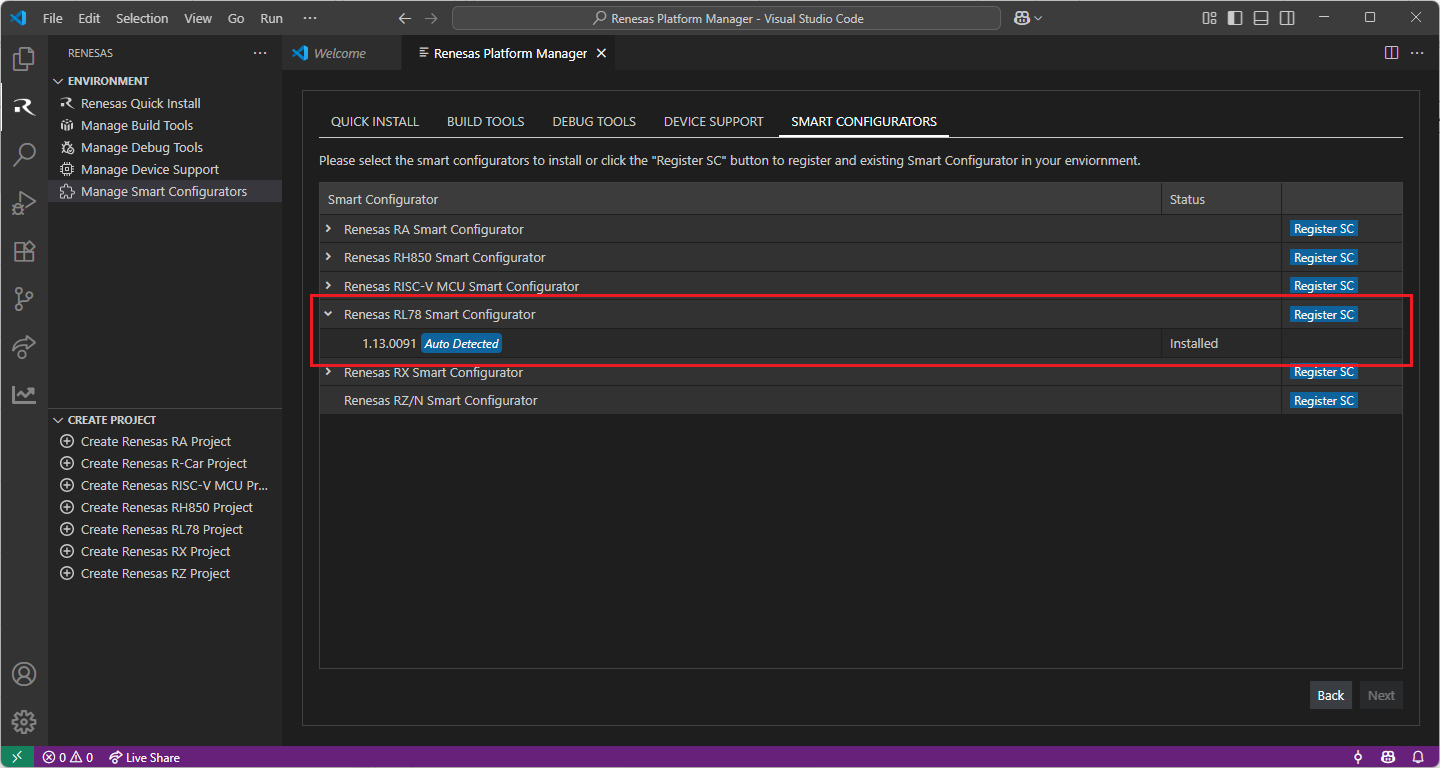
You can click “Manage Smart Configurators” to check the detected Smart Configurators. If it is not automatically detected, you can use the “Register SC” button to register the Smart Configurator manually by selecting the path of the Smart Configurator.
Installing Toolchains for RL78 Development:
Install one of the preferred toolchains for RL78 Project Build. It is recommended to use either “CC-RL” or “LLVM for Renesas RL78”.
Installing and Configuring “CC-RL” toolchain
For installing “CC-RL”:
Download and install the latest toolchain:
https://www.renesas.com/us/en/software-tool/c-compiler-package-rl78-family
Note
CC-RL toolchain should be installed to a path that does not contain spaces or special characters.
Add “CC-RL” toolchain to Renesas Platform
Registering CC-RL toolchain in Renesas Platform
Open VS Code
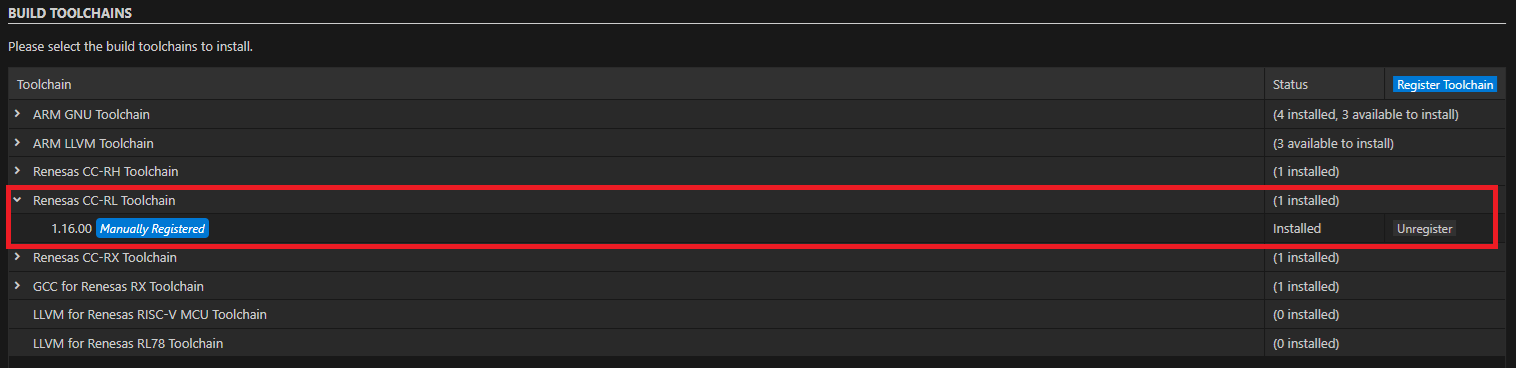
Navigate to the “Renesas” tab in VS Code and click “Manage Build Tools”.
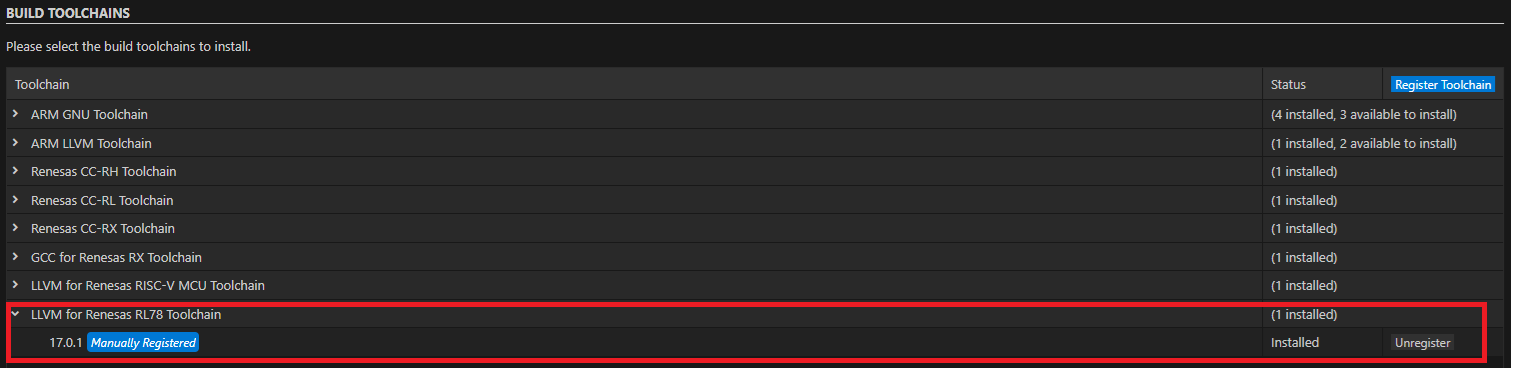
Click the “Register Toolchain” button in the Build Toolchains table header.
In the folder selection dialog, navigate to the root folder of the CC-RL toolchain (not the
binfolder).Select the folder and complete the toolchain registration.
Installing and Configuring “LLVM for Renesas RL78” toolchain
For installing “LLVM for Renesas RL78”:
Download and install the latest toolchain:
https://llvm-gcc-renesas.com/rl78/rl78-download-toolchains
Note
LLVM for Renesas RL78 toolchain should be installed to a path that does not contain spaces or special characters.
Add “LLVM for Renesas RL78” toolchain to Renesas Platform
Registering LLVM for Renesas RL78 toolchain in Renesas Platform
Open VS Code
Navigate to the “Renesas” tab in VS Code and click “Manage Build Tools”.
Click the “Register Toolchain” button in the Build Toolchains table header.
In the folder selection dialog, navigate to the root folder of the LLVM for Renesas RL78 toolchain (not the
binfolder).Select the folder and complete the toolchain registration.
Installing Additional Emulator Drivers
You may need to download and install additional USB drivers for establishing a connection with the emulators and devices. Please install the latest drivers before starting your debug session. Use the following links to download the drivers suitable for your operating system and device:
For other Renesas emulators, please check for any recommended drivers:
For the Renesas RL78 Family, Renesas Platform provides a straightforward installation wizard to install the CMake, Ninja, Python and the Support Files for RL78 Family. To set up your environment:
Open VS Code.
Navigate to the “Renesas” tab in VS Code. Then, click “Renesas Quick Install” in the “Environment” view.
Click the “Install” button for the “Renesas RL78” device family. The Renesas Platform will now check the dependencies required by the Renesas RL78 Device Family. The Renesas Platform extension will check the local environment and CMake, Ninja, Python and the Support Files for RL78 Family, then create an installation plan for them if necessary.
When your selection is ready, click the “Start Installations” button. The download and installation process will start automatically.
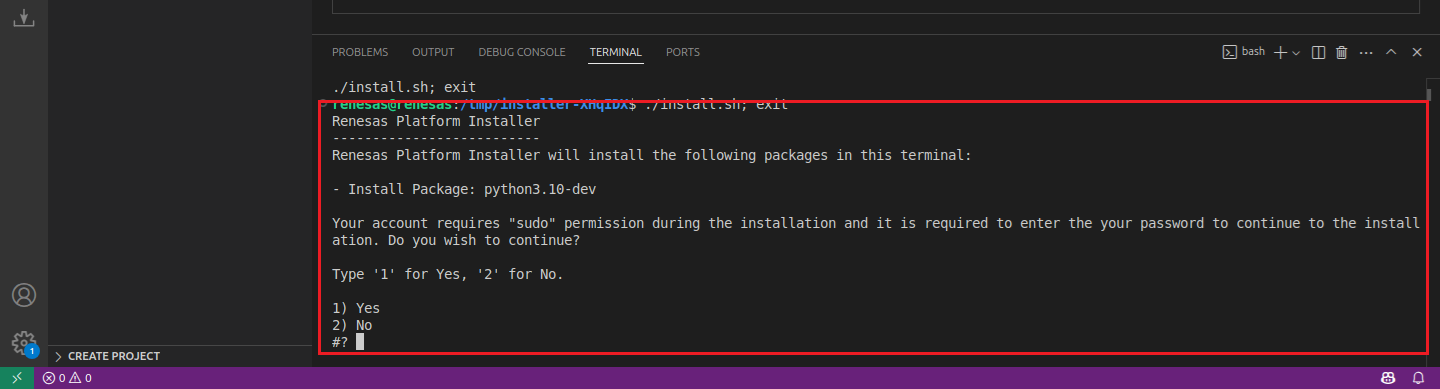
Most of the installations will be performed automatically, some installations may require manual interaction.
During the “Python 3.10” installation, the terminal wizard will appear for manual interaction. The terminal will show the execution plan and ask for confirmation before continuing. During the installation, it requires administrative rights to execute the installation, thus a password could be needed during the installation. Please make sure that the current user has “sudo” permissions and enter the password.
Installing Toolchains for RL78 Development:
Install one of the preferred toolchains for RL78 Project Build. It is recommended to use either “CC-RL” or “LLVM for Renesas RL78”.
Installing and Configuring “CC-RL” toolchain
For installing “CC-RL”:
Download and install the latest toolchain:
https://www.renesas.com/us/en/software-tool/c-compiler-package-rl78-family
Installing and Configuring “LLVM for Renesas RL78” toolchain
For installing “LLVM for Renesas RL78”:
Download and install the latest toolchain:
Installing Additional Emulator Drivers
You may need to download and install additional USB drivers for establishing a connection with the emulators and devices. Please install the latest drivers before starting your debug session. Use the following links to download the drivers suitable for your operating system and device:
For other Renesas emulators, please check for any recommended drivers:
For the Renesas RL78 Family, Renesas Platform provides a straightforward installation wizard to install the CMake, Ninja, Python and the Support Files for RL78 Family. To set up your environment:
Open VS Code.
Navigate to the “Renesas” tab in VS Code. Then, click “Renesas Quick Install” in the “Environment” view.
Click the “Install” button for the “Renesas RL78” device family. The Renesas Platform will now check the dependencies required by the Renesas RL78 Device Family. The Renesas Platform extension will check the local environment and CMake, Ninja, Python and the Support Files for RL78 Family, then create an installation plan for them if necessary.
When your selection is ready, click the “Start Installations” button. The download and installation process will start automatically.
Most of the installations will be performed automatically, some installations may require manual interaction.
During the “Python 3.10” installation, the terminal wizard will appear for manual interaction. The terminal will show the execution plan and ask for confirmation before continuing. During the installation, it requires administrative rights to execute the installation, thus a password could be needed during the installation. Please make sure that the current user has “sudo” permissions and enter the password.
Installing Toolchains for RL78 Development:
Install one of the preferred toolchains for RL78 Project Build. It is recommended to use either “CC-RL” or “LLVM for Renesas RL78”.
Installing and Configuring “CC-RL” toolchain
For installing “CC-RL”:
Download and install the latest toolchain:
https://www.renesas.com/us/en/software-tool/c-compiler-package-rl78-family
Installing and Configuring “LLVM for Renesas RL78” toolchain
For installing “LLVM for Renesas RL78”:
Download and install the latest toolchain:
Installing Additional Emulator Drivers
You may need to download and install additional USB drivers for establishing a connection with the emulators and devices. Please install the latest drivers before starting your debug session. Use the following links to download the drivers suitable for your operating system and device:
For other Renesas emulators, please check for any recommended drivers:
To utilise the Renesas extensions on macOS, it’s necessary to install:
Homebrew
XZ Archive Utilities
First, install Homebrew (brew), which is an open-source software package management system that manages the installation of software for macOS. For installation and more information about Homebrew, please refer to https://brew.sh/.
After installing the Homebrew, install the “XZ Archive Utilities” by using brew install xz command.
$ brew install xz
For the Renesas RL78 Family, Renesas Platform provides a straightforward installation wizard to install the CMake, Ninja, Python and the Support Files for RL78 Family. To set up your environment:
Open VS Code.
Navigate to the “Renesas” tab in VS Code. Then, click “Renesas Quick Install” in the “Environment” view.
Click the “Install” button for the “Renesas RL78” device family. The Renesas Platform will now check the dependencies required by the Renesas RL78 Device Family. The Renesas Platform extension will check the local environment and CMake, Ninja, Python and the Support Files for RL78 Family, then create an installation plan for them if necessary.
When your selection is ready, click the “Start Installations” button. The download and installation process will start automatically.
Most of the installations will be performed automatically, some installations may require manual interaction.
During the “Python 3.10” installation, the terminal wizard will appear for manual interaction. The terminal will show the execution plan and ask for confirmation before continuing. During the installation, it requires administrative rights to execute the installation, thus a password could be needed during the installation. Please make sure that the current user has “sudo” permissions and enter the password.
Installing Toolchains for RL78 Development:
Install the “LLVM for Renesas RL78” toolchain for RL78 project development in macOS operating system. For installing “LLVM for Renesas RL78”:
Download and install the latest toolchain:
Installing Additional Emulator Drivers
You may need to download and install additional USB drivers for establishing a connection with the emulators and devices. Please install the latest drivers before starting your debug session. Please check for the recommended drivers:
15.3. Creating a Project
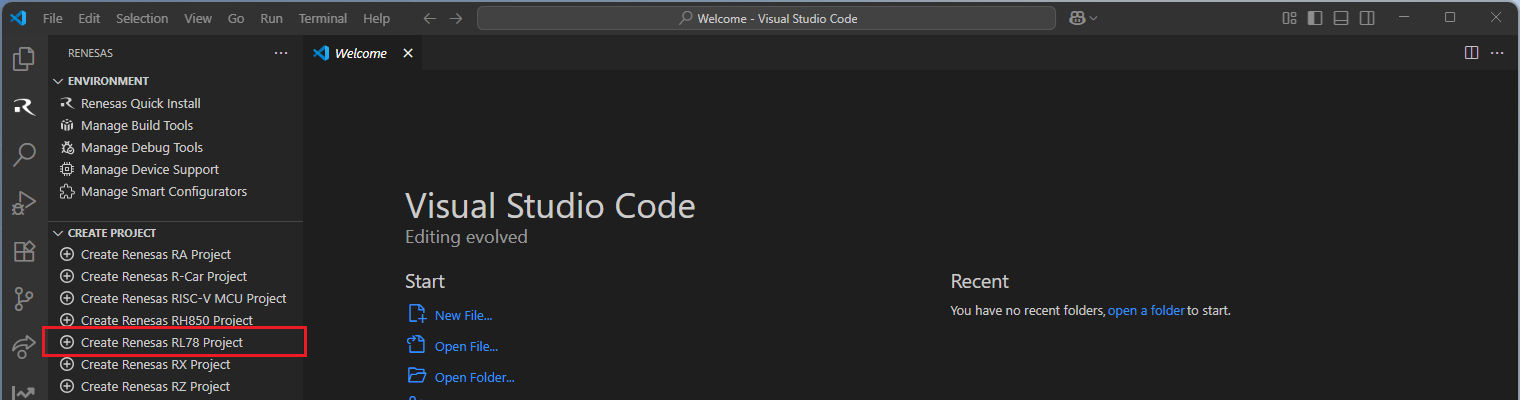
For RL78 device family projects, Smart Configurator can be accessed via the “Create Project” view in the “Renesas” tab. Please use the following instructions to create and build a project for RL78 device family.
Navigate to “Renesas” and click [Create Renesas RL78 project] from the commands.
Select [Create RL78 Project with Smart Configurator] option from the list.

Then, VSCode will show installed [RL78 Smart Configurator] list, select a [Smart Configurator] from the list.

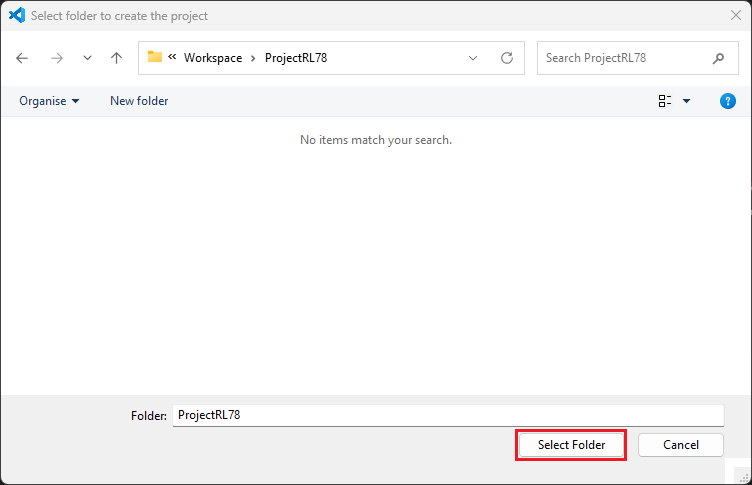
Select a [Folder] to create the project.
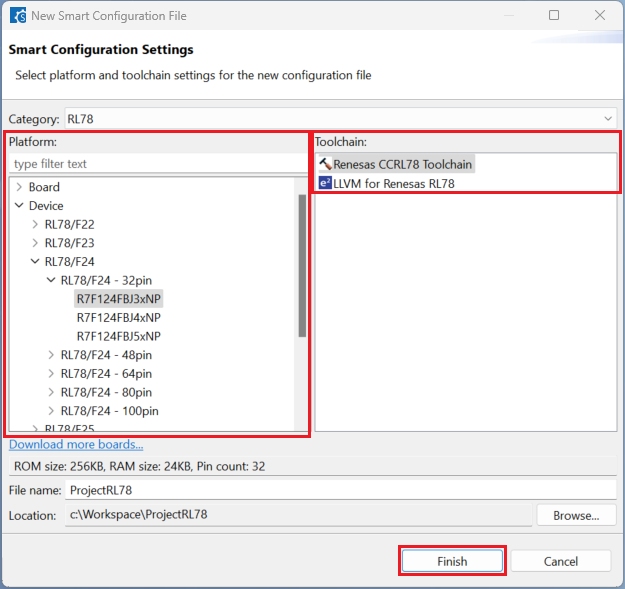
Enter [File name], configure your board and device type, select either [Renesas CCRL78 Toolchain] or [LLVM for Renesas RL78] (only applicable for some devices), and then click [Finish] to complete the project creation steps.
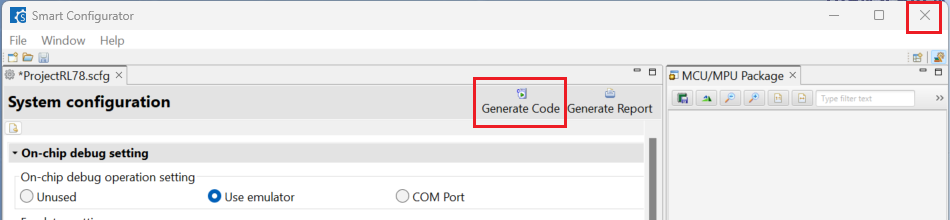
Click [System], select [Use emulator] or [COM Port] for [On-chip debug operation setting].

Click [Generate Code] and close [RL78 Smart Configurator] after generation of the project files completes.
15.4. Building the Project
For building a project, which has been created with RL78 Smart Configurator, please follow the steps below:
In the VS Code Command Palette, run the “CMake: Delete Cache and Reconfigure” command.

In the first time of running, a kit selection is shown. Select “[Unspecified]”.

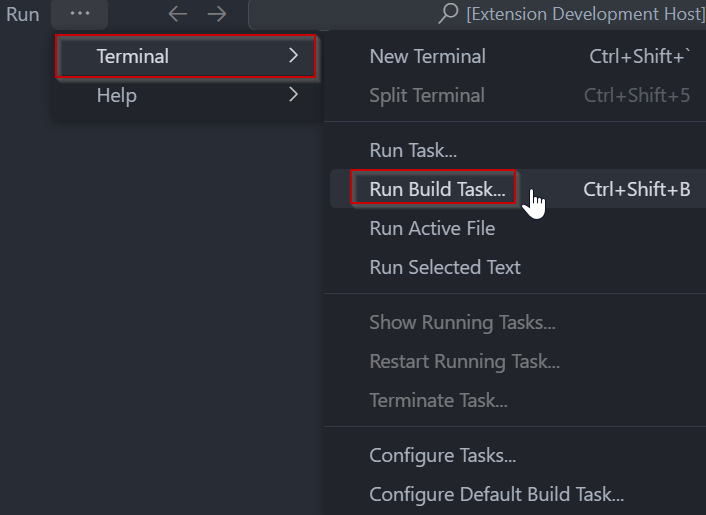
In VS Code, click [Terminal] ⇒ [Run Build Task] from the menu. Alternatively, press ctrl+shift+B to quickly open the Build task.
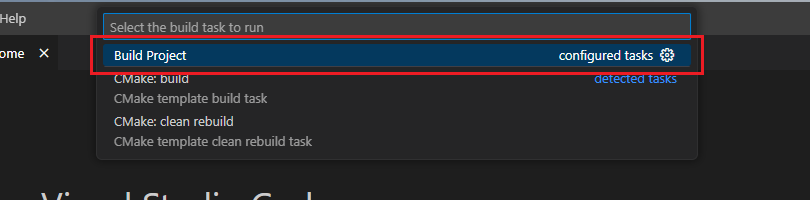
Select [Build Project] from the commands.
TIP: For more information about RL78 Smart Configurator, click here to visit the RL78 Smart Configurator page.
15.5. Debugging the Project
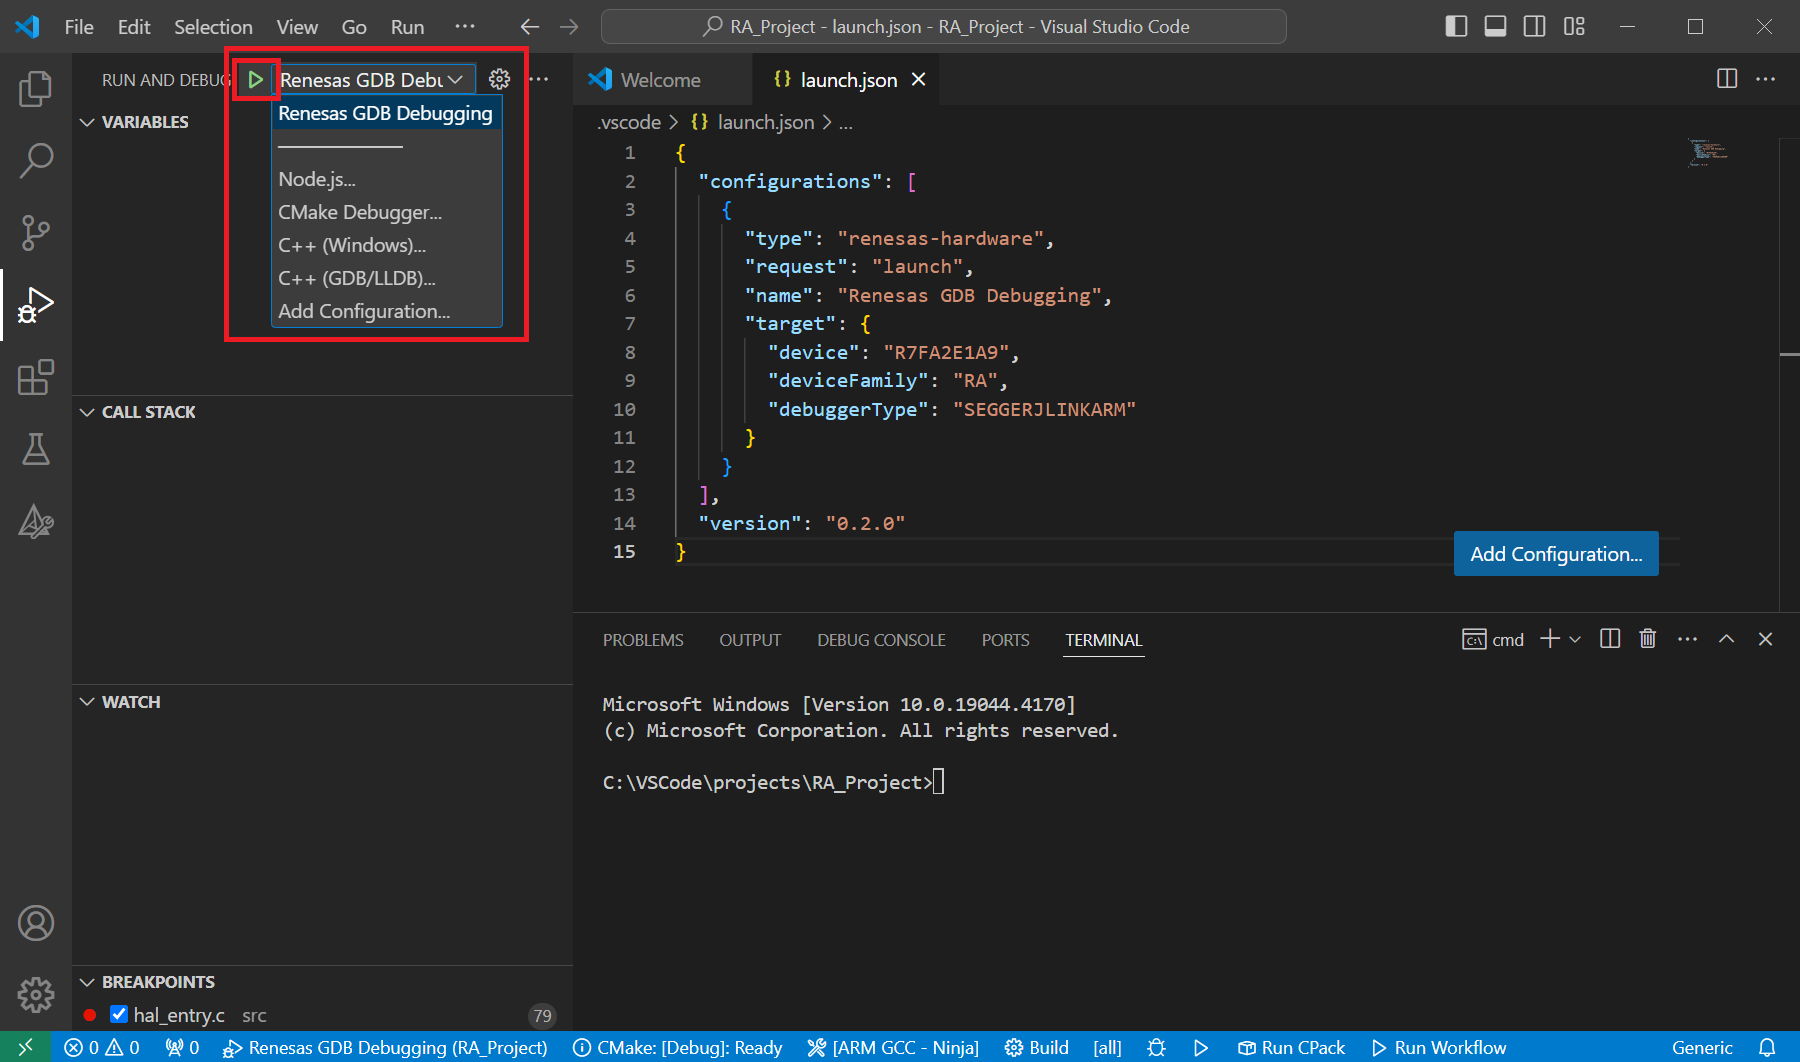
A debug session can be started by selecting the created configuration and clicking the [Start Debugging] button in the [Run and Debug] tab, or pressing [F5] from the keyboard.
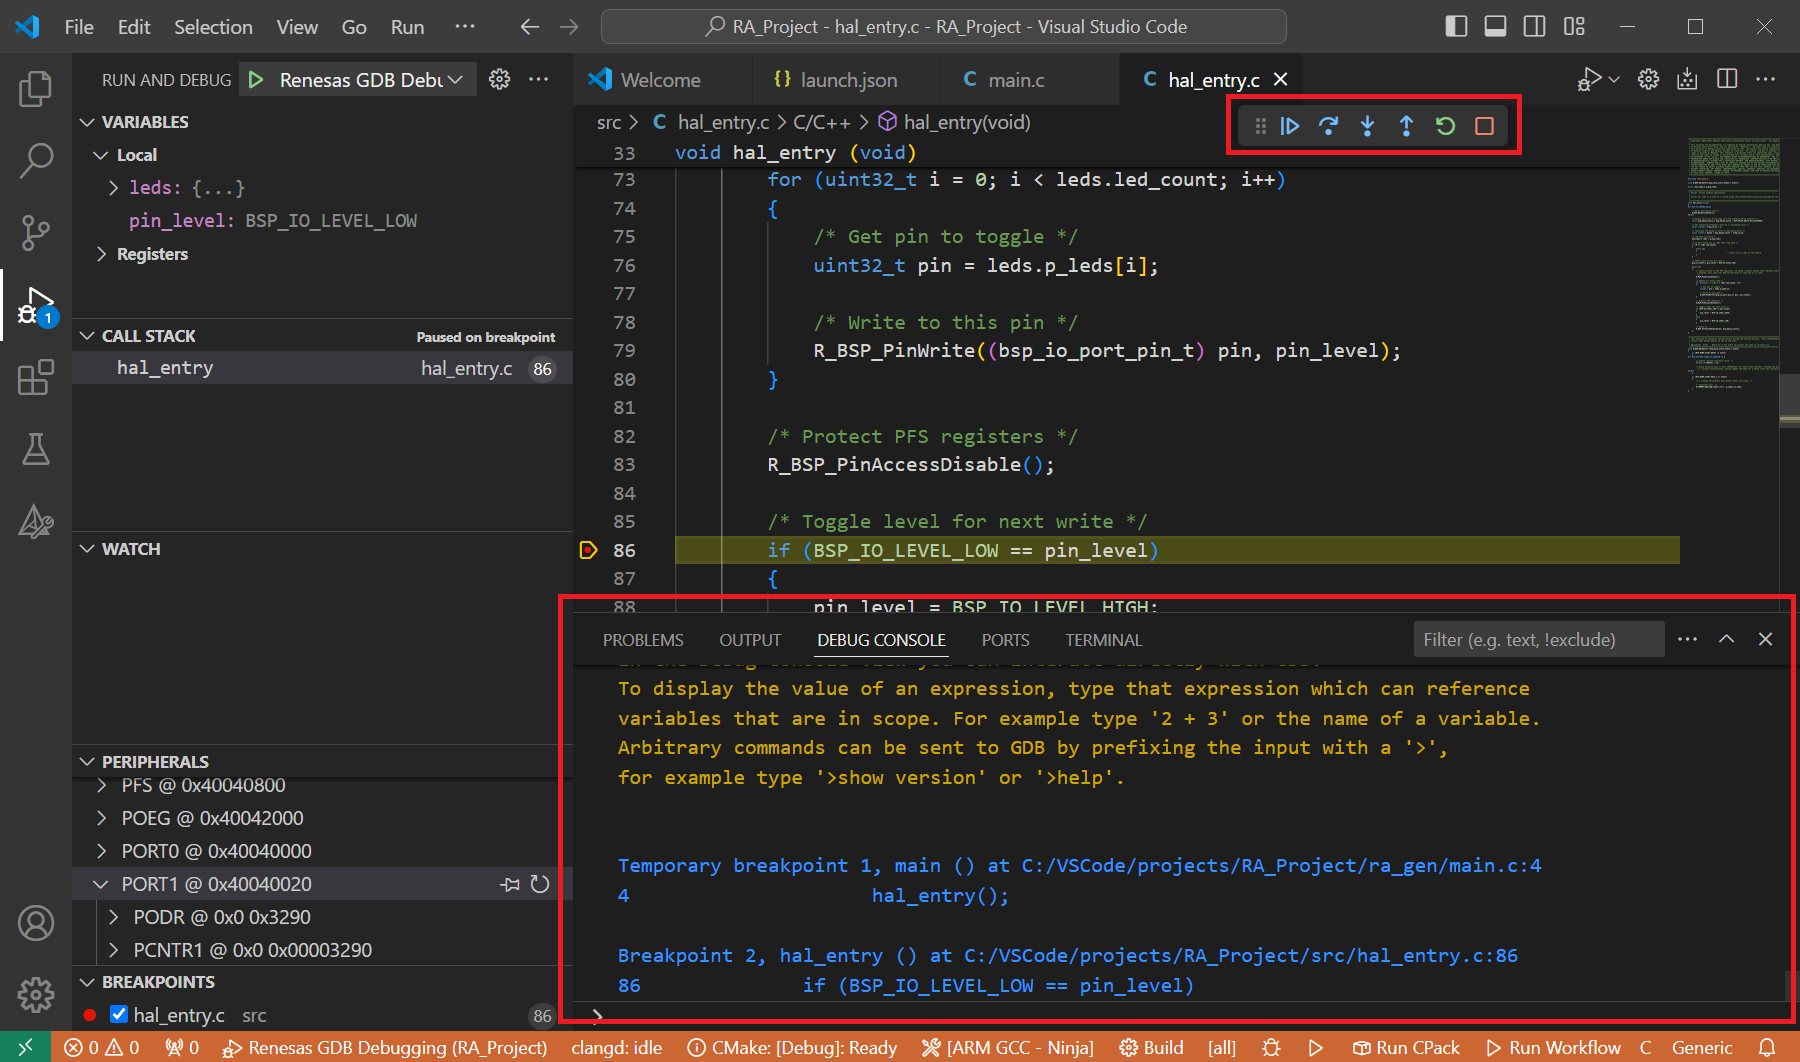
When VS Code starts the debug session, common debug control flow functions like resume, suspend, step into, step over, step out, restart, terminate debug session can be performed via the debug flow control buttons. Also, the [Debug Console] view will contain useful messages during the debug session.
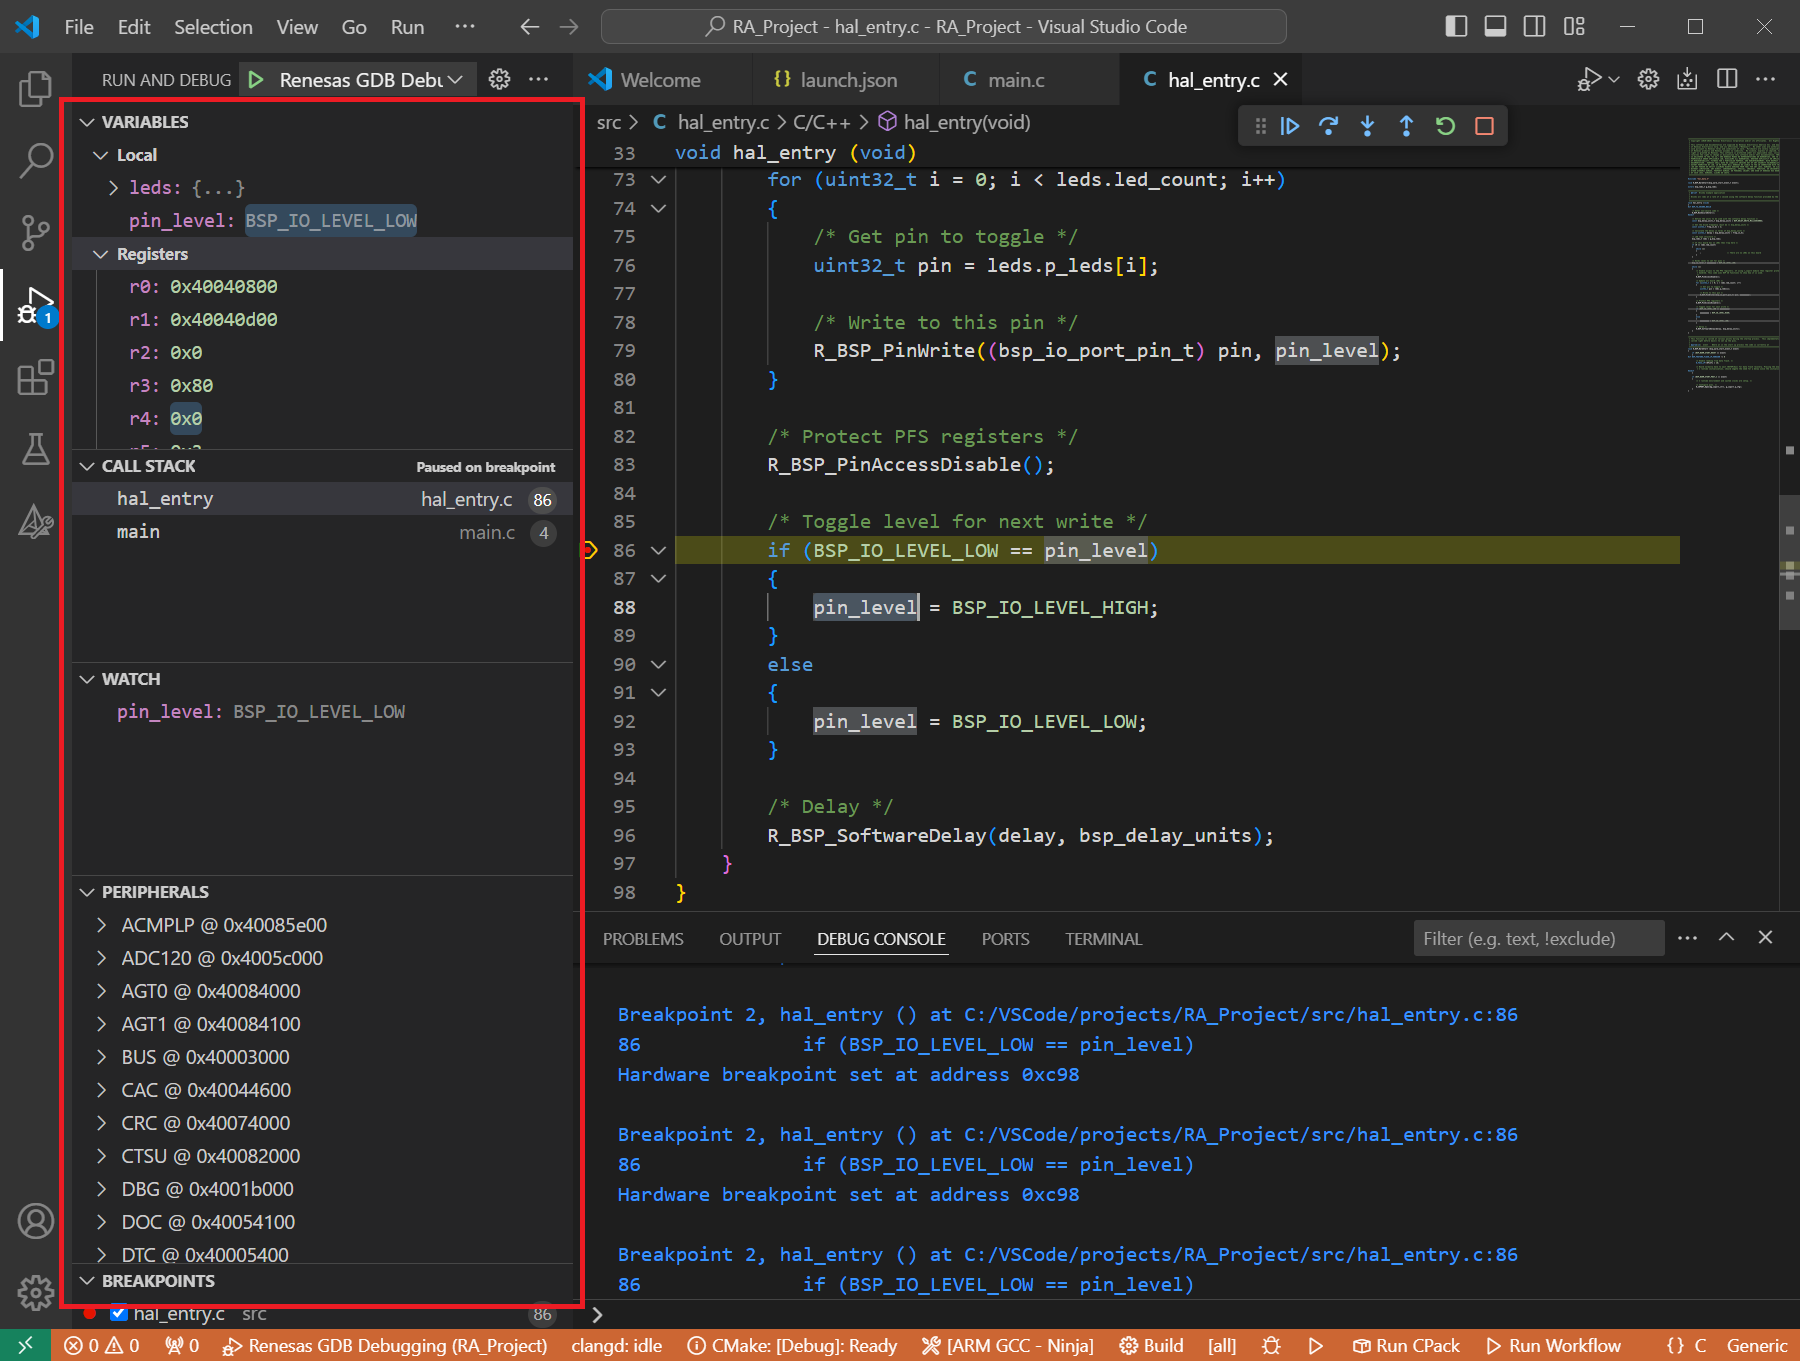
During the debug session, details about the local variables, device registers, call stack, watched variables, states of the peripherals can be accessed at the primary sidebar of VS Code in the [Run and Debug] tab.
15.6. GDB Server launch parameters for RL78 devices
Reference for common parameters: All common server parameters, including default settings and options applicable to Renesas device families, are documented in the GDB Server Parameters section. The specific parameters of the RL78 devices are described below.
15.6.1. Connection Settings
15.6.1.1. Clock
Option |
Details |
|---|---|
|
Description: Specify the Main Clock Frequency.
Default Value: 0: Using Internal Clock
Emulator: E1, E2, E2LITE, EZ, COMPORT, SIMULATOR, IECUBE
Available Values: 0: Using Internal Clock, 2.00, 3.00, 3.57, 4.00, 4.19, 4.91, 5.00, 6.00, 8.00, 8.38, 10.00, 12.00, 16.00, 20.00, or between 0.001 and 99.999 (in MHz).
Example:
"serverParameters": { "-umFreq=": 16.00 } |
|
Description: Specify the Sub Clock Frequency. When using an external sub clock oscillation,
specify the frequency adjusted via LIOTRM.
Default Value: 0 (Using Internal Clock)
Emulator: E1, E2, E2LITE, EZ, COMPORT, SIMULATOR, IECUBE
Available Values: 0 (Using Internal Clock), 32.768, 38.40, or between 0.0001 and 99.9999 (in kHz).
Example:
"serverParameters": { "-usFreq=": 32.768 }Note: Using Internal Clock will send value zero for COMPORT.
|
|
Description: Select a clock for monitor programs to operate while the program is stopped.
Default Value: 1 (System)
Emulator: E1, E2, E2LITE, EZ, COMPORT
Available Values: 0: User, 1: System
Example:
"serverParameters": { "-umClock=": 1 } |
|
Description: Select the main clock source for the target board.
Default Value: 0 (Generated by emulator)
Emulator: IECUBE
Available Values: 0: Generated by emulator, 1: External, 2: Clock Socket
Example:
"serverParameters": { "-umainClockMode=": 0 } |
|
Description: Select the sub clock source for the target board.
Default Value: 0 (Generated by emulator)
Emulator: IECUBE
Available Values: 0: Generated by emulator, 1: External, 2: Clock Socket
Example:
"serverParameters": { "-usubClockMode=": 0 } |
15.6.1.2. Connection with Target Board
Option |
Details |
|---|---|
|
Description: Select the emulator to connect.
Default Value: (Auto)
Emulator: E1, E2, E2LITE
Available Values: (Auto) or the serial number of the emulator.
Example:
"serverParameters": { "-sn": "e2:_9es002310c" } |
|
Description: Select whether to use Low voltage OCD board or not.
Default Value: 0
Emulator: E1, E2, E2LITE
Available Values: 0: No, 1: Yes
Example:
"serverParameters": { "-ulowVoltageOcdBoard=": 0 } |
|
Description: Select whether to supply power to the target board from emulator (MAX 200mA) and the power source.
Default Value: 1
Emulator: E1, E2, E2LITE
Available Values: 0, 1, 2
Example:
"serverParameters": { "-w": 1 }Note:
-w 2- supply power via E2 expansion interface. (E2 only) |
|
Description: Select the power voltage supplied to the target board.
Default Value: 0 (3.3 V)
Emulator: E1, E2, E2LITE
Available Values:
-usupplyVoltage= 0: 3.3 V-usupplyVoltage= 1: 5.0 V-usupplyVoltage= 18: 1.8 V-usupplyVoltage= 50: 5.0 VExample:
"serverParameters": { "-usupplyVoltage=": 0 }Note: Values
0 and 1 are reserved for 3.3 V and 5.0 V respectively. E2LITE only supports 3.3 V. |
|
Description: Select whether to connect as hot plug-in.
Default Value: 0
Emulator: E1, E2, E2LITE
Available Values: 0: No, 1: Yes
Example:
"serverParameters": { "-uHotPlug=": 0 } |
|
Description: Select the COMPORT to connect.
Default Value: None
Emulator: COMPORT
Available Values: Any valid COMPORT number.
Example:
"serverParameters": { "-uComPort=": "COM3" }Note: The message “A COMPORT must be selected” is displayed when COMPORT has not been specified.
|
|
Description: Select the reset control pin.
Default Value: 0 (DTR)
Emulator: COMPORT
Available Values:
-uResetControl= 0: DTR.-uResetControl= 1: RTS.Example:
"serverParameters": { "-uResetControl=": 0 } |
|
Description: Select data transmission rate.
Default Value: 0 (Auto)
Emulator: COMPORT
Available Values:
-uComBaudRate= 0: Auto.-uComBaudRate= 115200: 115.2K bps.-uComBaudRate= 250000: 250K bps.-uComBaudRate= 500000: 500K bps.-uComBaudRate= 1000000: 1M bps.Example:
"serverParameters": { "-uComBaudRate=": 0 } |
|
Description: Specify whether to connect with the target board.
Default Value: 0
Emulator: IECUBE
Available Values: 0: No, 1: Yes
Example:
"serverParameters": { "-utargetBoardConnected=": 0 } |
15.6.1.3. Flash
Option |
Details |
|---|---|
|
Description: Specify a security ID for reading codes in the internal ROM.
Default Value:
Device with 10 bytes ID code: 00000000000000000000.
Device with 16 bytes ID code: 00000000000000000000000000000000.
Emulator: E1, E2, E2LITE, EZ, COMPORT
Available Values:
Device with 10 bytes ID code: 0x0 to 0xFFFFFFFFFFFFFFFFFFFE.
Device with 16 bytes ID code: 0x0 to 0xFFFFFFFFFFFFFFFFFFFFFFFFFFFFFFFE.
Example:
"serverParameters": { "-usecurityID=": "00000000000000000000" }Note: Appears only when the selected microcontroller supports the ROM security function. 10 bytes ID code by default; 16 bytes if the selected microcontroller supports it.
(refer to user’s manual of On-Chip Debug Security ID for more detail).
|
|
Description: Specify a serial programming security ID for programming flash memory.
Default Value: FFFFFFFFFFFFFFFFFFFFFFFFFFFFFFFF
Emulator: E1, E2, E2LITE, EZ, COMPORT
Available Values: 0x0 to 0xFFFFFFFFFFFFFFFFFFFFFFFFFFFFF (hexadecimal).
Example:
"serverParameters": { "-uprogrammerSecurityID=": "FFFFFFFFFFFFFFFFFFFFFFFFFFFFFFFF" } |
|
Description: Select whether the serial programming security ID is written when downloading or not.
Default Value: 0
Emulator: E1, E2, E2LITE, EZ, COMPORT
Available Values: 0: No, 1: Yes
Example:
"serverParameters": { "-uallowWritingProgramerSecurityID=": 1 } |
|
Description: Select whether to enable flash rewrite. When No is specified, downloading program image or
setting software breakpoint is disabled.
Default Value: 1
Emulator: E1, E2, E2LITE, EZ, COMPORT
Available Values: 0: No, 1: Yes
Example:
"serverParameters": { "-upermitFlash=": 1 } |
|
Description: Select whether to rewrite the flash memory in wide voltage mode.
Default Value: 1
Emulator: E1, E2, E2LITE, EZ, COMPORT
Available Values: 0: No, 1: Yes
Example:
"serverParameters": { "-uuseWideVoltageMode=": 1 } |
|
Description: Select whether to erase the flash ROM when connecting to the debug tool.
Please specify Yes for Permit Flash Programming.
Default Value: 0
Emulator: E1, E2, E2LITE, EZ, COMPORT
Available Values: 0: No, 1: Yes
Example:
"serverParameters": { "-ueraseRom=": 0 } |
|
Description: Specify whether to program the flash memory by the flash self library.
This option is enabled only for the device which requires this setting.
Default Value: 0
Emulator: E1, E2, E2LITE, EZ, COMPORT
Available Values: 0: No, 1: Yes
Example:
"serverParameters": { "-uSelfCodeSet=": 0 } |
|
Description: Select whether to allow fill unused area with 0xFF when writing flash memory.
Default Value: 0
Emulator: E1, E2, E2LITE, EZ, COMPORT
Available Values: 0: No, 1: Yes
Example:
"serverParameters": { "-uFillUnusedFlashOnRewriting=": 0 } |
|
Description: Select whether to modify BTBLS for bank swapping when the program uses bank swapping feature.
Default Value: 0
Emulator: E2, E2LITE, COMPORT, SIMULATOR
Available Values: 0: No, 1: Yes
Example:
"serverParameters": { "-ubankSwapEnable=": 0 } |
|
Description: Specify the boot cluster size (in KB) for BTBLS on connection.
Default Value: 16
Emulator: SIMULATOR
Available Values: 16, 32, 64, 128 (depend on the target device)
Example:
"serverParameters": { "-ubootClusterSize=": 16 } |
15.6.2. Debug Tool Settings
15.6.2.1. General Debug
Option |
Details |
|---|---|
|
Description: Select whether to reset the program after downloaded.
Default Value: 1
Emulator: E1, E2, E2LITE, EZ, COMPORT, SIMULATOR, IECUBE
Available Values: 0: No, 1: Yes
Example:
"serverParameters": { "-uresetOnReload=": 1 } |
15.6.2.2. Break
Option |
Details |
|---|---|
|
Description: Select whether to terminate the peripheral emulation of timers while stopping.
Default Value: 0
Emulator: E1, E2, E2LITE, EZ, COMPORT, IECUBE
Available Values: 0: No, 1: Yes
Example:
"serverParameters": { "-ustopTimerEmu=": 0 } |
|
Description: Select whether to terminate the peripheral emulation of serials while stopping.
Default Value: 0
Emulator: E1, E2, E2LITE, EZ, COMPORT, IECUBE
Available Values: 0: No, 1: Yes
Example:
"serverParameters": { "-ustopSerialEmu=": 0 } |
15.6.2.3. Mask For Input Signal
Option |
Details |
|---|---|
|
Description: Configure Target Reset Signal Masking.
Default Value: 0
Emulator: E1, E2, E2LITE, EZ
Available Values: 0: No, 1: Yes
Example:
"serverParameters": { "-umaskTargetResetSignal=": 0 } |
|
Description: Configure Internal Reset Signal Masking.
Default Value: 0
Emulator: E1, E2, E2LITE, EZ, COMPORT, IECUBE
Available Values: 0: No, 1: Yes
Example:
"serverParameters": { "-umaskInternalResetSignal=": 0 } |
|
Description: Configure NMI Signal Masking.
Default Value: 0
Emulator: IECUBE
Available Values: 0: No, 1: Yes
Example:
"serverParameters": { "-umaskNMISignal=": 0 } |
15.6.2.4. Memory
Option |
Details |
|---|---|
|
Description: Select whether to verify the value when writing the memory.
Default Value: 1
Emulator: E1, E2, E2LITE, EZ, COMPORT, IECUBE
Available Values: 0: No, 1: Yes
Example:
"serverParameters": { "-uverifyOnWritingMemory=": 1 } |
|
Description: Select whether to allow accessing memory by stopping execution while program is running.
Default Value: 1 (Yes) for E1, E2; 0 (No) for COM Port.
Emulator: E1, E2, E2LITE, EZ, COMPORT
Available Values: 0: No, 1: Yes
Example:
"serverParameters": { "-uAllowRRMDMM=": 1 } |
15.6.2.5. Simulator GUI
Option |
Details |
|---|---|
|
Description: Select whether to display the Simulator GUI window.
Default Value: 1
Emulator: SIMULATOR
Available Values: 0: No, 1: Yes
Example:
"serverParameters": { "-udisplaySimGUI=": 1 } |
|
Description: Select Simulator GUI configuration file. Allows the state of each window in the Simulator GUI to be restored on reconnection. This file will be created if it does not already exist.
Default Value: Simulator configuration (simpj) file stored in the project folder as the active configuration name.
Emulator: SIMULATOR
Available Values: Any valid file path.
Example:
"serverParameters": { "-uSimulatorSetting=": "${workspace_loc:/${ProjName}}/${LaunchConfigName}.simpj" } |
15.6.2.6. Fail-safe Break
Option |
Details |
|---|---|
|
Description: Stop on fetch from fetch-protected area.
Default Value: 1
Emulator: IECUBE
Available Values: 0: No, 1: Yes
Example:
"serverParameters": { "-ufsbFetchFromProtected=": 1 } |
|
Description: Stop on write to write-protected area.
Default Value: 1
Emulator: IECUBE
Available Values: 0: No, 1: Yes
Example:
"serverParameters": { "-ufsbWriteToProtected=": 1 } |
|
Description: Stop on read from read-protected SFR.
Default Value: 1
Emulator: IECUBE
Available Values: 0: No, 1: Yes
Example:
"serverParameters": { "-ufsbReadFromSFR=": 1 } |
|
Description: Stop on write to write-protected SFR.
Default Value: 1
Emulator: IECUBE
Available Values: 0: No, 1: Yes
Example:
"serverParameters": { "-ufsbWriteToSFR=": 1 } |
|
Description: Stop on overflow of user stack.
Default Value: 0
Emulator: IECUBE
Available Values: 0: No, 1: Yes
Example:
"serverParameters": { "-ufsbStackOverflow=": 0 } |
|
Description: Specify the user stack top address.
Default Value: 0x0
Emulator: IECUBE
Available Values: Any valid hex address.
Example:
"serverParameters": { "-ufsbStackTop=": "0x0" } |
|
Description: Stop on underflow of user stack.
Default Value: 0
Emulator: IECUBE
Available Values: 0: No, 1: Yes
Example:
"serverParameters": { "-ufsbUnderflowStack=": 0 } |
|
Description: Specify the user stack bottom address.
Default Value: 0x0
Emulator: IECUBE
Available Values: Any valid hex address.
Example:
"serverParameters": { "-ufsbStackBottom=": "0x0" } |
|
Description: Stop on uninitialized stack pointer.
Default Value: 1
Emulator: IECUBE
Available Values: 0: No, 1: Yes
Example:
"serverParameters": { "-ufsbUninitStack=": 1 } |
|
Description: Stop on read from uninitialized RAM.
Default Value: 1
Emulator: IECUBE
Available Values: 0: No, 1: Yes
Example:
"serverParameters": { "-ufsbUninitRAM=": 1 } |
|
Description: Stop on access to memory in non-mapped area.
Default Value: 1
Emulator: IECUBE
Available Values: 0: No, 1: Yes
Example:
"serverParameters": { "-ufsbNonMapMem=": 1 } |
|
Description: Stop on misaligned word access.
Default Value: 1
Emulator: IECUBE
Available Values: 0: No, 1: Yes
Example:
"serverParameters": { "-ufsbMisalignWord=": 1 } |
|
Description: Stop on fail safe from peripheral.
Default Value: 1
Emulator: IECUBE
Available Values: 0: No, 1: Yes
Example:
"serverParameters": { "-ufsbPeripFSB=": 1 } |
|
Description: Stop on illegal flash event.
Default Value: 0
Emulator: IECUBE
Available Values: 0: No, 1: Yes
Example:
"serverParameters": { "-ufsbIllegalFlash=": 0 } |
15.6.2.7. RTOS
Option |
Details |
|---|---|
|
Description: Enable RTOS Debugging for a large number of threads. Non-executing RTOS
threads will display information only if manually suspended.
Default Value: 0
Emulator: E1, E2, E2LITE, EZ, COMPORT, SIMULATOR, IECUBE
Available Values: 0: No, 1: Yes
Example:
"serverParameters": { "-uOSRestriction=": 1 } |
15.6.3. Emulation Settings
15.6.3.1. Flash
Option |
Details |
|---|---|
|
Description: Specify whether to use flash self-programming.
Default Value: 0
Emulator: IECUBE
Available Values: 0: No, 1: Yes
Example:
"serverParameters": { "-ufspEnable=": 0 } |
|
Description: Specify the write time for flash memory.
Default Value: 1 (Typical retries assumed by flash specification)
Emulator: IECUBE
Available Values:
0: No retries.
1: Typical retries assumed by flash specification.
2: Maximum retries assumed by flash specification.
3: Maximum retries.
Example:
"serverParameters": { "-ufspWriteTime=": 1 } |
|
Description: Specify the address for write time.
Default Value: 0x0
Emulator: IECUBE
Available Values: Any valid hex address.
Example:
"serverParameters": { "-ufspWriteAddress=": "0x0" } |
|
Description: Specify the erase time for flash memory.
Default Value: 1 (Typical retries assumed by flash specification)
Emulator: IECUBE
Available Values:
0: No retries.
1: Typical retries assumed by flash specification.
2: Maximum retries assumed by flash specification.
3: Maximum retries.
Example:
"serverParameters": { "-ufspEraseTime=": 1 } |
|
Description: Specify the address for erase time.
Default Value: 0x0
Emulator: IECUBE
Available Values: Any valid hex address.
Example:
"serverParameters": { "-ufspEraseAddress=": "0x0" } |
|
Description: Specify the macro service error 0.
Default Value: 0 (None)
Emulator: IECUBE
Available Values:
0: None.
1: Erase Error.
2: Blank Check Error.
3: Write Error.
4: Verify Error.
5: Erase Error (Security/Flash Shield).
6: Write Error (Security/Flash Shield).
7: Verify Error (Security/Flash Shield).
Example:
"serverParameters": { "-ufspMSR0=": 0 } |
|
Description: Specify the address for macro service error 0.
Default Value: 0x0
Emulator: IECUBE
Available Values: Any valid hex address.
Example:
"serverParameters": { "-ufspMSR0Address=": "0x0" }Note: This value will not be sent to GDB server if
-ufspMSR0= is set to 0 (None). |
|
Description: Specify the address mask for macro service error 0.
Default Value: 0x0
Emulator: IECUBE
Available Values: Any valid hex address.
Example:
"serverParameters": { "-ufspMSR0Mask=": "0x0" }Note: This value will not be sent to GDB server if
-ufspMSR0= is set to 0 (None). |
|
Description: Specify the macro service error 1.
Default Value: 0 (None)
Emulator: IECUBE
Available Values:
0: None.
1: Erase Error.
2: Blank Check Error.
3: Write Error.
4: Verify Error.
5: Erase Error (Security/Flash Shield).
6: Write Error (Security/Flash Shield).
7: Verify Error (Security/Flash Shield).
Example:
"serverParameters": { "-ufspMSR1=": 0 } |
|
Description: Specify the address for macro service error 1.
Default Value: 0x0
Emulator: IECUBE
Available Values: Any valid hex address.
Example:
"serverParameters": { "-ufspMSR1Address=": "0x0" }Note: This value will not be sent to GDB server if
-ufspMSR1= is set to 0 (None). |
|
Description: Specify the address mask for macro service error 1.
Default Value: 0x0
Emulator: IECUBE
Available Values: Any valid hex address.
Example:
"serverParameters": { "-ufspMSR1Mask=": "0x0" }Note: This value will not be sent to GDB server if
-ufspMSR1= is set to 0 (None). |
|
Description: Specify the macro service error 2.
Default Value: 0 (None)
Emulator: IECUBE
Available Values:
0: None.
1: Erase Error.
2: Blank Check Error.
3: Write Error.
4: Verify Error.
5: Erase Error (Security/Flash Shield).
6: Write Error (Security/Flash Shield).
7: Verify Error (Security/Flash Shield).
Example:
"serverParameters": { "-ufspMSR2=": 0 } |
|
Description: Specify the address for macro service error 2.
Default Value: 0x0
Emulator: IECUBE
Available Values: Any valid hex address.
Example:
"serverParameters": { "-ufspMSR2Address=": "0x0" }Note: This value will not be sent to GDB server if
-ufspMSR2= is set to 0 (None). |
|
Description: Specify the address mask for macro service error 2.
Default Value: 0x0
Emulator: IECUBE
Available Values: Any valid hex address.
Example:
"serverParameters": { "-ufspMSR2Mask=": "0x0" }Note: This value will not be sent to GDB server if
-ufspMSR2= is set to 0 (None). |
15.6.3.2. Flash Shield Window
Option |
Details |
|---|---|
|
Description: Specify the flash shield start block.
Default Value: 0x0
Emulator: IECUBE
Available Values: Any valid hex block address.
Example:
"serverParameters": { "-ufspShieldStart=": "0x0" } |
|
Description: Specify the flash shield end block.
Default Value: 0xFFFF
Emulator: IECUBE
Available Values: Any valid hex block address.
Example:
"serverParameters": { "-ufspShieldEnd=": "0xFFFF" } |
15.6.3.3. Security Flag
Option |
Details |
|---|---|
|
Description: Specify whether to disable block erase.
Default Value: 0
Emulator: IECUBE
Available Values: 0: No, 1: Yes
Example:
"serverParameters": { "-ufspDisableErase=": 0 } |
|
Description: Specify whether to disable program.
Default Value: 0
Emulator: IECUBE
Available Values: 0: No, 1: Yes
Example:
"serverParameters": { "-ufspDisableProgram=": 0 } |
|
Description: Specify whether to disable boot area rewrite.
Default Value: 0
Emulator: IECUBE
Available Values: 0: No, 1: Yes
Example:
"serverParameters": { "-ufspDisableBootWrite=": 0 } |
15.6.3.4. Data Flash
Option |
Details |
|---|---|
|
Description: Specify whether to use DataFlash self-programming.
Default Value: 0
Emulator: IECUBE
Available Values: 0: No, 1: Yes
Example:
"serverParameters": { "-udfspEnable=": 0 } |
|
Description: Specify the write time for DataFlash memory.
Default Value: 1 (Typical retries assumed by flash specification)
Emulator: IECUBE
Available Values:
0: No retries.
1: Typical retries assumed by flash specification.
2: Maximum retries assumed by flash specification.
3: Maximum retries.
Example:
"serverParameters": { "-udfspWriteTime=": 1 } |
|
Description: Specify the address for DataFlash write time.
Default Value: 0xF1000
Emulator: IECUBE
Available Values: Any valid hex address.
Example:
"serverParameters": { "-udfspWriteAddress=": "0xF1000" } |
|
Description: Specify the macro service error 0 for DataFlash.
Default Value: 0 (None)
Emulator: IECUBE
Available Values:
0: None.
1: Blank Check Error.
2: Write Error.
3: Verify Error.
Example:
"serverParameters": { "-udfspMSR0=": 0 } |
|
Description: Specify the address for DataFlash macro service error 0.
Default Value: 0xF1000
Emulator: IECUBE
Available Values: Any valid hex address.
Example:
"serverParameters": { "-udfspMSR0Address=": "0xF1000" }Note: This value will not be sent to GDB server if
-udfspMSR0= is set to 0 (None). |
|
Description: Specify the address mask for DataFlash macro service error 0.
Default Value: 0xFFFF
Emulator: IECUBE
Available Values: Any valid hex address.
Example:
"serverParameters": { "-udfspMSR0Mask=": "0xFFFF" }Note: This value will not be sent to GDB server if
-udfspMSR0= is set to 0 (None). |
|
Description: Specify the macro service error 1 for DataFlash.
Default Value: 0 (None)
Emulator: IECUBE
Available Values:
0: None.
1: Blank Check Error.
2: Write Error.
3: Verify Error.
Example:
"serverParameters": { "-udfspMSR1=": 0 } |
|
Description: Specify the address for DataFlash macro service error 1.
Default Value: 0xF1000
Emulator: IECUBE
Available Values: Any valid hex address.
Example:
"serverParameters": { "-udfspMSR1Address=": "0xF1000" }Note: This value will not be sent to GDB server if
-udfspMSR1= is set to 0 (None). |
|
Description: Specify the address mask for DataFlash macro service error 1.
Default Value: 0xFFFF
Emulator: IECUBE
Available Values: Any valid hex address.
Example:
"serverParameters": { "-udfspMSR1Mask=": "0xFFFF" }Note: This value will not be sent to GDB server if
-udfspMSR1= is set to 0 (None). |
|
Description: Specify the macro service error 2 for DataFlash.
Default Value: 0 (None)
Emulator: IECUBE
Available Values:
0: None.
1: Blank Check Error.
2: Write Error.
3: Verify Error.
Example:
"serverParameters": { "-udfspMSR2=": 0 } |
|
Description: Specify the address for DataFlash macro service error 2.
Default Value: 0xF1000
Emulator: IECUBE
Available Values: Any valid hex address.
Example:
"serverParameters": { "-udfspMSR2Address=": "0xF1000" }Note: This value will not be sent to GDB server if
-udfspMSR2= is set to 0 (None). |
|
Description: Specify the address mask for DataFlash macro service error 2.
Default Value: 0xFFFF
Emulator: IECUBE
Available Values: Any valid hex address.
Example:
"serverParameters": { "-udfspMSR2Mask=": "0xFFFF" }Note: This value will not be sent to GDB server if
-udfspMSR2= is set to 0 (None). |