10. Quick Start for Dialog DA148xx
10.1. Supported Environments
Operating System |
Windows: Windows 10 / Windows 11 Linux: Ubuntu 22.04 / Ubuntu 24.04 macOS: macOS 14 Sonoma (Apple silicon) / macOS 15 Sequoia (Apple silicon) |
VS Code version |
1.102.0 (minimum) |
VS Code can be downloaded and installed from this page https://code.visualstudio.com/.
10.2. Installation
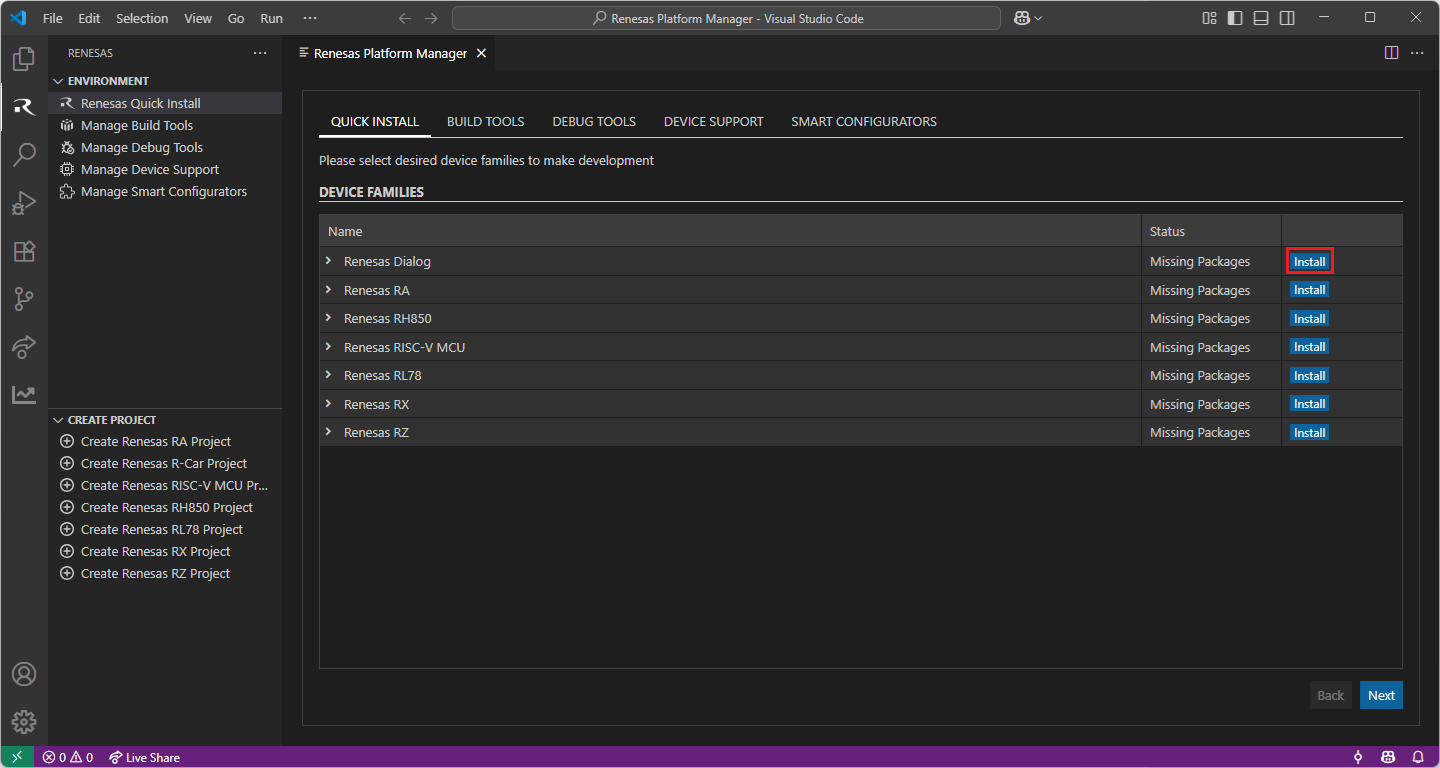
For the Dialog Family, Renesas Platform provides a straightforward installation wizard to install CMake, Ninja Build, Python 3.10, ARM GNU Toolchain, SEGGER J-Link and Support Files for Dialog Family. To set up your environment:
Open VS Code.
Navigate to the “Renesas” tab in VS Code. Then, click “Renesas Quick Install” in the “Environment” view.

Click the “Install” button for the “Dialog” device family. The Renesas Platform will now check the dependencies required by the Dialog Device Family. The Renesas Platform extension will check the local environment and CMake, Ninja Build, Python 3.10, ARM GNU Toolchain, SEGGER J-Link and Support Files for Dialog Family, then create an installation plan for them if necessary.
When your selection is ready, click the “Start Installations” button. The download and installation process will start automatically.
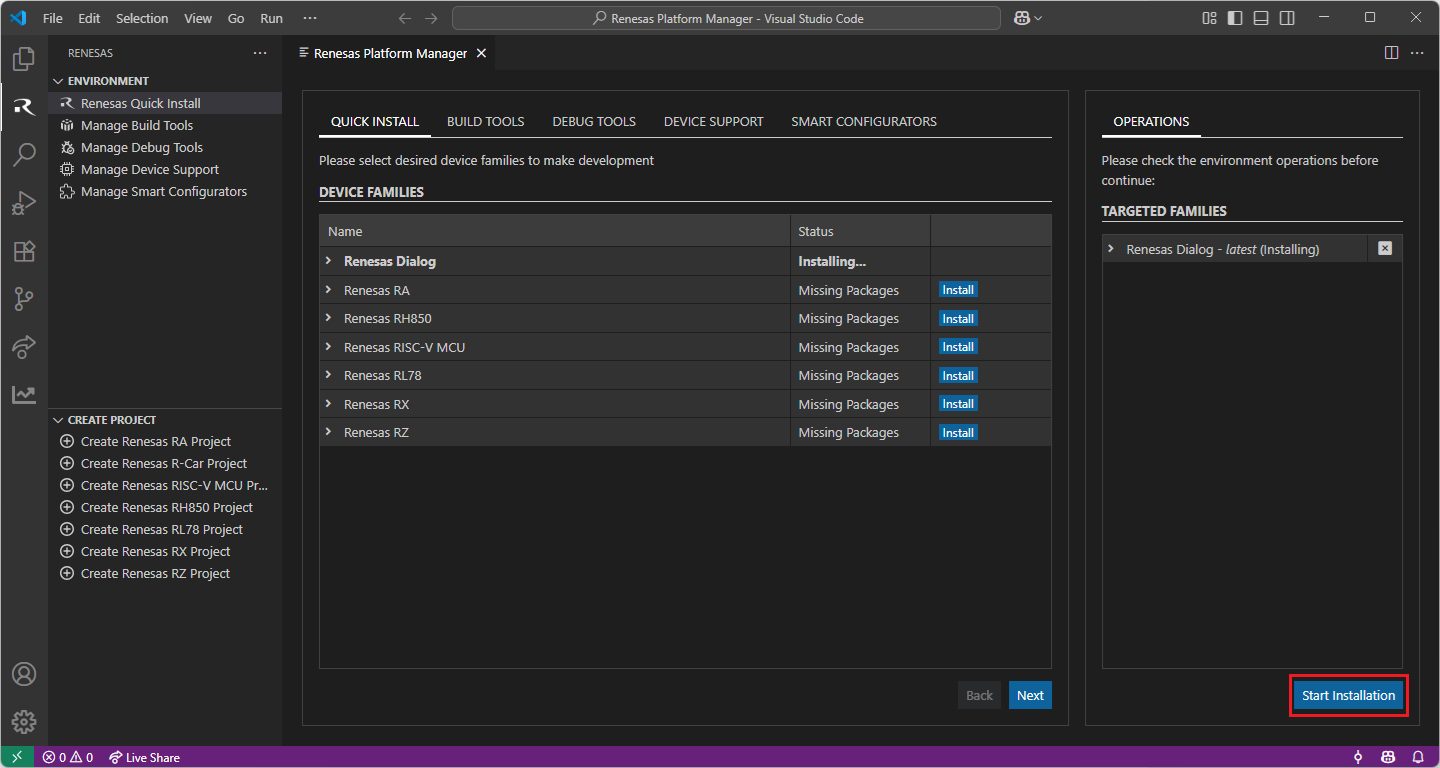
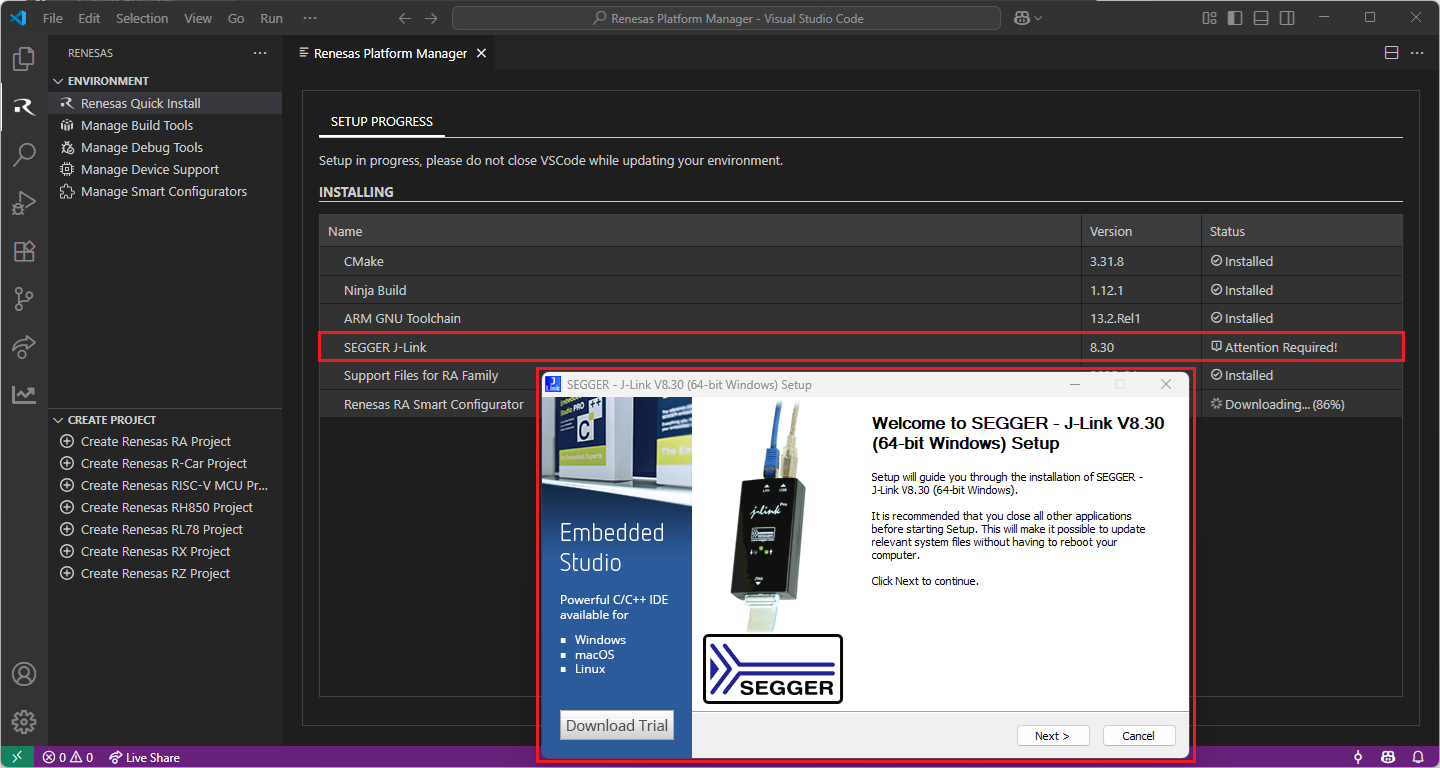
Most of the installations will be performed automatically, some installations may require manual interaction.
During the SEGGER J-Link installation, the setup wizard will appear for manual installation, please follow the steps to complete the SEGGER J-Link installation.
Getting the Dialog Audio Development Platform:
For Dialog projects, it is recommended to use the “Dialog Audio Development Platform” during project development. Customers can access the Audio Development Platform (ADP) software upon request.
For the Dialog Family, Renesas Platform provides a straightforward installation wizard to install CMake, Ninja Build, Python 3.10, ARM GNU Toolchain, SEGGER J-Link and Support Files for Dialog Family. To set up your environment:
Open VS Code.
Navigate to the “Renesas” tab in VS Code. Then, click “Renesas Quick Install” in the “Environment” view.
Click the “Install” button for the “Dialog” device family. The Renesas Platform will now check the dependencies required by the Dialog Device Family. The Renesas Platform extension will check the local environment and CMake, Ninja Build, Python 3.10, ARM GNU Toolchain, SEGGER J-Link and Support Files for Dialog Family, then create an installation plan for them if necessary.
When your selection is ready, click the “Start Installations” button. The download and installation process will start automatically.
Most of the installations will be performed automatically, some installations may require manual interaction.
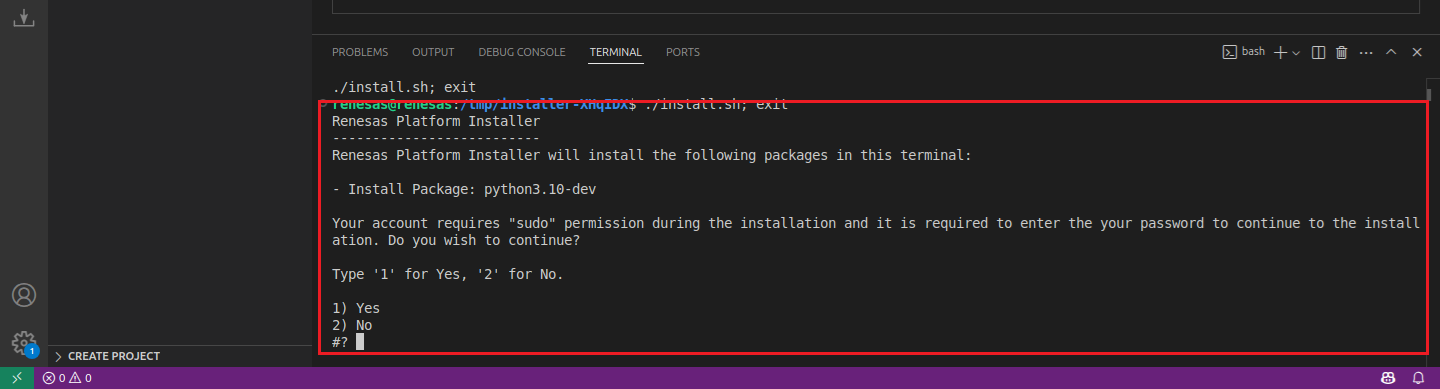
During the “Python 3.10” installation, the terminal wizard will appear for manual interaction. The terminal will show the execution plan and ask for confirmation before continuing. During the installation, it requires administrative rights to execute the installation, thus a password could be needed during the installation. Please make sure that the current user has “sudo” permissions and enter the password.
Getting the Dialog Audio Development Platform:
For Dialog projects, it is recommended to use the “Dialog Audio Development Platform” during project development. Customers can access the Audio Development Platform (ADP) software upon request.
For the Dialog Family, Renesas Platform provides a straightforward installation wizard to install CMake, Ninja Build, Python 3.10, ARM GNU Toolchain, SEGGER J-Link and Support Files for Dialog Family. To set up your environment:
Open VS Code.
Navigate to the “Renesas” tab in VS Code. Then, click “Renesas Quick Install” in the “Environment” view.
Click the “Install” button for the “Dialog” device family. The Renesas Platform will now check the dependencies required by the Dialog Device Family. The Renesas Platform extension will check the local environment and CMake, Ninja Build, Python 3.10, ARM GNU Toolchain, SEGGER J-Link and Support Files for Dialog Family, then create an installation plan for them if necessary.
When your selection is ready, click the “Start Installations” button. The download and installation process will start automatically.
Most of the installations will be performed automatically, some installations may require manual interaction.
During the “Python 3.10” installation, the terminal wizard will appear for manual interaction. The terminal will show the execution plan and ask for confirmation before continuing. During the installation, it requires administrative rights to execute the installation, thus a password could be needed during the installation. Please make sure that the current user has “sudo” permissions and enter the password.
Getting the Dialog Audio Development Platform:
For Dialog projects, it is recommended to use the “Dialog Audio Development Platform” during project development. Customers can access the Audio Development Platform (ADP) software upon request.
To utilise the Renesas extensions on macOS, it’s necessary to install:
Homebrew
XZ Archive Utilities
First, install Homebrew (brew), which is an open-source software package management system that manages the installation of software for macOS. For installation and more information about Homebrew, please refer to https://brew.sh/.
After installing the Homebrew, install the “XZ Archive Utilities” by using brew install xz command.
$ brew install xz
For the Dialog Family, Renesas Platform provides a straightforward installation wizard to install CMake, Ninja Build, Python 3.10, ARM GNU Toolchain, SEGGER J-Link and Support Files for Dialog Family. To set up your environment:
Open VS Code.
Navigate to the “Renesas” tab in VS Code. Then, click “Renesas Quick Install” in the “Environment” view.
Click the “Install” button for the “Dialog” device family. The Renesas Platform will now check the dependencies required by the Dialog Device Family. The Renesas Platform extension will check the local environment and CMake, Ninja Build, Python 3.10, ARM GNU Toolchain, SEGGER J-Link and Support Files for Dialog Family, then create an installation plan for them if necessary.
When your selection is ready, click the “Start Installations” button. The download and installation process will start automatically.
Most of the installations will be performed automatically, some installations may require manual interaction.
During the “Python 3.10” installation, the terminal wizard will appear for manual interaction. The terminal will show the execution plan and ask for confirmation before continuing. During the installation, it requires administrative rights to execute the installation, thus a password could be needed during the installation. Please make sure that the current user has “sudo” permissions and enter the password.
Getting the Dialog Audio Development Platform:
For Dialog projects, it is recommended to use the “Dialog Audio Development Platform” during project development. Customers can access the Audio Development Platform (ADP) software upon request.
10.3. Using Audio Development Platform (ADP) for Dialog DA148xx device family
Renesas VS Code extensions support project development for DA148xx family of integrated audio processors. Customers can have access to the Audio Development Platform software upon request and start their Dialog project development by using Dialog Audio Development Platform (ADP). The ADP comes with ready to start, predefined project samples inside the package. Please follow the instructions below to start developing a Dialog device project:
From the ADP sample projects, open a desired start up project in VSCode.
Note
Sample projects in the ADP can be found inside the following directories:
<ADP_ROOT>/Software/Source/projects/bare_metal
<ADP_ROOT>/Software/Source/projects/freertos
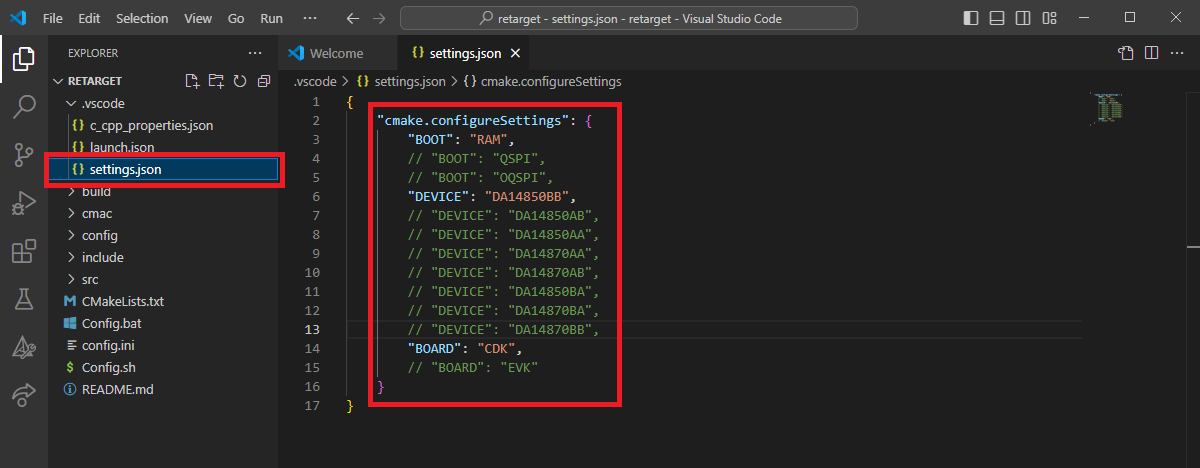
After your project is opened in VSCode, open the settings file of the project in .vscode/settings.json path and check the cmake.configureSettings configuration. Make sure the BOARD, BOOT and DEVICE settings are correct for the targeted development. Configure them if necessary.
Then, open “Command Palette” (by using “View”” => “Command Palette” menu), and run the “CMake: Select a Kit” command.
From the list, select the CMake Kit “Renesas Platform: ARM GNU Toolchain - 9-2019-q4-major” toolchain (you can search for search and look for “Renesas Platform” to filter the list).

In the VS Code Command Palette, run “CMake: Delete Cache and Reconfigure” command.

Then, run the “CMake: Build” command.

By default, the executable file (<project name>.elf) is generated into the “build/syscpu” folder.
10.4. Debugging the Project
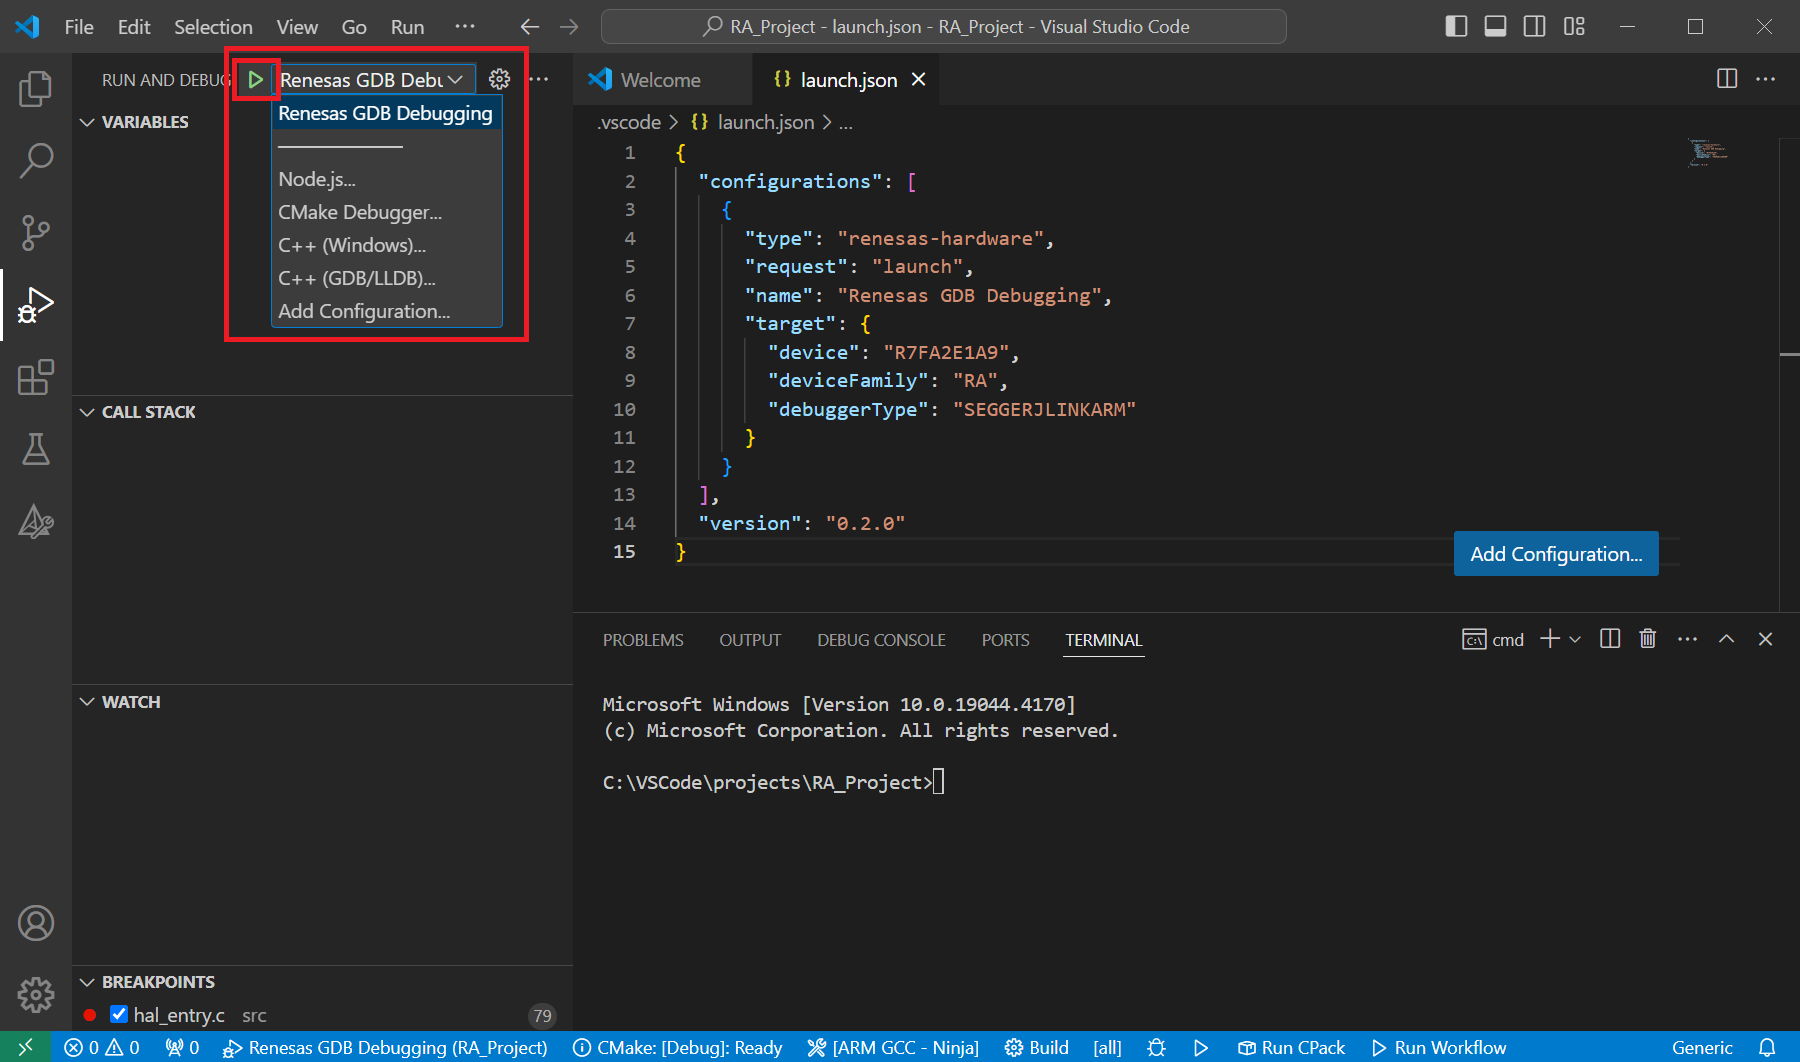
A debug session can be started by selecting the created configuration and clicking the [Start Debugging] button in the [Run and Debug] tab, or pressing [F5] from the keyboard.
When VS Code starts the debug session, common debug control flow functions like resume, suspend, step into, step over, step out, restart, terminate debug session can be performed via the debug flow control buttons. Also, the [Debug Console] view will contain useful messages during the debug session.
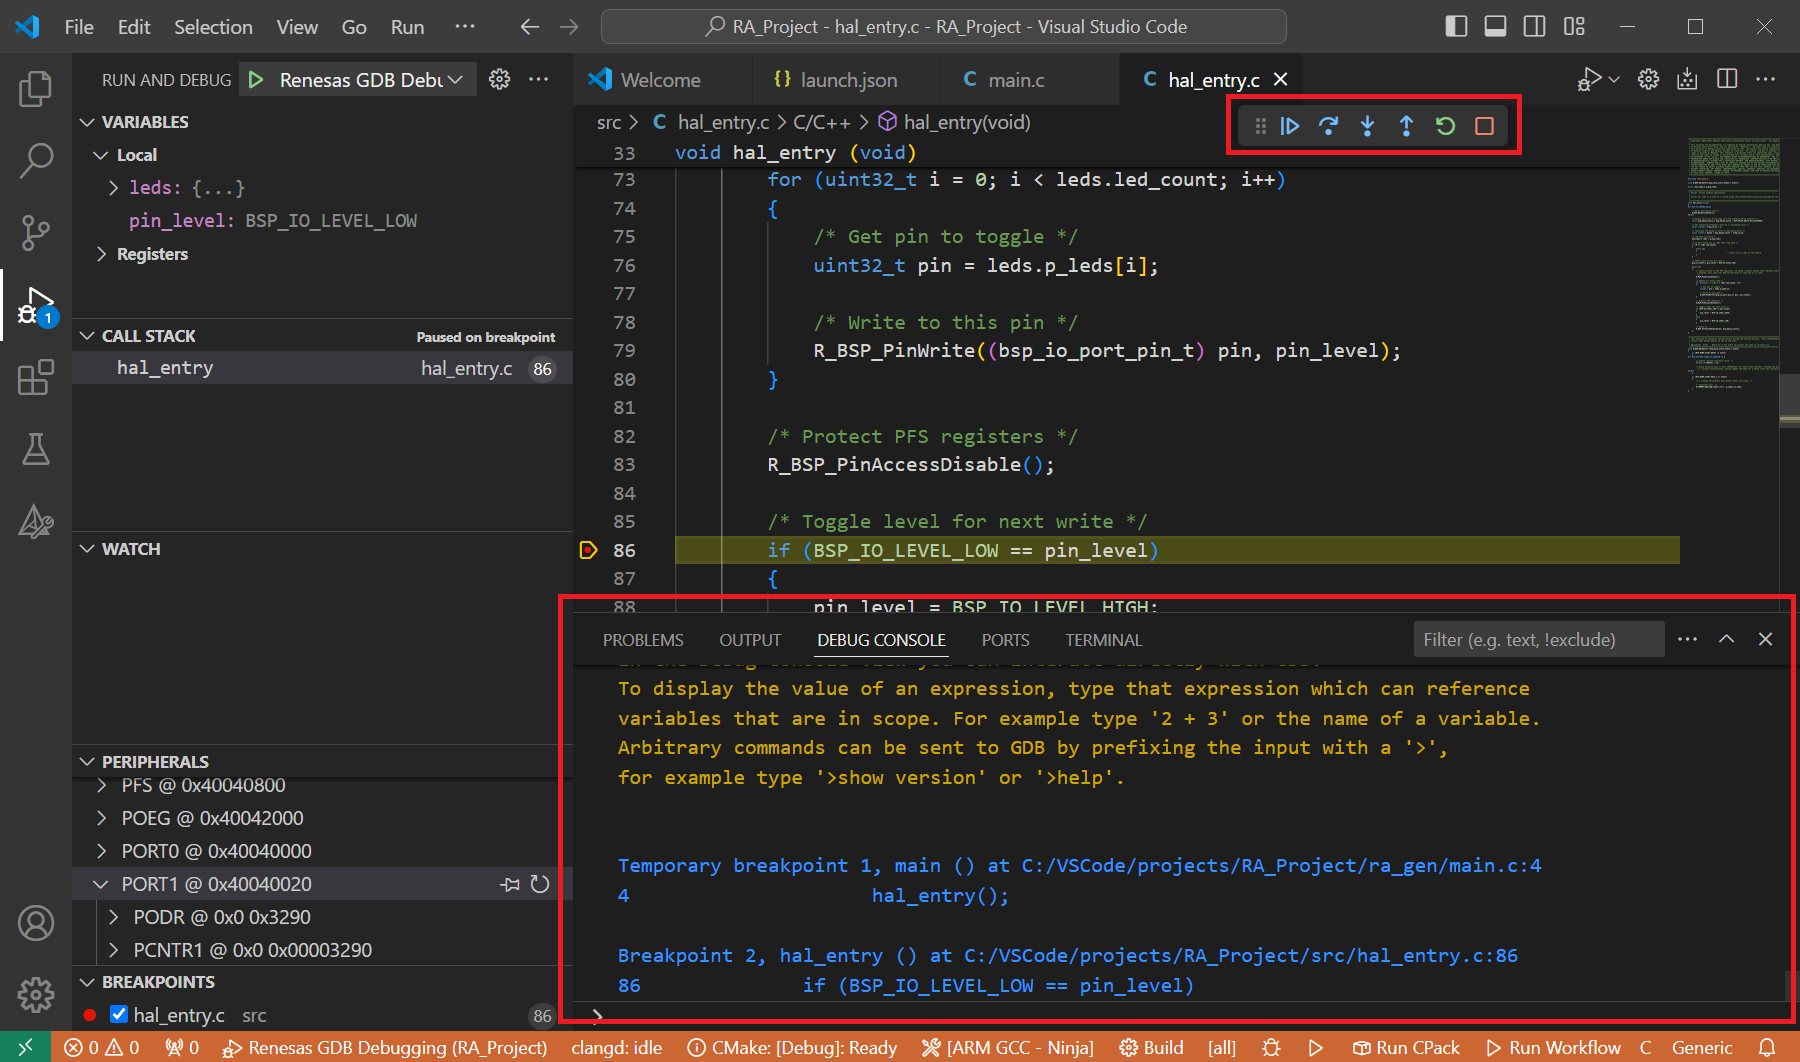
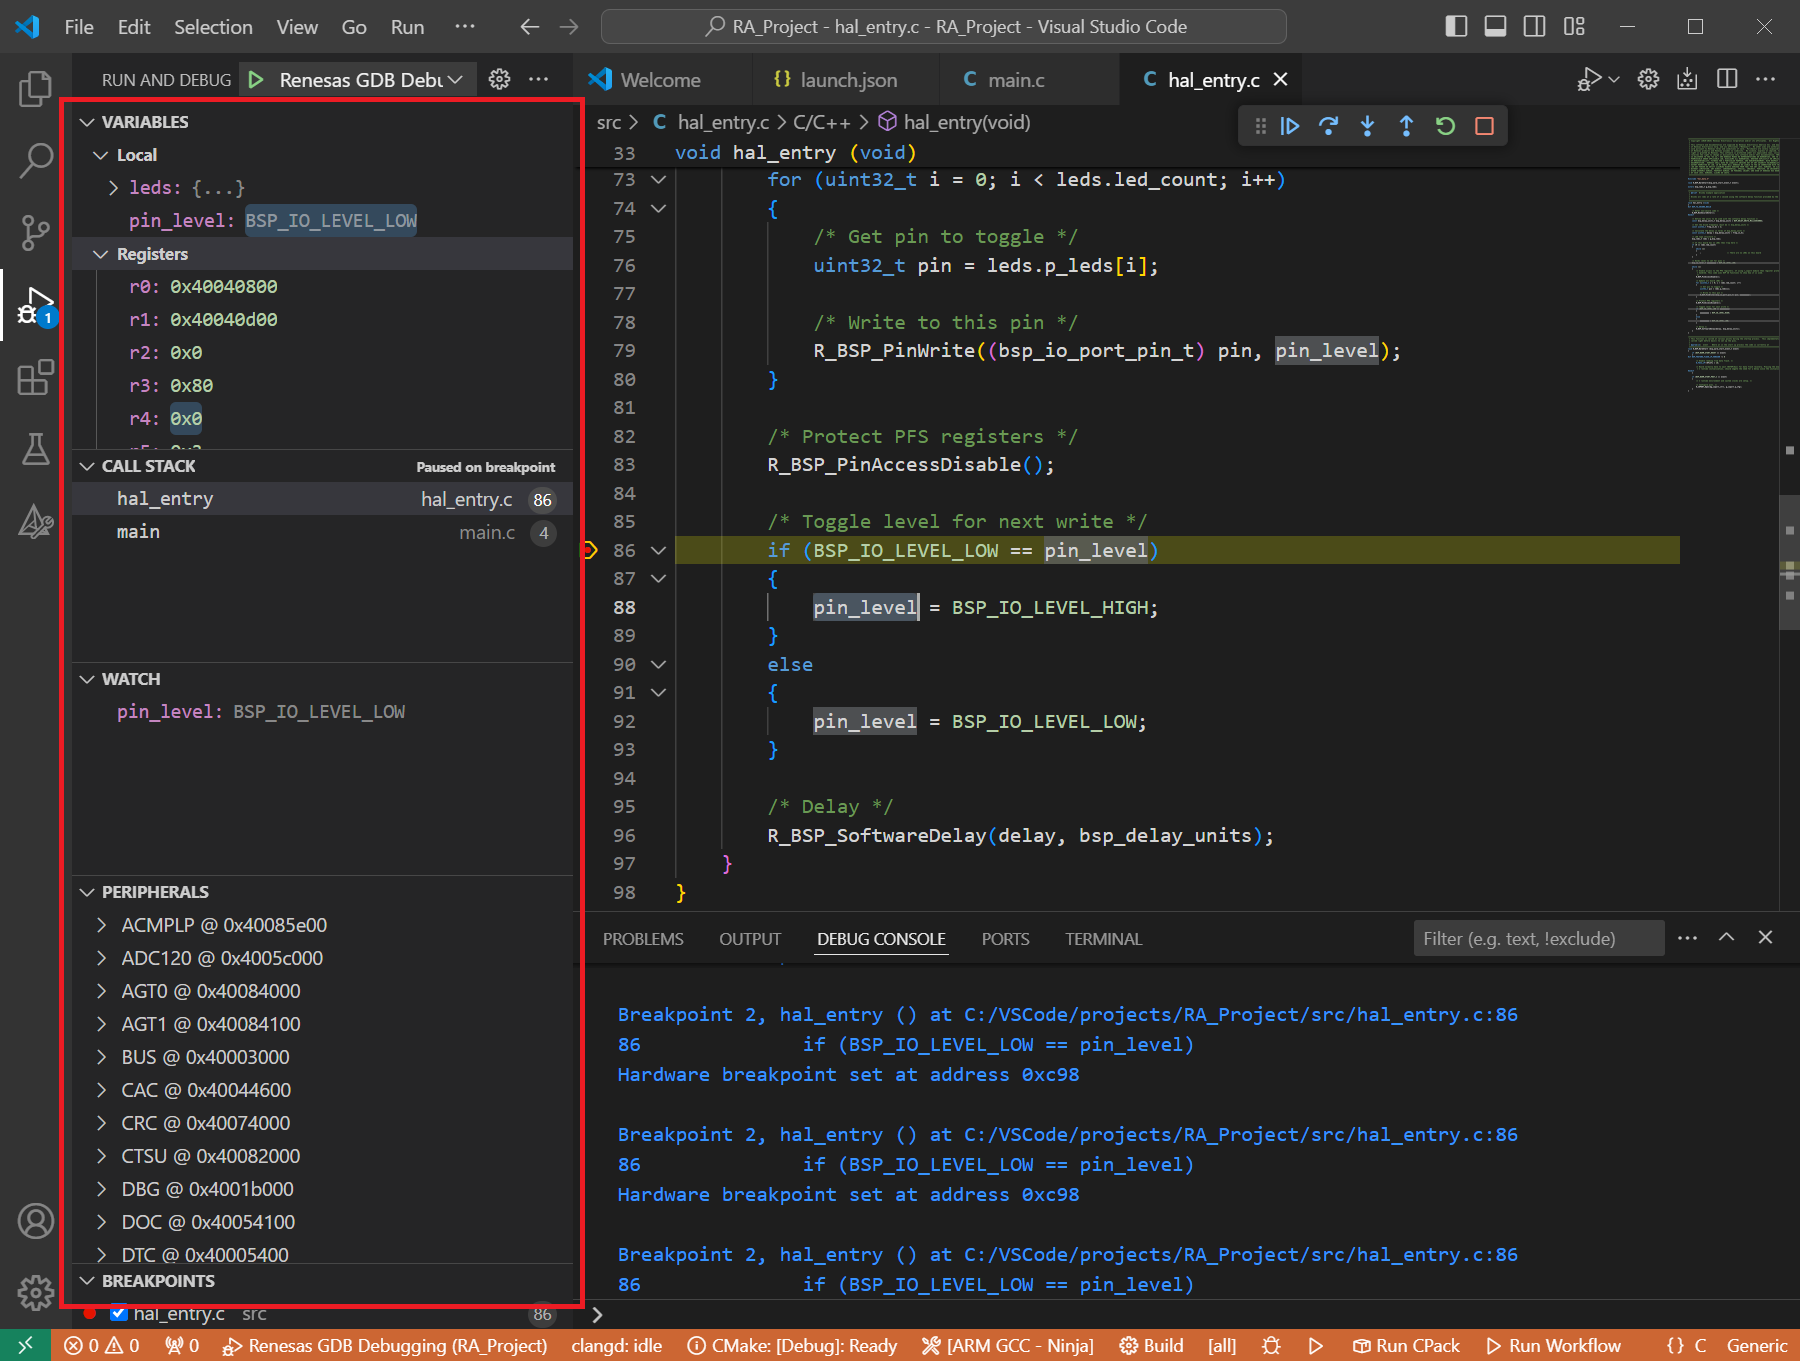
During the debug session, details about the local variables, device registers, call stack, watched variables, states of the peripherals can be accessed at the primary sidebar of VS Code in the [Run and Debug] tab.
10.5. GDB Server launch parameters for Dialog devices
Reference for common parameters: All common server parameters, including default settings and options applicable to Renesas device families, are documented in the GDB Server Parameters section. The specific parameters of the Dialog devices are described below.
10.5.1. Connection Settings
10.5.1.1. J-Link
Option |
Details |
|
Description: Specify connection type when using J-Link.
Default Values: None. The J-Link will be selected automatically.
Emulator: J-Link
Available Values: Using USB: USB=<J-Link Serial number>, Using IP via LAN: IP=<Host Name/IP address: port number>, Using IP via tunnel: IP=tunnel
Example: Select USB with serial number 000051000569:
"serverParameters": { "-uSelect=": "USB=000051000569" }, Select IP with address 127.0.0.1 and port 61234: "serverParameters": { "-uSelect=": "IP=127.0.0.1:61234" }Note: If using IP via tunnel, it’s needed to specify the following parameters.
|
|
Description: Specify the identifier for J-Link remote server’s tunnel mode.
Default Values: None
Emulator: J-Link
Available Values: Any valid identifier
Example: Set the identifier using serial for J-Link having serial 281100001:
"serverParameters": { "-uIpTunnelIdentifier=": "281100001" }Note: Identifier should be the serial or nickname of the J-Link. Use this parameter only when connecting via tunnel.
|
|
Description: Specify the tunnel server for J-Link remote server’s tunnel mode.
Default Values: None
Emulator: J-Link
Available Values: Any valid tunnel server
Example:
"serverParameters": { "-uIpTunnelServer=": "jlink-asia.segger.com" }Note: Use this parameter only when connecting via tunnel.
|
|
Description: Specify the port number for J-Link remote server’s tunnel mode.
Default Values: None
Emulator: J-Link
Available Values: Valid port number
Example:
"serverParameters": { "-uIpTunnelPort=": 61234 }Note: Use this parameter only when connecting via tunnel.
|
|
Description: Specify the password for J-Link remote server’s tunnel mode.
Default Values: None
Emulator: J-Link
Available Values: Letter, number, and special characters.
Example:
"serverParameters": { "-uIpTunnelPassword=": "Pass1234" }Note: Use this parameter only when connecting via tunnel.
|
|
Description: Specify the file path containing J-Link settings.
Default Values: None
Emulator: J-Link
Available Values: Any valid path to .jlink file
Example:
"serverParameters": { "-uJLinkSetting=": "C:\Users\a5121276\MyDoc\DA_SDK\DA1453x_SDK_6.0.20.1338\DA145xx_SDK\6.0.20.1338\projects\target_apps\ble_examples\prox_reporter\Eclipse/prox_reporter Debug_RAM_DA14535.jlink" } |
|
Description: Specify the file path containing J-Link script.
Default Values : None
Emulator: J-Link
Available Values: Any valid path to script file
Example:
"serverParameters": { "-uJLinkScript=": "C:\Users\a5121276\.eclipse\com.renesas.platform_1942470680/DebugComp/Dialog/ARM/Segger/Scripts/script_da1453x_RAM.JLinkScript" } |
|
Description: Specify the log file for the J-Link to output logging information. If the log file already exists, the contents of the current log file will be overwritten. If the option is empty, no logging information is outputted.
Default Values: None
Available Values: Any valid path to log file. The log file path must not contain any blank space characters.
Example:
"serverParameters": { "-uJLinkLog=": "C:\Users\a5121276\MyDoc\DA_SDK\DA1453x_SDK_6.0.20.1338\DA145xx_SDK\6.0.20.1338\projects\target_apps\ble_examples\prox_reporter\Eclipse/JLinkLog.log" }Note: J-Link web control panel is prioritized over this configuration. The override option for log file in J-Link web control panel must be disabled before using this parameter.
|
10.5.1.2. Interface
Option |
Details |
|
Description: Specify the connection type to be used by the emulator when communicating with the CPU on target system.
Default Values: JTAG
Emulator: J-Link
Available Values: SWD: Type SWD, JTAG: Type JTAG
Example:
"serverParameters": { "-uInteface=": "SWD" } |
|
Description: Specify the interface speed in kHz.
Default Values: auto
Emulator: J-Link
Available Values: auto (Selects the appropriate JTAG speed handled by the emulator),
adaptive (If the target provides the RTCK signal, select the adaptive clocking function to synchronize the clock to the processor clock outside the core),
From 1 to 100000 (Specify value for interface speed in kHz)
Example:
"serverParameters": { "-uIfSpeed=": 4000 }Note: “adaptive” option is just available for J-Link
|
10.5.1.3. JTAG Scan Chain
Option |
Details |
|
Description: Specify the number of IR-bits of all devices which are closer to TDO than the one we want to communicate with.
Default Values: 0
Emulator: J-Link
Available Values: Valid integer number of IR-bits
Example:
"serverParameters": { "-uscIrPre=": 0 } |
|
Description: Specify the number of devices which are closer to TDO than the one we want to communicate with.
Default Values: 0
Emulator: J-Link
Available Values: Valid integer number
Example:
"serverParameters": { "-uscDrPre=": 0 } |
10.5.1.4. Connection
Option |
Details |
|
Description: Specify whether to hold reset during the connection progress.
Default Values: 0
Emulator: J-Link
Available Values: 0: No, 1: Yes
Example:
"serverParameters": { "-uResetCon=": 1 } |
|
Description: Specify whether the CPU should be reset at the beginning of connection.
Default Values: 1
Emulator: J-Link
Available Values: 0: No, 1: Yes
Example:
"serverParameters": { "-uResetBeginConnection=": 1 } |
|
Description: Specify whether the CPU should not be reset at the end of connection.
Default Values: 1
Emulator: J-Link
Available Values: 0: Reset, 1: No Reset
Example:
"serverParameters": { "-uNoReset=": 1 } |
|
Description: Specify the ID code to unlock the device (if one has been set previously to protect connection).
Default Values: None
Emulator: J-Link
Available Values: 32 hex digits
Example:
"serverParameters": { "-uIdCodeBytes=": "FFFFFFFFFFFFFFFFFFFFFFFFFFFFFFFF" } |
|
Description: Specify if the program uses low power consumption mode or not.
Default Values: 0
Emulator: J-Link
Available Values: 0: No, 1: Yes
Example:
"serverParameters": { "-uLowPower=": 0 } |
|
Description: Specify if registers should be initialized on connection.
Default Values: 0
Emulator: J-Link
Available Values: 0: No, 1: Yes
Example:
"serverParameters": { "-uInitRegisters=": 0 } |
|
Description: Specify if an additional reset should be applied before the downloaded module is run.
Default Values: 0
Emulator: J-Link
Available Values: 0: No, 1: Yes
Example:
"serverParameters": { "-uResetPreRun=": 0 } |
|
Description: Specify if an additional reset should be applied before the module is downloaded.
Default Values: 0
Emulator: J-Link
Available Values: 0: No, 1: Yes
Example:
"serverParameters": { "-uResetBefDownload=": 0 } |
|
Description: Specify if CPSR(5 bit) should be set to ARM mode after the module is downloaded.
Default Values: 0
Emulator: J-Link
Available Values: 0: No, 1: Yes
Example:
"serverParameters": { "-uSetArmModeAfterDownload=": 0 } |
|
Description: Specify whether prevent run away at launching a debug session for Cortex-M3 core.
Default Values: 1
Emulator: J-Link
Available Values: 0: No, 1: Yes
Example:
"serverParameters": { "-uReleaseCM3=": 0 } |
|
Description: Specify the Secure Vector address.
Default Values: None
Emulator: J-Link
Available Values: The valid hex address.
Example:
"serverParameters": { "-uSecureVectorAddress=": "0x10010110" } |
|
Description: Specify the Non Secure Vector address.
Default Values: None
Emulator: J-Link
Available Values: The valid hex address.
Example:
"serverParameters": { "-uNonSecureVectorAddress=": "0x10010110" } |
|
Description: Specify if connecting to an already running target system.
Default Values: 0
Emulator: J-Link
Available Values: 0: Disabled, 1: Enabled
Example:
"serverParameters": { "-uHotPlug=": 1 } |
|
Description: Specify the disconnection mode to control the target state after disconnecting.
Default Values: 2
Emulator: J-Link
Available Values: 0: No change mode, 1: Stop mode, 2: Continue mode
Example:
"serverParameters": { "-uDisconnectionMode=": 1 } |
10.5.1.5. SWV
Option |
Details |
|
Description: Specify the core clock speed in Hz.
Default Values: 0
Emulator: J-Link
Available Values: Valid frequency value in Hz
Example: With 8 MHz:
"serverParameters": { "-uSWOcoreClock=": 8000000 } |
10.5.1.6. TrustZone
Option |
Details |
|
Description: Specify whether the boundaries of memory regions need to be set to separate each memory region when a debugging connection is initiated.
Default Values: 0
Emulator: J-Link
Available Values: 0: Disabled, 1: Enabled
Example:
"serverParameters": { "-uEnableSciBoot=": 1 } |
|
Description: Specify the debugging type of TrustZone.
Default Values: None
Emulator: J-Link
Available Values: SSD: Secure Software Development, NSECSD: Non Secure Software Development
Example:
"serverParameters": { "-uTz=": "NSECSD" } |
|
Description: Specify the authentication level.
Default Values: 0
Emulator: J-Link
Available Values: 0 (AL0: Ignores the key and connect without authentication), 1 (AL1: Authenticate device with key to AL1),
3 (AL2: Authenticate device with key to AL2), 255 (ALERASE: Initialize device back to AL2)
Example:
"serverParameters": { "-uAuthLevel=": 3 }Note: Use this parameter only with TrustZone devices that support Authentication Level
|
|
Description: Specify the Authentication Key.
Default Values: None
Emulator: J-Link
Available Values: Key for Authentication
Example:
"serverParameters": { "-uAuthKey=": "ACD6B31BF68FE9AE07AEF6B3C3870730" }Note: Use this parameter only with TrustZone devices that support Authentication Level
|
10.5.2. Debug Tool Settings
10.5.2.1. Break
Option |
Details |
|
Description: Specify whether to use software breakpoints to flash memory or not.
Default Values: 0
Emulator: J-Link
Available Values: 0: No, 1: Yes
Example:
"serverParameters": { "-uFlashBp=": 0 }Note: This parameter does not need to be specified if
-uProgReWriteIRom or -uProgReWriteDFlash is sent with value 1. |
|
Description: Specify if Instruction Set simulation will be used or not.
Default Values: 0
Emulator: J-Link
Available Values: 0: No, 1: Yes
Example:
"serverParameters": { "-uSimulation=": 0 }Note: This parameter does not need to be specified if
-uProgReWriteIRom or -uProgReWriteDFlash is sent with value 1. |
10.5.2.2. Flash
Option |
Details |
|
Description: Specify whether or not to erase the flash ROM (program ROM) before a download.
Default Values: 0
Emulator: J-Link
Available Values: 0: No, 1: Yes
Example:
"serverParameters": { "-ueraseRomOnDownload=": 0 } |
|
Description: Specify whether or not to erase the data flash ROM before a download.
Default Values: 0
Emulator: J-Link
Available Values: 0: No, 1: Yes
Example:
"serverParameters": { "-ueraseDataRomOnDownload=": 0 } |
|
Description: Specify the start address of the Working RAM area which is used by JLink during flash programming.
Default Values: 0
Emulator: J-Link
Available Values: Valid address
Example:
"serverParameters": { "-ucfiFlashWorkStart=": "0x20001000" }Note: Start address and end address of Working RAM area have to be set together and start address have to be smaller than end address.
|
|
Description: Specify the end address of the Working RAM area which is used by JLink during flash programming.
Default Values: None
Emulator: J-Link
Available Values: Valid address
Example:
"serverParameters": { "-ucfiFlashWorkEnd=": "0x20004000" }Note: Start address and end address of Working RAM area have to be set together and end address have to be bigger than start address
|
|
Description: Specify the start address of CFI Flash Area.
Default Values: 0
Emulator: J-Link
Available Values: Any valid hex address.
Example:
"serverParameters": { "-ucfiFlashStart=": "&DebugMon_Handler" }Note: Start address and end address of CFI flash have to be set together and start address have to be smaller than end address.
The CFI flash address will not be set in Renesas GDB server if Work RAM address is not set before.
|
|
Description: Specify the end address of CFI Flash Area.
Default Values: 0
Emulator: J-Link
Available Values: Any valid hex address.
Example:
"serverParameters": { "-ucfiFlashEnd=": "&PendSV_Handler" }Note: Start address and end address of CFI flash have to be set together and end address have to be bigger than start address.
The CFI flash address will not be set in Renesas GDB server if Work RAM address is not set before.
|
|
Description: Specify whether enable and exclude the Flash Cache for a address range.
Default Values: If this parameter is not sent, this feature will be disabled.
Emulator: J-Link
Available Values: Set of address value with below formats: <Start address>,<End address> or <Start address>-<End address>
Example:
"serverParameters": { "-uExcludeFlashCacheRange=": "0x10000000,0x100FFFFF" } or "serverParameters": { "-uExcludeFlashCacheRange=": "0x10000000-0x100FFFFF" } |
|
Description: Specify the Flash Memory type.
Default Values: None
Emulator: J-Link
Available Values:
SerialFlash, HyperFlash, or OctaFlashExample:
"serverParameters": { "-uflashMemoryType=": "SerialFlash" } |
|
Description: Specify the Flash Bus type.
Default Values: None
Emulator: J-Link
Available Values:
SPIBSC, HyperBus, or OctaBusExample:
"serverParameters": { "-uflashBusType=": "SPIBSC" } |
10.5.2.3. RTOS
Option |
Details |
|
Description: When debugging a project with a large number of OS threads the Debug View will always check the status of every thread. Selecting Yes will
force the view to only check the current thread. This speeds up debugger responsiveness.
Default Values: 0
Emulator: J-Link
Available Values: 0: No, 1: Yes
Example:
"serverParameters": { "-uOSRestriction=": 1 }Note:
"-uOSRestriction=": 0: Do not restrict OS thread checking, "-uOSRestriction=": 1: Restrict OS thread checking to the current thread |
10.5.2.4. System
Option |
Details |
|
Description: Specify whether the flash contents are cached by J-Link or not.
Default Values: 0
Emulator: J-Link
Available Values: 0: Yes, 1: No
Example:
"serverParameters": { "-uAllowCachingFlash=": 0 }Note:
"-uAllowCachingFlash=": 0: Enable caching for the flash contents, "-uAllowCachingFlash=": 1: Disable caching for the flash contents |
10.5.2.5. Time Measurement
Option |
Details |
|
Description: For Renesas RZ targets, this will set the value for bit[3] of the PMCR register to 0.
Default Values: 1
Emulator: J-Link
Available Values: 0: No, 1: Yes
Example:
"serverParameters": { "-uCECycle=": 1 } |
|
Description: Specify the operating frequency (ICLK) in Hz. It is used to calculate the timestamp of SWO trace.
Default Values: None
Emulator: J-Link
Available Values: The frequency in Hz in range 1000 - 999999000
Example:
"serverParameters": { "-uCPUFrequency=": 120000000 } |
10.5.2.6. Reset Behaviour
Option |
Details |
|
Description: Specify the behaviour for the reset command.
Default Values: Reset
Emulator: J-Link
Available Values:
Reset, ChangePCExample:
"serverParameters": { "-uResetBehavior=": "Reset" } |
|
Description: Specify the value which is set to PC.
Default Values: None
Emulator: J-Link
Available Values: Any valid address or symbol
Example:
"serverParameters": { "-uPcOnReset=": "&main" }Note: If PC value is not specified, it will be set to the entry point value.
|
|
Description: Specify the value which is set to CPSR.
Default Values: None
Emulator: J-Link
Available Values: Any valid address
Example:
"serverParameters": { "-uSetCpsrOnReset=": 0x1da }Note: If CPSR value is not specified, it will keep the original value.
|