4. Debugging a Project
Important
Please also refer to Configure C/C++ debugging in Visual Studio Code documents for descriptions of launch.json.
Please note that the debugger type “renesas-rcar” is changed to specific adapter types after the 25.10.0 version of the Renesas Debug extension. If you are still using the “renesas-rcar” debugger type in your .vscode/launch.json file, Please read this section carefully and convert your existing configuration.
4.1. Configuring the launch configuration
In order to start debugging a project using VS Code and the Renesas Debug extension, a configuration file called “launch.json” needs to be created. Please follow the instructions below to create the launch configuration:
Note
Smart Configurators are automatically creating the launch.json file while generating the project files. If you already generated the project using a Smart Configurator, then you can skip to section “Starting the debug session”.
The RH850 (1.14.0), RL78 (1.14.0), RISC-V MCU (1.5.0), and RX (2.25.0) Smart Configurators support automatic creation of the launch.json file starting from these versions onward.
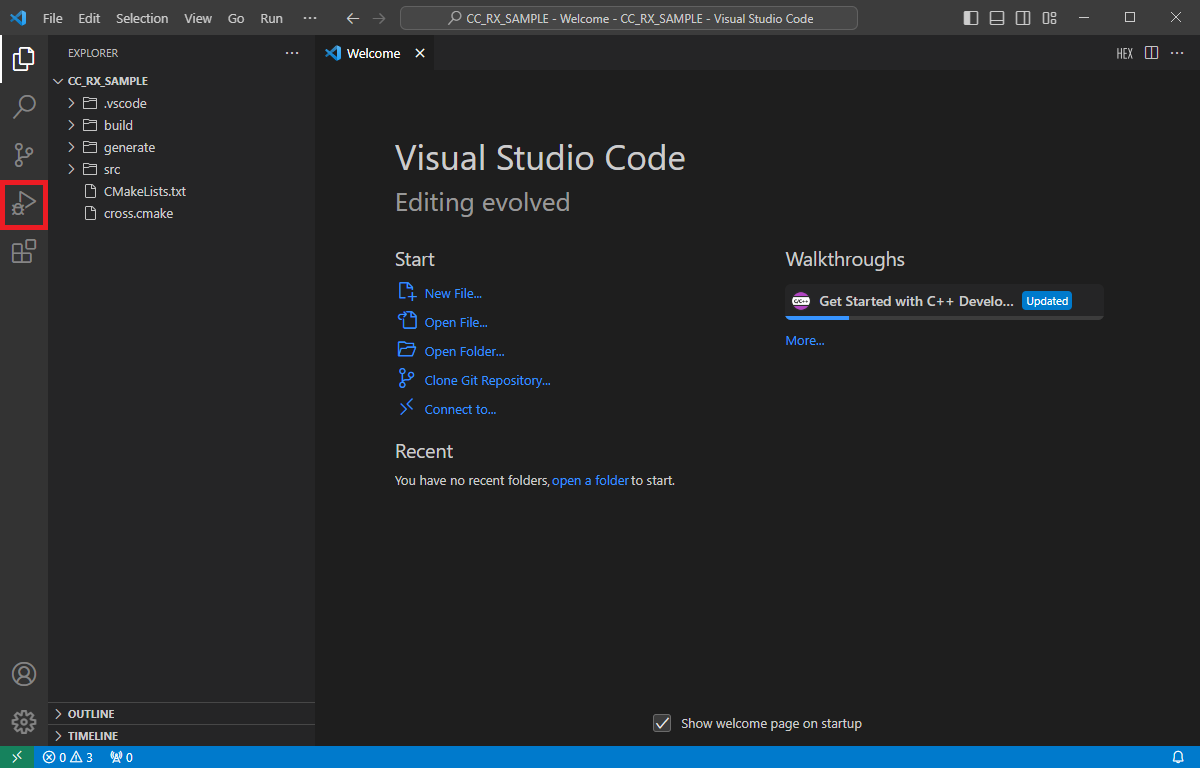
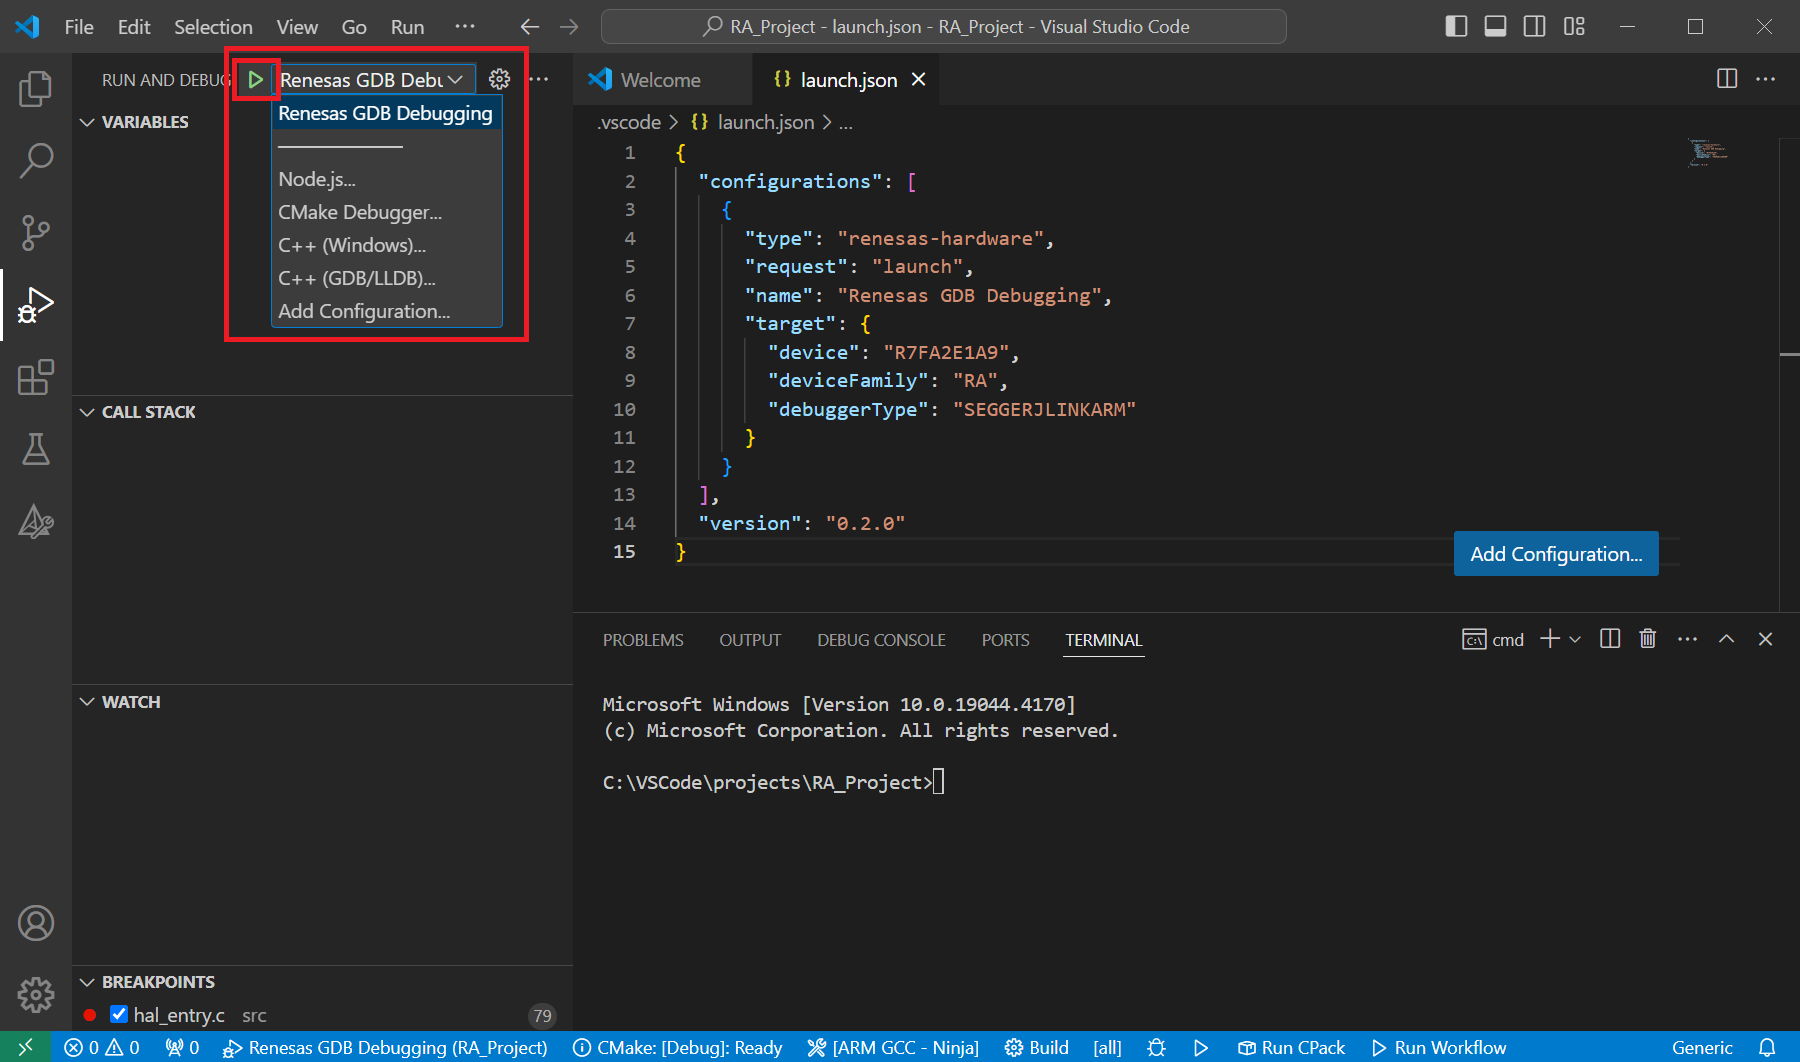
Select [Run and Debug] view.
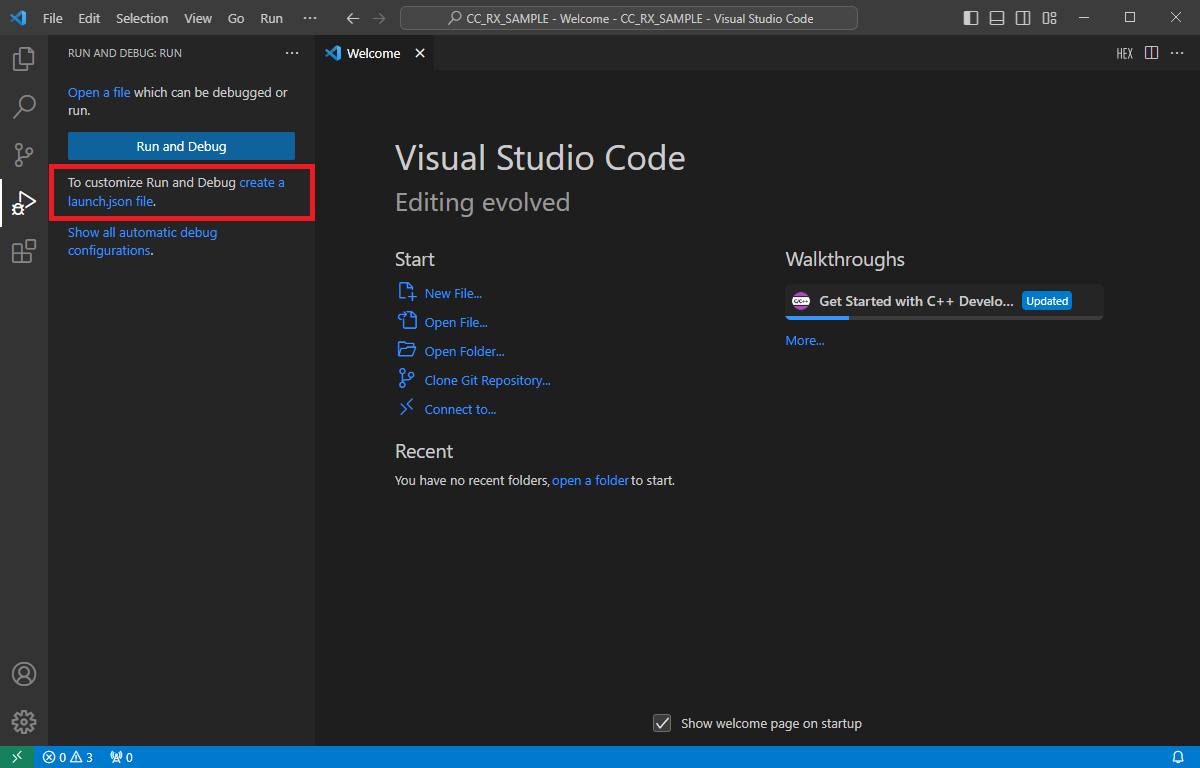
Select [create a launch.json file] link.
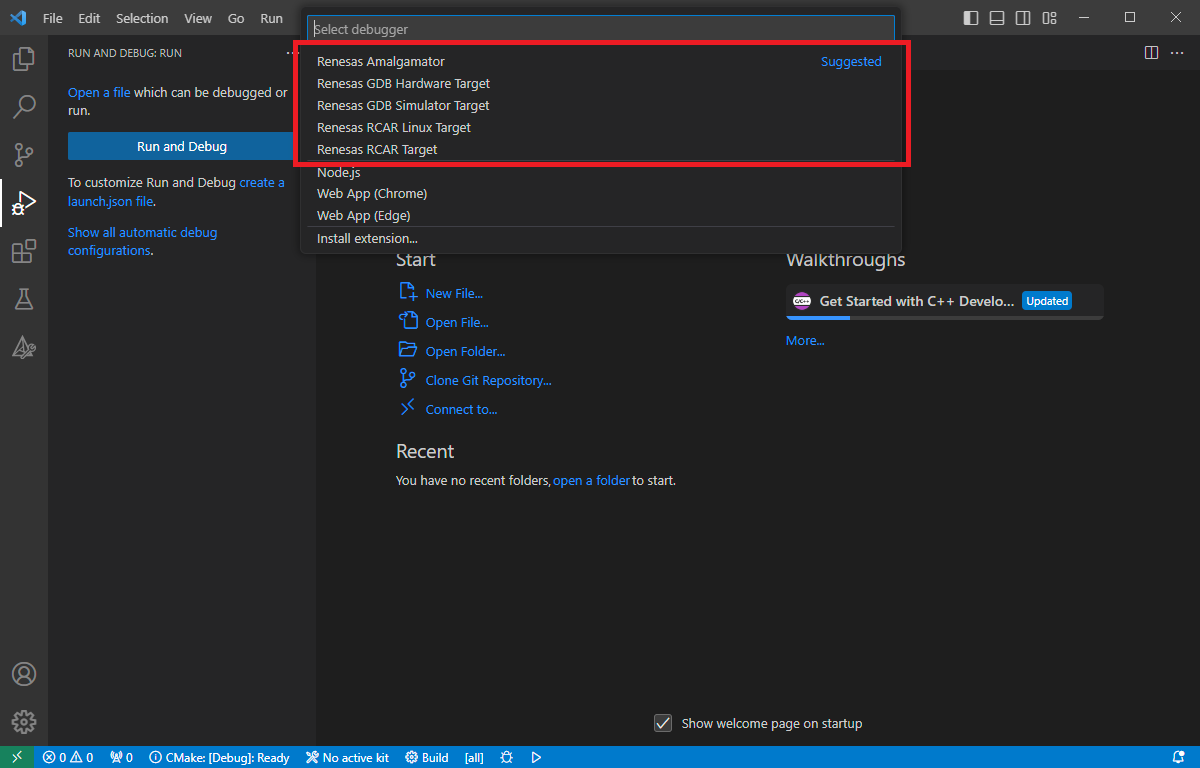
Select one of the Renesas debuggers from the options menu:
Renasas Amalgamator: For running the debug session on R-Car S4 devices with ARM/G4MH, CA55 and CR52 cores.
Renesas GDB Hardware Target: For running the debug session on Dialog, RA, R-Car, RH850, RISC-V MCU, RL78, RX or RZ device families.
Renesas GDB Simulator Target: For running the debug session on RL78 or RX device family simulators.
Renesas RCAR Linux Target: For running the debug session on R-Car family devices which are running Linux operating system.
VS Code will generate “launch.json” file will be created inside “.vscode” folder with some default settings.
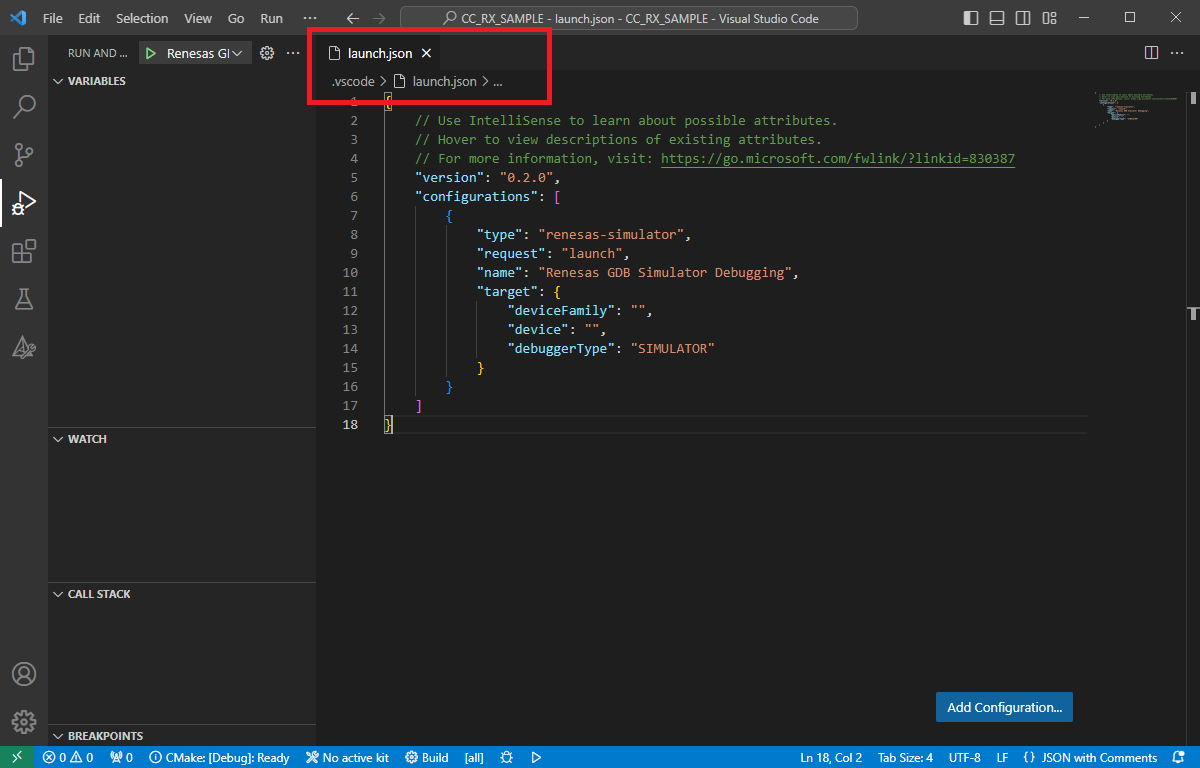
The minimum configuration of the launch configuration is shown below:
launch.json format
{
    // Use IntelliSense to learn about possible attributes.
    // Hover to view descriptions of existing attributes.
    // For more information, visit: https://go.microsoft.com/fwlink/?linkid=830387
    "version": "0.2.0",
    "configurations": [
        {
            "type": "<type>",
            "request": "launch",
            "name": "<display name of the configuration>",
            "target": {
                "deviceFamily": "<device family (Dialog, RA, RCAR, RH850, RISC-V MCU, RL78, RX or RZ)>",
                "device": "<device code>",
                "debuggerType": "<debugger type (type of the simulator or emulator)>"
            }
        }
    ]
}
Note
Different Renesas debuggers support different device families and emulator/simulator types. Please check the section Debuggers, Device Families and Emulator/Simulator Types in launch.json for more details.
You must install the support files and register/import the RA Smart Configurator in VS Code before starting the debug session with RA devices. Please follow the instructions in section Installation at Quick Start for Renesas RA.
4.1.1. Renesas Amalgamator
Renesas Amalgamator (renesas-amalgamator) type supports debugging session for R-Car S4 devices with ARM/G4MH, CA55 and CR52 cores. Please refer to the advanced guidelines for more details:
4.1.2. Renesas GDB Hardware Target
Renesas GDB Hardware Target (renesas-hardware) type enables the emulator debugging for hardware devices with Dialog, RA, R-Car, RH850, RISC-V MCU, RL78, RX or RZ device family Renesas MCU’s. Here are some examples of launch configurations for the Renesas GDB Hardware Target:
Example launch.json for “Renesas GDB Hardware Target” for an RA family device:
{
  // Use IntelliSense to learn about possible attributes.
  // Hover to view descriptions of existing attributes.
  // For more information, visit: https://go.microsoft.com/fwlink/?linkid=830387
  "version": "0.2.0",
  "configurations": [
    {
      "type": "renesas-hardware",
      "request": "launch",
      "name": "Renesas GDB Hardware Debugging",
      "target": {
        "deviceFamily": "RA",
        "device": "R7FA2E1A9",
        "debuggerType": "SEGGERJLINKARM"
      }
    }
  ]
}
Example launch.json for “Renesas GDB Hardware Target” for an RH850 family device:
{
  // Use IntelliSense to learn about possible attributes.
  // Hover to view descriptions of existing attributes.
  // For more information, visit: https://go.microsoft.com/fwlink/?linkid=830387
  "version": "0.2.0",
  "configurations": [
    {
      "type": "renesas-hardware",
      "request": "launch",
      "name": "Renesas GDB Hardware Debugging",
      "target": {
        "deviceFamily": "RH850",
        "device": "R7F701275", // U2B10 use R7F70254x_Fusa or R7F70254x_Performance
        "debuggerType": "E2",
        "serverParameters": ["-uocdID=", "FFFFFFFFFFFFFFFFFFFFFFFFFFFFFFFFFFFFFFFFFFFFFFFFFFFFFFFFFFFFFFFF"]
      }
    }
  ]
}
Note
If you want to use the E2 emulator as a power supply instead of an external power source, please set the serverParameters configuration as follows:
"serverParameters": ["-uocdID=", "FFFFFFFFFFFFFFFFFFFFFFFFFFFFFFFFFFFFFFFFFFFFFFFFFFFFFFFFFFFFFFFF","-w", "1", "-usupplyVoltage=","1"]
Example launch.json for “Renesas GDB Hardware Target” for RL78 device family (F22, F23, F24, F25 series):
{
  // Use IntelliSense to learn about possible attributes.
  // Hover to view descriptions of existing attributes.
  // For more information, visit: https://go.microsoft.com/fwlink/?linkid=830387
  "version": "0.2.0",
  "configurations": [
    {
      "type": "renesas-hardware",
      "request": "launch",
      "name": "Renesas GDB Hardware Debugging",
      "target": {
        "deviceFamily": "RL78",
        "device": "R7F124FBJ",
        "debuggerType": "E2LITE",
        "serverParameters": ["-usecurityID=", "00000000000000000000000000000000", "-usecurityIdSize", "16", "-uprogrammerSecurityID=", "FFFFFFFFFFFFFFFFFFFFFFFFFFFFFFFF"]
      }
    }
  ]
}
Example launch.json for “Renesas GDB Hardware Target” for R-Car device family (CA55, CA76, CR52, G4MH):
{
  // Use IntelliSense to learn about possible attributes.
  // Hover to view descriptions of existing attributes.
  // For more information, visit: https://go.microsoft.com/fwlink/?linkid=830387
  "version": "0.2.0",
  "configurations": [
    {
      "type": "renesas-hardware",
      "request": "launch",
      "name": "RCAR",
      "program": "${cwd}/Debug/MR_BAREMETAL_CA55.axf",
      "target": {
        "deviceFamily": "RCAR",
        "device": "R8A779F0_CA55",
        "debuggerType": "E2ARM"
      }
    }
  ]
}
Note
Except for the RH850 device family and RL78 (F22, F23, F24, F25 series), other devices share a similar launch.json structure with the RA device family.
Renesas GDB Hardware Target (renesas-hardware) supports variety of device families and hardware debug emulators. Supported device families and debug emulator type listed below:
Debugger |
type |
target.deviceFamily |
target.debuggerType |
|---|---|---|---|
Renesas GDB Hardware Target |
renesas-hardware |
Dialog |
SEGGERJLINKARM |
RA |
E2, E2LITE, SEGGERJLINKARM |
||
RCAR |
E2ARM, E2RH850, IE850ARH850, LAUTERBACHT32 |
||
RH850 |
E1, E2, IE850ARH850 |
||
RISC-V MCU |
E2, E2LITE, SEGGERJLINKRISCV |
||
RL78 |
E1, E2, E2LITE, IECUBE, COMPORT |
||
RX |
E1, E2, E2LITE, E20, SEGGERJLINKRX |
||
RZ |
SEGGERJLINKARM |
Note
Smart Configurators are generating the contents of the launch.json file during the project generation.
Dialog ADP projects already contain a pre-defined launch.json file. Please check the “target.device” definition in the pre-defined launch configuration, and change the value of the “target.device” to the targeted device if necessary.
4.1.3. Renesas GDB Simulator Target
Renesas GDB Simulator Target (renesas-simulator) type enables the debugging operation for RL78 and RX device family simulators in developer machine. Here is an example launch configuration for using simulator for an RX device family project:
launch.json example for project build with GCC toolchain
{
  // Use IntelliSense to learn about possible attributes.
  // Hover to view descriptions of existing attributes.
  // For more information, visit: https://go.microsoft.com/fwlink/?linkid=830387
  "version": "0.2.0",
  "configurations": [
    {
      "type": "renesas-simulator",
      "request": "launch",
      "name": "Renesas GDB Simulator Debugging",
      "target": {
        "deviceFamily": "RX",
        "device": "R5F51101",
        "debuggerType": "SIMULATOR"
      }
    }
  ]
}
Renesas GDB Simulator Target (renesas-simulator) supports simulators for RL78 and RX device families.
Debugger |
type |
target.deviceFamily |
target.debuggerType |
|---|---|---|---|
Renesas GDB Simulator Target |
renesas-simulator |
RL78 |
SIMULATOR |
RX |
SIMULATOR |
4.1.4. Renesas RCAR Linux Target
Renesas RCAR Linux Target (renesas-rcar-linux) type enables the debugging operation for Renesas R-Car family Linux devices. Renesas RCAR Linux Target is using SSH connection to connect target device, automatically creating a SSH Tunnel between the target device and the developer machine during the debug session.
The following configuration contains a sample definition for Renesas RCAR Linux Target, where the board accepts username/password authentication method for SSH connection:
launch.json example for Renesas RCAR Linux project
{
  // Use IntelliSense to learn about possible attributes.
  // Hover to view descriptions of existing attributes.
  // For more information, visit: https://go.microsoft.com/fwlink/?linkid=830387
  "version": "0.2.0",
  "configurations": [
    {
      "type": "renesas-rcar-linux",
      "request": "launch",
      "name": "Renesas RCAR Linux Debugging",
      "program": "${workspaceFolder}/build/rcar.debug.V3H2/helloworld_sample_app_v3h2_d",
      "target": {
        "deviceFamily": "RCAR",
        "device": "V3H2",
        "debuggerType": "RCAR_PROXY",
        "ssh": {
          "host": "10.0.0.2",
          "user": "root",
          "password": "the-password",
        }
      }
    }
  ]
}
Renesas RCAR Linux Target also supports RSA private key authentication method. The following configuration shows how to pass the private key information to the debug session.
launch.json example for Renesas RCAR Linux project with private key authentication
{
  // Use IntelliSense to learn about possible attributes.
  // Hover to view descriptions of existing attributes.
  // For more information, visit: https://go.microsoft.com/fwlink/?linkid=830387
  "version": "0.2.0",
  "configurations": [
    {
      "type": "renesas-rcar-linux",
      "request": "launch",
      "name": "Renesas RCAR Linux Debugging",
      "program": "${workspaceFolder}/build/rcar.debug.V3H2/helloworld_sample_app_v3h2_d",
      "target": {
        "deviceFamily": "RCAR",
        "device": "V3H2",
        "debuggerType": "RCAR_PROXY",
        "ssh": {
          "host": "10.0.0.2",
          "user": "root",
          "privateKeyPath": "~/.ssh/id_rsa"
        }
      }
    }
  ]
}
launch.json example for Renesas RCAR Linux project simulator
{
  // Use IntelliSense to learn about possible attributes.
  // Hover to view descriptions of existing attributes.
  // For more information, visit: https://go.microsoft.com/fwlink/?linkid=830387
  "version": "0.2.0",
  "configurations": [
    {
      "type": "renesas-rcar-linux",
      "request": "launch",
      "name": "Renesas RCAR Linux Debugging",
      "sdkPath": "Path to SDK package e.g. ${User}/rcar-xos/v3.33.0",
      "program": "${workspaceFolder}/build/rcar.debug.V4H2_Simulation/imp_inversion_sample_app_v4h2_d",
      "target": {
        "isLinuxSimulator": true,
        "deviceFamily": "RCAR",
        "device": "V4H2",
        "debuggerType": "SIMULATOR",
      }
    }
  ]
}
launch.json example for Renesas RCAR Linux project CVEngine
{
  // Use IntelliSense to learn about possible attributes.
  // Hover to view descriptions of existing attributes.
  // For more information, visit: https://go.microsoft.com/fwlink/?linkid=830387
  "version": "0.2.0",
  "configurations": [
    {
      "type": "renesas-rcar-linux",
      "request": "launch",
      "name": "Renesas RCAR Linux Debugging",
      "isCVEngine": true,
      "program": "${workspaceFolder}/build/rcar.debug.V4H2_Simulation/cve.out",
      "target": {
        "deviceFamily": "RCAR",
        "device": "V4H2",
        "debuggerType": "CVE",
        "port": "9876",
        "server": "sdb_yocto",
      }
    }
  ]
}
Renesas RCAR Linux Target (renesas-rcar-linux) supports the following configuration:
Debugger |
type |
target.deviceFamily |
target.debuggerType |
|---|---|---|---|
Renesas RCAR Linux Target |
renesas-rcar-linux |
RCAR |
RCAR_PROXY, SIMULATOR, CVE |
4.2. Starting the debug session
A debug session can be started by selecting the created configuration and clicking the [Start Debugging] button in the [Run and Debug] tab, or pressing [F5] from the keyboard.
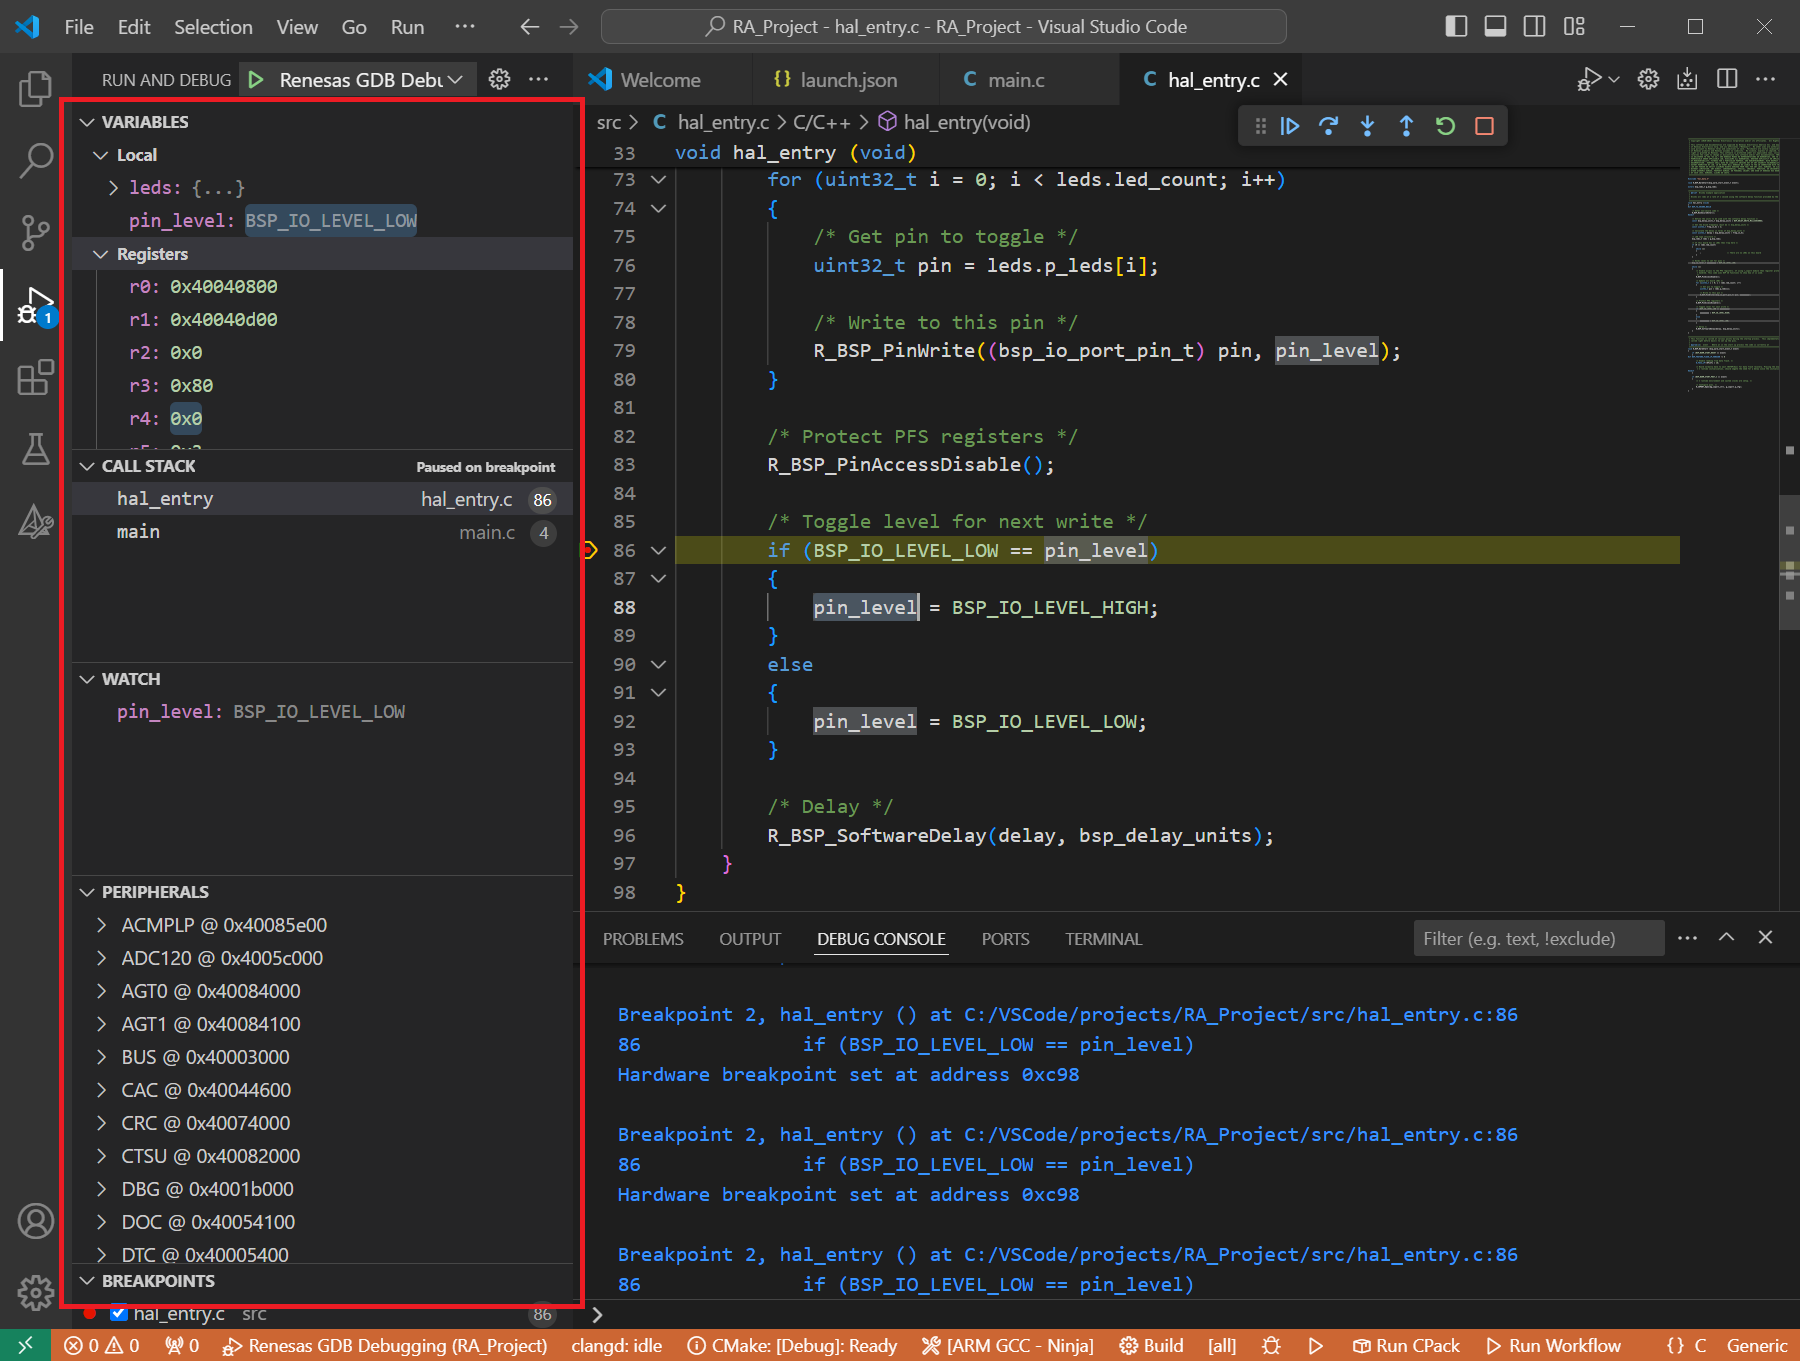
When VS Code starts the debug session, common debug control flow functions like resume, suspend, step into, step over, step out, restart, terminate debug session can be performed via the debug flow control buttons. Also, the [Debug Console] view will contain useful messages during the debug session.
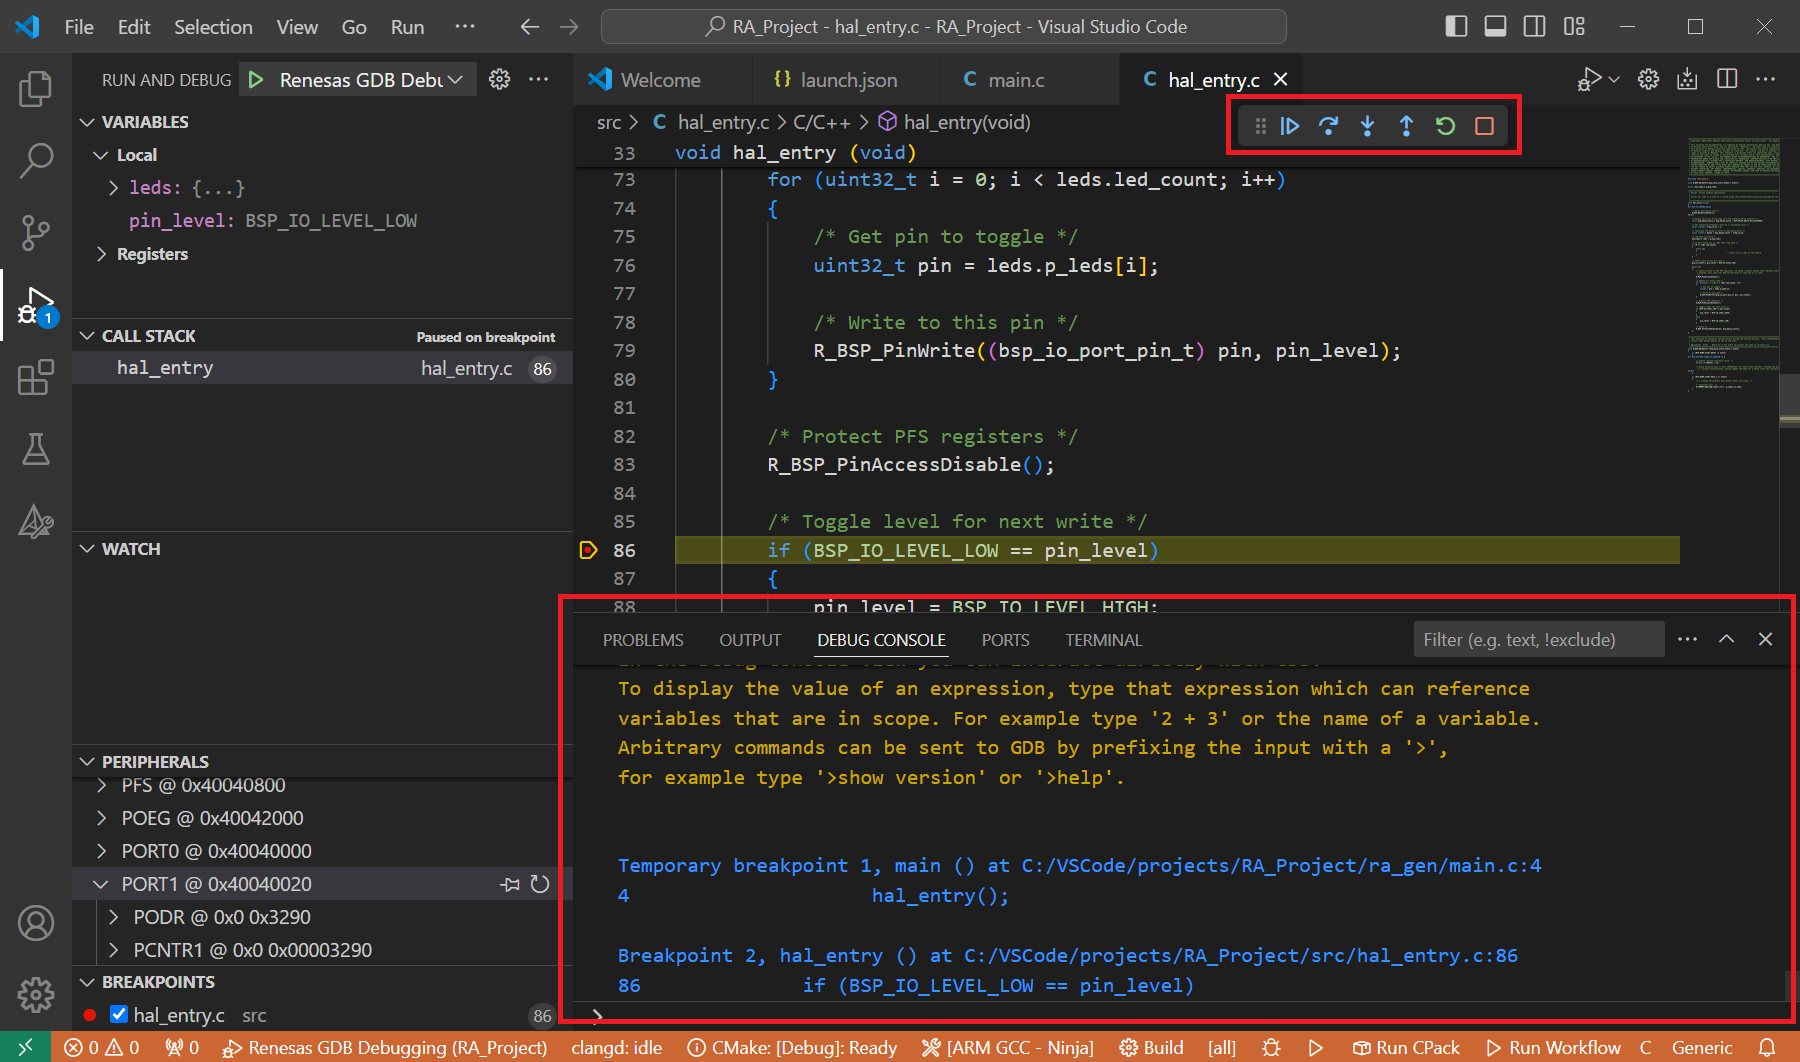
During the debug session, details about the local variables, device registers, call stack, watched variables, states of the peripherals can be accessed at the primary sidebar of VS Code in the [Run and Debug] tab.