This panel is central to the functionality of the solution for measuring current consumption.
See "2.18 Measuring Current Consumption [E2][Simulator]" for details on the solution for measuring current consumption.
There will be some error in the results of measurement. For the specifications of the measurement of current consumption, e.g. the maximum current consumption, the maximum time over which measurement is possible, the resolution of measurements of current consumption, etc., refer to the E2 Emulator User's Manual. |
This section describes the following.
This area shows warning messages if there are inconsistencies between the conditions for measurement of current consumption and the conditions to be set before the debug tool is connected.
This area is hidden when there is no warning to be reported.
This area shows the measured results for current consumption with the current represented by the y axis and time by the x axis of the graph.
This area also has the following lines which can be dragged.
When a cursor or marker is dragged, information in the information display area is updated accordingly.
The supplementary lines for searching are used to simply specify the threshold current which is the basis of the search.
While current consumption is being measured, the display of data is cleared and the cursor and markers cannot be dragged. |
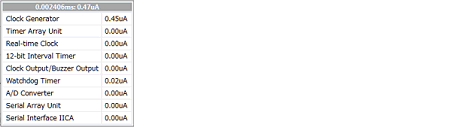
With the simulator, when the mouse cursor is hovered over a point on the graph, the following window pops up to display the values for current consumption by the individual modules.
This area displays particular values from the graph of the measured data that is displayed in the graph area.
The average of the values for current between markers A and B is displayed.
When there are no markers, the average value over the whole range of measured data is displayed in the case of the simulator and blank space is displayed in the case of the E2 emulator.
The maximum of the values for current between markers A and B is displayed.
When there are no markers, the maximum value over the whole range of measured data is displayed in the case of the simulator and blank space is displayed in the case of the E2 emulator.
The values for current at the position of the cursor is displayed.
When the cursor is not displayed, this item becomes blank.
The time at the position of the cursor is displayed.
When the cursor is not displayed, this item becomes blank.
The time at the position of marker A is displayed.
When marker A is not displayed, this item becomes blank.
The time at the position of marker B is displayed.
When marker B is not displayed, this item becomes blank.
The time between markers A and B is displayed.
When markers are not displayed, this item becomes blank.
This area displays a list of monitoring points that have been set and is used to specify the settings for building and downloading when monitor points are set.
When building proceeds with the function for automatically inserting nop instructions for monitoring points, the options for use in building are reflected in the properties of the build tool.
This check box is only effective when the compiler for the current active project is CC-RL V1.05.00 or later. |
A list of monitoring points that are currently set is displayed.
When the measured results are displayed in the graph display area and a cell is double-clicked with each line of the list selected, the cursor in the graph display area is moved to the position of the monitoring point that is indicated by that line.
A selected monitoring point can be deleted by pressing the [Delete] key.
The following describes the individual components.
Monitoring points for which the check boxes are selected are valid in the measurement of current consumption.
Displays the cursor in the graph display area at the position of the monitoring point on the given line.
When the cursor is selected for a point, the background color of the cell changes to red.
Displays how many times the monitoring point on the given line has been crossed during measurement.
Displays the position of the monitoring point on the given line in the format "file-name#line-number (address)".
In the graph display area, the color of the vertical line is displayed at the position corresponding to the monitoring point on the given line.
|
Executes the program and starts measurement of current consumption. When V1.05.00 or later of the CC-RL compiler is selected for the active project, rebuilding and downloading are performed to insert nop instructions at the positions corresponding to monitoring points in the source file registered in the active project. However, even if the RRM or DMM function is enabled, the setting is ignored during the measurement of current consumption. |
||
|
Executes the program and starts measurement of current consumption. Rebuilding and downloading are not performed to insert nop instructions at the positions corresponding to monitoring points. Note that this button appears when V1.05.00 or later of the CC-RL compiler is selected for the active project. However, even if the RRM or DMM function is enabled, the setting is ignored during the measurement of current consumption. |
||
|
Selects whether current consumption is to be measured during the execution of a program. |
||
|
Has the same functionality as the same button on the Debug toolbar in the Main window. |
||
|
Opens the Current Consumption Measurement Condition Setting dialog box [E2] to set measurement conditions. |
||
|
Opens the Current Consumption Measurement Trigger Condition Setting dialog box [E2], which is used to set trigger conditions for measurement. |
||
|
Moves marker A in the graph display area to the corresponding position. |
||
|
Moves marker B in the graph display area to the corresponding position. |
||
|
Moves the cursor in the graph display area to the corresponding position. |
||
|
Switches between showing and hiding the cursor, marker A, marker B, and the supplementary lines for searching in the graph display area. |
||
|
Searches for the first position that matches the condition set with the supplementary lines for searching and the search mode. When the position is found, the cursor in the graph display area is moved to that position. |
||
|
Searches for the first position before the cursor position that matches the condition set with the supplementary lines for searching and the search mode. When the position is found, the cursor in the graph display area is moved to that position. |
||
|
Searches for the first position after the cursor position that matches the condition set with the supplementary lines for searching and the search mode. When the position is found, the cursor in the graph display area is moved to that position. |
||
|
Searches for the last position that matches the condition set with the supplementary lines for searching and the search mode. When the position is found, the cursor in the graph display area is moved to that position. |
||
|
Selects a search mode from among "Under threshold", "In range", "Out of range" or "Monitor point" can be selected as the search mode. |
||
|
Opens the Current Consumption Measurement Search dialog box [E2][Simulator] to specify and search the detailed conditions. |
||
|
Selects whether movement of the cursor in the graph display area is linked with the Editor panel. When this icon is selected and the cursor is stopped on a monitoring point, the position of source code where the monitoring point has been set is opened in the Editor panel. |
||
|
Selects whether movement of the cursor in the graph display area is linked with the Disassemble panel. When this icon is selected and the cursor is stopped on a monitoring point, the position of source code where the monitoring point has been set is opened in the Disassemble panel. When movement of the cursor is also linked with the Editor panel, linking with the Editor panel is given priority. |
||
|
Opens the Save Current Values dialog box [E2] or the Save File dialog box [Simulator] to save the data on current in the measured results of current consumption in a file with the CSV format.
The file saved by this button can be displayed in the graph display area by clicking on |
||
|
Reads the CSV file saved by using |
||
|
Opens the Save File dialog box to save the measured results for current consumption and settings of conditions for measurement in a file with the CSV or Microsoft Office Excel book format. |
||
|
Clears the graph showing the measured results in the graph display area. |
||
|
Clears the graph of the data which has been read by using |
||


 ,
,  ,
,  , and
, and  .
.


 .
.
 and displays it in the graph display area.


 in the graph display area.
|
Opens the Save Current Values dialog box [E2] or the Save File dialog box [Simulator] to save the data on current in the measured results of current consumption in a file with the CSV format. The file saved by this menu can be displayed in the graph display area by selecting the [Load Results of Current Values] menu. |
||
|
Reads the CSV file saved by using the [Save Results of Current Values] menu and displays it in the graph display area. |
||
|
Clears the graph showing the measured results in the graph display area. |
||
|
Clears the graph of the data which has been read by using the [Save Results of Current Values] menu in the graph display area. |
||
|
The following cascade menus are displayed to switch the time unit of the X axis in the graph display area. |
||
|
Switches the time unit of the X axis in the graph display area to seconds. |
||
|
Switches the time unit of the X axis in the graph display area to milliseconds. |
||
|
Switches the time unit of the X axis in the graph display area to microseconds. |
||
|
The following cascade menus are displayed to zoom in the display ranges of the X and Y axes in the graph display area. |
||
|
Zooms in the display ranges of the X and Y axes in the graph display area. |
||
|
Zooms in the display ranges of the X axe in the graph display area. |
||
|
Zooms in the display ranges of the Y axe in the graph display area. |
||
|
The following cascade menus are displayed to zoom out the display ranges of the X and Y axes in the graph display area. |
||
|
Zooms out the display ranges of the X and Y axes in the graph display area. |
||
|
Zooms out the display ranges of the X axe in the graph display area. |
||
|
Zooms out the display ranges of the Y axe in the graph display area. |
||
|
Restores the display ranges of the X and Y axes in the graph display area to the initial values. |
||