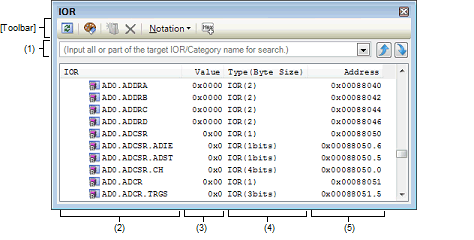
This panel displays the contents of I/O registers and changes their values (see Section"2.11.3 Displaying and changing the I/O registers").
Note that this panel can only be opened when CS+ is connected with the debug tool.
The I/O registers that get the microcontroller actuated by a read operation are protected against reads, so that no values are read from those registers ([Value] marked with "?"). |
By double-clicking a line delimiting each area on panel, it is possible to change the relevant area to the smallest displayable width without omitting the content in it. |
This section describes the following.
This area performs a search of I/O register names.


The I/O register names that are hidden as classified by category (folder) also are searched (expanded and placed in selected state). |
After entering the character string to be searched, press the [Enter] key and the same option as would be when the |
 button is clicked is performed, or press the [Shift] + [Enter] keys and the same operation as would be when the
  button is clicked is performed.
This area displays I/O register names in list form as classified by type of I/O register as category (folder).
The meaning of each displayed icon is as follows.
|
Indicates that names of I/O registers in this category are currently displayed. Double-clicking this icon or clicking "-" will close the category and hide the names of corresponding I/O registers. Note that categories are, by default, nonexistent. If necessary, create a new category and then Edit the tree. |
|
|
Indicates that names of I/O registers in this category are currently hidden. Double-clicking this icon or clicking "+" will open the category and display the names of corresponding I/O registers. Note that categories are, by default, nonexistent. If necessary, create a new category and then Edit the tree. |
|


By clicking the header part of this area, it is possible to sort category names in order of character code. (The I/O register names in each category are sorted in the same way.) |
This area has the following features.
The tree form can be edited by classifying each I/O register by any category (folder).
To create a new category, move the caret to the I/O register name for which a category is to be created and click the  button in the toolbar or select [Create Category] from the context menu. Then enter any category name (specifiable in up to 1,024 characters).
To remove a category, select the category to be removed and click the  button in the toolbar or select [Remove] from the context menu. Note, however, that only blank categories can be removed.
Also, to edit a category name, select the category name to edit and follow one of the following procedures:
Choose [Change Name] from the [Edit] menu and then edit the category name directly from the keyboard |
When a category is created, drag-and-drop I/O register names directly into the category. That way, I/O register names can be displayed in tree form classified by category.
Similarly, the order in which categories or I/O register names are displayed (one above or below another) can be freely changed by a drag-and-drop operation.
To clear and restore an edited category, click on the  button on the toolbar or select [Clear customization] from the context menu.
I/O registers or categories can be registered as watch-expressions on the Watch panel.
For details on how to do it, see "2.11.6.1 Registering watch-expressions".
If a watch-expression is registered for a category, all of the I/O registers belonging to that category are registered as watch-expressions. |
To zoom in and out of the IOR panel view, change the zoom ratio by using the drop-down list on the toolbar of the Main window while the focus is placed in the IOR panel.
You can also change the zoom ratio by using the [Ctrl] key + mouse-wheel combination.
Using the [Ctrl] key + mouse-wheel forward will zoom into the view, making the contents larger and easier to see (max. 300%). |
Using the [Ctrl] key + mouse-wheel backward will zoom out of the view, making the contents smaller (min. 50%). |
If the panel is closed after the zoom ratio is changed, the changed zoom ratio is retained (next time, the panel will open at the changed zoom ratio).
This area displays or changes I/O register values.
The notation (numeral representation) in which values are displayed can be selected using the appropriate toolbar button or selecting from the context menu. Also, it is possible to select a display form that always adds hexadecimal equivalents to the ordinary display.
The meaning of marks displayed as I/O register values and their colors are as follows (The colors in which text and backgrounds are displayed depend on how the [General - Font and Color] category of the Option dialog box is set.).


 button on the toolbar or [Reset Color] from the context menu.
 This refers to the I/O registers that get the microcontroller actuated by a read operation. |
The 1-byte or 2-byte I/O registers and the 1-bit I/O registers mapped to those 1-byte or 2-byte I/O registers differ in timing with which values are retrieved. Therefore, while a value from the same I/O register is being displayed, it is possible that the displayed value is different. |
The values are sorted in ascending order of numeric value by clicking the header part of this area. |
This area has the following features.
When changing I/O register values, select the target I/O register value and then click it again to edit it directly from the keyboard. (Pressing the [Esc] key cancels the edit mode.)
After editing an I/O register value, hit the [Enter] key or move the focus to other than the edit area. The edited value is written into the debug tool's target memory.
For details on how to edit I/O register values, see "2.11.3.4 Changing the contents of I/O registers".
Choosing [Save IOR Data As ...] from the [File] menu opens the Save As dialog box, making it possible to save all content of this panel to a text file (*.txt) or CSV file (*.csv).
For details on how to save I/O register values, see "2.11.3.6 Saving the displayed I/O register contents".
This area displays the type information of each I/O register in the form shown below.
For the "IOR [R/W 1.8] (1 byte)" case |
For the "IOR [R/W 1] (1 bit)" case |
The type information is sorted in order of character code by clicking the header part of this area. |
This area displays the addresses to which the I/O registers are mapped (always shown in hexadecimal).
However, the bit registers displayed here are given bit offset values, as shown in the examples below.
The addresses are sorted in ascending order of numeric value by clicking the header part of this area. |


 Hexadecimal
 Signed Decimal
 Unsigned Decimal
 Octal
Octal Binary
 ASCII
ASCII
[[File] menu (IOR Panel-Only Items)]
The [File] menu used exclusively for the IOR panel is as follows (The other items are shared.).
However, all of these items are disabled during program execution.
|
Saves the content of this panel to a text file (*.txt) or CSV file (*.csv) that has been saved previously (see "(b) Saving of I/O register values"). If this item is selected for the first time after startup, the same operation as [Save IOR Data As …] would have been selected is performed. |
|
|
Opens the Save As dialog box in order to save the content of this panel to a specified text file (*.txt) or CSV file (*.csv) (see "(b) Saving of I/O register values"). |
[[Edit] menu (IOR Panel-Only Items)]
The [Edit] menu used exclusively for the IOR panel is as follows (All other items are disabled.).
|
Cuts a selected range of character string and moves it to the clipboard (No I/O registers and categories can be cut.). |
|
|
Copies a selected range of character string to the clipboard. If an I/O register or category is in selected state, that item is copied. Note that the copied item can be pasted to the Watch panel. |
|
|
Pastes the content of the clipboard to the caret position when text is in editing mode (I/O registers and categories cannot be pasted.). |
|
|
Deletes a selected range of character string. If a blank category is in selected state, that item is deleted (No I/O registers can be deleted.). |
|
|
Selects all character strings whose text is in edit mode. If the text is in other than edit mode, all I/O registers and categories are placed in selected state. |
|
|
Opens the Go to the Location dialog box to move the caret to a specified I/O register. |
|
Registers the selected I/O register or category to the Watch panel (Watch1). |
||
|
Obtains latest information from the debug tool and updates the display. No data are reloaded for the I/O registers protected against read. |
||
|
Forcibly loads a value once for I/O registers protected against read. |
||
|
Opens the Go to the Location dialog box. |
||
|
Adds a new category (folder). Enter a category name directly into the text box. While you can create any number of new categories, note that a category cannot be created within another category. |
||
|
Clears the user customization (creation of categories, changing orders, and changing notation). |
||
|
Copies a selected range of character string to the clipboard. If an I/O register or category is in selected state, that item is copied. Note that the copied item can be pasted to the Watch panel. |
||
|
Deletes a selected range of character string. If a blank category is in selected state, that item is deleted (No I/O registers can be deleted.). |
||
|
Shows the following cascaded menu to specify the form in which values are displayed. |
||
|
Displays the value of the selected item in hexadecimal (default). |
||
|
Displays the value of the selected item in unsigned decimal. |
||
|
Adds a hexadecimal equivalent for the displayed value of a selected item at the end of it, with the equivalent enclosed in parentheses ( ). |
||
|
Resets the highlighting for a selected I/O register, which indicates that its value has changed as a result of program execution. |
||