This panel displays the disassembled results of memory contents (disassembled text), as well as displays the results of line assemble (see "2.6.4 Performing line assembly"), instruction-level debugging (see "2.9.3 Execute programs in steps"), and code coverage measurements [Simulator] [E20 [RX71M, RX66x, RX65x, RX64M, RX66T, RX671, RX72T, RX72M, and RX72N Groups]] (see "2.15 Measure Coverage [Simulator] [E20 [RX71M, RX66x, RX65x, RX64M, RX66T, RX671, RX72T, RX72M, and RX72N Groups]]").
Up to four instances of this panel can be displayed at a time. Each panel is discriminated by the name "Disassemble1," "Disassemble2," "Disassemble3," and "Disassemble4" in the title bar.
By displaying this panel in mixed display mode, it is also possible to display the source text in a source file corresponding to code data (default).
Note that this panel can only be opened when Cube Suite+ is connected with the debug tool.
If a program is stepped through while the focus exists on this panel, the program is executed one instruction at a time. (See "2.9.3 Execute programs in steps.") |
In a Scroll Range Settings dialog box that is opened by selecting [View] and then clicking the |
 button in the toolbar, it is possible to set the scroll range of the vertical scroll bar of this panel.
By choosing [Print...] from the [File] menu, it is possible to print the picture image currently being displayed on this panel. |
Disassemble Panel (When Code Coverage Measurement Result is Displayed) [Simulator][E20 [RX71M, RX66x, RX65x, RX64M, RX66T, RX671, RX72T, RX72M, and RX72N] |
This section describes the following.
The lines where an event can be set are displayed against a white background. (If a line is displayed against a gray background, it means that no events can be set on that line.)
If there is a currently set event on a line, an Event mark denoting the type of event is displayed on the line.
This area has the following features:
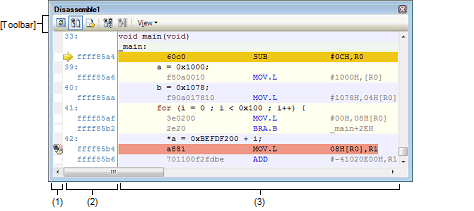
Click a place with the mouse where you want to set a breakpoint. That way, it is possible to set a breakpoint easily.
A breakpoint is set in an instruction at the beginning address corresponding to the line position you've clicked.
When a breakpoint is set, an Event mark is displayed on the line where you've set the breakpoint. Also, detailed information on the set breakpoint is reflected on the Events panel.
Note that if you've done this operation at a place where any event mark is already displayed, the event is deleted and no breakpoint is set.
Also note that an event can be set on only a line that is displayed against a white background.
For details on how to set a breakpoint, see "2.10.2 Stop the program at the arbitrary position (breakpoint)."
Right-clicking any event mark brings up the menu shown below, allowing you to change the state of a selected event.
|
Changes the state of a selected event to an Enabled state. When a specified condition is true, the event concerned occurs.
Note that if the event mark |
|
|
Changes the state of a selected event to a Disabled state. Even when a specified condition is true, the event concerned does not occur.
Note that if the event mark |
|
|
Note that if the event mark |
|
|
Opens an Events panel that shows detailed information on a selected event. |
 denoting that there are multiple events set is selected, all of the set events are enabled.
 denoting that there are multiple events set is selected, all of the set events are disabled.
 denoting that there are multiple events set is selected, all of the set events are deleted.
When the mouse cursor is hovered over an Event mark, the event name of the event, detailed information on it, and the comment added to the event are displayed in a popup box.
Note that if there are multiple events set at the relevant place, information on each event, for up to three, is enumerated.
This area displays the beginning address of disassembly on each line (always displayed in hexadecimal).
Also, the current PC mark ( ) denoting the current PC position (PC register value) is displayed.
The address width is equal to that of the memory space of the microcontroller that is specified in the project.
Note that, for the source text line during mixed display mode, a line number (xxx:) in a source file corresponding to the beginning address is displayed.
This area has the following features:
When the mouse cursor is hovered over an address/source line number, the following information is displayed in a popup box.
|
Format: <load module name>Note$<label name> + <offset value> |
|
The load module name is displayed only when there are multiple load module files that have been downloaded. |
Following the source text line concerned, a disassembled result line is displayed as shown below.
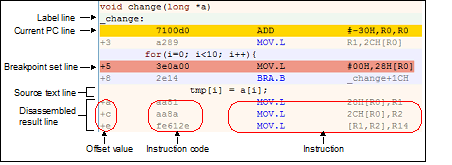
The highlighting color depends on how the [General - Font and Color] category in the Option dialog box are set. |
By clicking the |
 button (toggle) in the toolbar or unchecking [Mixed Display] on the context menu, it is possible to hide the source text. (By default, this menu item is checked.)
The offset value is, by default, not displayed. To show it, click the |
 button in the toolbar or select [Show Offset] on the context menu.
This area has the following features:
The displayed instruction/code can be edited (assembled in-line).
For details on how to do it, see "2.6.4 Performing line assembly."
By stepping through a program while the focus exists on this panel, it is possible to control program execution at the instruction level.
For details on how to do it, see "2.9.3 Execute programs in steps."
By selecting [Break Settings], [Trace Settings] or [Timer Settings] on the context menu, it is possible to set various events at the address or line at which the caret currently exits.
When an event is set, the corresponding Event mark is displayed in the Event area. Also, detailed information on the set event is reflected on the Events panel.
However, events can only be set on a line that is displayed against a white background in the event area.
For details on how to set an event, see the following sections:
Breakpoints can also be set or cleared easily in the Event area. (See "(a) Setting/clearing a breakpoint.") |
The displayed C variable, CPU register, I/O register or assembler symbol can be registered as a watch-expression in the Watch panel.
For details on how to do it, see "2.11.6.1 Registering watch-expressions."
While the caret has been moved to an instruction that references a symbol, click the  button in the toolbar or select [Go to Symbol] on the context menu. The caret position is moved to the address at which the symbol at the caret position is defined.
Also, following this operation, click the  button in the toolbar or select [Back to Address] on the context menu. The caret position is returned to the instruction that was referencing the symbol before the caret was moved. (Address denotes the address value of the instruction that references the symbol.)
When [Jump to Source] on the context menu is selected, the Editor panel is opened, with the caret on it moved to a source line corresponding to the address of the current caret position. (If the Editor panel is already open, CS+ jumps to it directly.)
Similarly, when [Jump to Memory] on the context menu is selected, the Memory panel (Memory1) is opened, with the caret on it moved to a memory value corresponding to the address of the current caret position. (If the Memory panel is already open, CS+ jumps to it directly.)
Displaying a code coverage measurement result [Simulator] [E20 [RX71M, RX66x, RX65x, RX64M, RX66T, RX671, RX72T, RX72M, and RX72N Groups]] |
If the coverage function is enabled, the lines included in the area that was subjected to coverage measurement are highlighted based on the code coverage measurement result acquired 2.15 Measure Coverage [Simulator] [E20 [RX71M, RX66x, RX65x, RX64M, RX66T, RX671, RX72T, RX72M, and RX72N Groups]] by program execution.
For details about coverage measurement, see "2.15 Measure Coverage [Simulator] [E20 [RX71M, RX66x, RX65x, RX64M, RX66T, RX671, RX72T, RX72M, and RX72N Groups]]."
By choosing [Save Disassemble Data As…] from the [File] menu, it is possible to open the Data Save dialog box and save the content of this panel in a text file (*.txt) or CSV file (*.csv).
For details on how to save disassembled data, see "2.6.2.5 Saving the displayed contents of disassembled results."
To zoom in and out of the Disassemble panel view, change the zoom ratio by using the drop-down list on the toolbar of the Main window while the focus is placed in the Disassemble panel.
You can also change the zoom ratio by using the [Ctrl] key + mouse-wheel combination.
Using the [Ctrl] key + mouse-wheel forward will zoom into the view, making the contents larger and easier to see (max. 300%). |
Using the [Ctrl] key + mouse-wheel backward will zoom out of the view, making the contents smaller (min. 25%). |
|
Gets latest information from the debug tool to update the display. |
||
|
Selects mixed display mode that shows the correspondence between disassembled result and source text (default). |
||
|
Specifies that the caret position track the current PC value. |
||
|
Moves the caret to the position at which a selected symbol is defined. |
||
|
Moves the caret to a position (address) at which it was immediately before being moved with the |
||
|
Shows the following buttons that change the form in which a disassemble area is displayed. |
||
|
Displays the offset value of a label. If no labels are defined at the address, the offset value from the nearest label is displayed. |
||
|
Displays an address value in the form "symbol + offset value" (default). However, if the address value has a symbol defined in it, only the symbol is displayed. |
||
|
Opens the Scroll Range Settings dialog box to set a scroll range. |
||


 button.
 Show Offset
 Show Symbol
[[File] menu (Disassemble Panel-Only Items)]
The [File] menu used exclusively for the Disassemble panel is as follows. (The other items are shared.)
However, all of these items are disabled during program execution.
|
Saves the disassembled content to a text file (*.txt) or CSV file (*.csv) that has been saved previously (see "(h) Saving disassembled data"). Note that if this item is selected for the first time after startup, the same operation as [Save Disassemble Data As…] would have been selected is performed. |
|
|
Opens the Data Save dialog box to save the disassembled content to a specified text file (*.txt) or CSV file (*.csv) (see "(h) Saving disassembled data"). |
|
|
Opens the Print Address Range Settings dialog box to print the content of this panel. |
[[Edit] menu (Disassemble Panel-Only Items)]
The [Edit] menu used exclusively for the Disassemble panel is as follows. (All other items are disabled.).
|
Copies the content of a selected line as a character string to the clipboard, if a line is selected. When in edit mode, a selected character string is copied to the clipboard. |
|
|
Goes to edit mode to edit the instruction or instruction code at the caret position (see "2.6.4 Performing line assembly"). |
|
|
Opens the Find and Replace dialog box, with its [Find in Files] tab selected. |
|
|
Opens the Find and Replace dialog box, with its [Replace in Files] tab selected. |
|
|
Opens the Go to the Location dialog box to move the caret to a specified address. |
[Disassemble area and Address area]
|
Registers a selected character string or a word at the caret position as a watch-expression in the Watch panel (Watch1). (Word determination depends on the current build tool.) When registered as a watch-expression, they are registered as a variable name, so that the displayed symbol name varies with scope. |
|||
|
Opens the Action Events dialog box to set an action event at an address at the caret position. |
|||
|
Executes the program from an address indicated by the current PC value to an address corresponding to the line where the caret is positioned. However, this is disabled during program execution or when [Build & Download] is under execution. |
|||
|
Changes the current PC value to an address of the line where the caret currently exists. However, this is disabled during program execution or when [Build & Download] is under execution. |
|||
|
Opens the Go to the Location dialog box to move the caret to a specified address. |
|||
|
Moves the caret to the position where a selected symbol is defined. |
|||
|
Moves the caret to a position (address) at which it was immediately before being moved by [Go to Symbol]. However, this is disabled when no symbol names are displayed at address. |
|||
|
Shows the following cascaded menu to set break-related events. Note that events can only be set on event settable lines (see "(1) Event area"). |
|||
|
Sets a breakpoint (hardware break event) at the address where the caret is positioned (see "2.10.2 Stop the program at the arbitrary position (breakpoint)." |
|||
|
Sets a breakpoint (software break event) at the address where the caret is positioned (see "2.10.2 Stop the program at the arbitrary position (breakpoint)." |
|||
|
Sets a break event for read access at the caret position or in a selected variable (global variable, static variable inside a function or static variable inside a file) or an I/O register (see "2.10.4.1 Set a break event (access-related) to a variable/I/O register"). |
|||
|
Sets a break event for write access at the caret position or in a selected variable (global variable, static variable inside a function or static variable inside a file) or an I/O register (see "2.10.4.1 Set a break event (access-related) to a variable/I/O register"). |
|||
|
Sets a break event for read/write access at the caret position or in a selected variable (global variable, static variable inside a function or static variable inside a file) or an I/O register (see "2.10.4.1 Set a break event (access-related) to a variable/I/O register"). |
|||
|
Sets a break at the caret position's address or the caret position or a selected variable (global variable, static variable inside a function, static variable inside a file) or I/O register as the condition for a combination break event (see "2.10.3.1 Set a beak event (execution-related)"). |
|||
|
Sets a break event by a read access to the caret position or a selected variable (global variable, static variable inside a function, static variable inside a file) or I/O register as the condition for a combination break (see "2.10.4.1 Set a break event (access-related) to a variable/I/O register"). |
|||
|
Sets a break event by a write access to the caret position or a selected variable (global variable, static variable inside a function, static variable inside a file) or I/O register as the condition for a combination break (see "2.10.4.1 Set a break event (access-related) to a variable/I/O register"). |
|||
|
Sets a break event by a read/write access to the caret position or a selected variable (global variable, static variable inside a function, static variable inside a file) or I/O register as the condition for a combination break (see "2.10.4.1 Set a break event (access-related) to a variable/I/O register"). |
|||
|
Opens the Property panel to set a break function. |
|||
|
Shows the following cascaded menu to set a trace-related event. Note that events can only be set on event settable lines (see "(1) Event area"). |
|||
|
Sets a trace start event that causes collection of trace data indicating a program execution history to start when an instruction at the address where the caret exists is executed (see "2.13.3.1 Setting a trace start event and a trace end event"). The setting of the [Use trace function] property in the [Trace] category on the Property panel is automatically set to [Yes]. |
|||
|
Sets a trace end event that causes collection of trace data indicating a program execution history to end when an instruction at the address where the caret exists is executed (see "2.13.3.1 Setting a trace start event and a trace end event"). The setting of the [Use trace function] property in the [[Trace]] category on the Property panel is automatically set to [Yes]. |
|||
|
Sets a point trace event that, when the caret position or a selected variable (global variable, static variable inside a function or static variable inside a file) or an I/O register is accessed for read, causes the accessed value to be recorded in trace memory (see "(1) When an access to a variable or I/O register occurred"). |
|||
|
Sets a point trace event that, when the caret position or a selected variable (global variable, static variable inside a function or static variable inside a file) or an I/O register is accessed for write, causes the accessed value to be recorded in trace memory (see "(1) When an access to a variable or I/O register occurred"). |
|||
|
Sets a point trace event that, when the caret position or a selected variable (global variable, static variable inside a function or static variable inside a file) or an I/O register is accessed for read/write, causes the accessed value to be recorded in trace memory (see "(1) When an access to a variable or I/O register occurred"). |
|||
|
Sets a trace event that causes trace recording to start upon read/write access to the caret position or a selected variable (global variable, static variable inside a function, static variable inside a file) or I/O register (see "2.13.3.1 Setting a trace start event and a trace end event"). |
|||
|
Sets a trace event that causes trace recording to end upon read/write access to the caret position or a selected variable (global variable, static variable inside a function, static variable inside a file) or I/O register (see "2.13.3.1 Setting a trace start event and a trace end event"). |
|||
|
Opens the Trace panel and displays acquired trace data. |
|||
|
Opens the Property panel to set the trace function. |
|||
|
Shows the following cascaded menu to set a timer-related event (see "2.14.3 Measuring execution time in a section"). Note that events can only be set on event settable lines (see "(1) Event area"). |
|||
|
Sets a timer start event that causes measurement of program execution time to start when an instruction at the address where the caret exists is executed (see "(1) How to set a timer start event"). |
|||
|
Sets a timer end event that causes measurement of program execution time to end when an instruction at the address where the caret exists is executed (see "(2) How to set a timer end event"). |
|||
|
Sets a timer start event that causes a measurement of the program's execution time to start upon read/write access to the caret position or a selected variable (global variable, static variable inside a function, static variable inside a file) or I/O register (see "(1) How to set a timer start event"). |
|||
|
Specify a channelNote 2 in which a timer start event is set. |
|||
|
Sets a timer end event that causes a measurement of the program's execution time to finish upon read/write access to the caret position or a selected variable (global variable, static variable inside a function, static variable inside a file) or I/O register (see "(2) How to set a timer end event"). |
|||
|
Specify a channelNote 2 in which a timer start event is set. |
|||
|
Opens the Events panel to display only timer-related events. |
|||
|
[Simulator] [E20 [RX71M, RX66x, RX65x, RX64M, RX66T, RX671, RX72T, RX72M, and RX72N Groups]] |
Clears all of the code coverage measurement results that the debug tool currently holds. However, this item is not displayed if the debug tool used does not support the coverage function. |
||
|
Goes to edit mode to edit an instruction at the line where the caret is positioned (see "2.6.4 Performing line assembly"). |
|||
|
Goes to edit mode to edit an instruction code at the line where the caret is positioned (see "2.6.4 Performing line assembly"). |
|||
|
Shows the following cascaded menu to set the contents displayed in the disassemble area. |
|||
|
Displays the offset value of a label. If no labels are defined at the address, the offset value from the nearest label is displayed. |
|||
|
Displays an address value in the form "symbol + offset value" (default). However, if the address value has a symbol defined in it, only the symbol is displayed. |
|||
|
Opens the Scroll Range Settings dialog box to set a scroll range. |
|||
|
Selects mixed display mode that shows the correspondence between disassembled result and source text (default). |
|||
|
Opens the Editor panel, with the caret on it moved to a source line corresponding to the address at the caret position. |
|||
|
Opens the Memory panel (Memory1), with the caret on it moved to a memory value corresponding to the address at the caret position. |
|||
The specifiable number of channels differs between the RX600/RX700 and RX200 Series/RX140 Group, as shown below. |
|
Defines the type of break that can be set by clicking the mouse once to be a hardware breakpoint (reflected in the setting of the [Type of breakpoints to be preferentially used] in the [Break] [E1] [E20] category on the Property panel. |
|
|
Defines the type of break that can be set by clicking the mouse once to be a software breakpoint (reflected in the setting of the [Type of breakpoints to be preferentially used] in the [Break] [E1] [E20] category on the Property panel). |